
Who doesn’t love a refreshing dessert that captures the essence of summer? The tangy zest of lemon meringue pie, combined with the crispy delight of cannolis, creates the perfect harmony of sweet and tart. As a kid, I remember enjoying lemon meringue pie at family gatherings, savoring the creamy filling and the crunchy meringue topping. But when the idea struck to combine this classic pie with a cannoli, it was like an explosion of summer flavors in a bite-sized treat. Lemon Meringue Pie Cannolis are the perfect way to take a beloved dessert to the next level, adding a crispy twist to the smooth, zesty filling we all know and love.
Print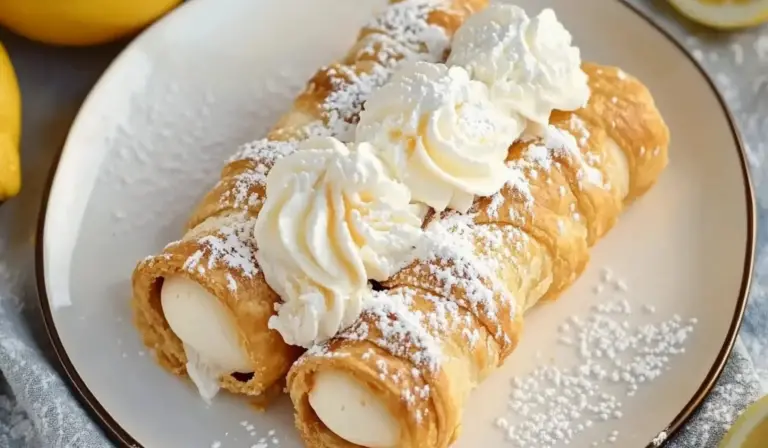
Lemon Meringue Pie Cannolis: Summer’s Perfect Treat
🍋🍥 Lemon Meringue Pie Cannolis—the ultimate summer indulgence! A crispy cannoli shell filled with zesty lemon cream and crowned with a fluffy meringue topping. These little beauties are perfect for a sunny day or any time you want a refreshing dessert! 🌞
#LemonLove #MeringueDelight #CannoliDessert #SummerBaking #TangySweetTreats #BakingForBeginners #RefreshingDesserts #CrispyAndCreamy #DessertLovers #FoodieFavorites 🍋🍥
- Total Time: 30 minutes
- Yield: 12 cannolis 1x
Ingredients
For the Cannoli Shells
- 12 cannoli shells (store-bought or homemade)
For the Lemon Filling
- 1 cup lemon curd (store-bought or homemade)
- 1/2 cup mascarpone cheese (softened)
- 1/2 cup heavy whipping cream
- 2 tbsp powdered sugar
For the Meringue Topping
- 2 large egg whites
- 1/2 cup granulated sugar
- 1/4 tsp cream of tartar
- 1/2 tsp vanilla extract
Instructions
Step 1: Prepare the Lemon Filling
- In a mixing bowl, beat the mascarpone cheese until smooth.
- Add the lemon curd to the mascarpone and mix until fully combined, ensuring the texture is creamy and uniform.
- In a separate bowl, whip the heavy cream and powdered sugar together until stiff peaks form. You’ll know it’s ready when the whipped cream holds its shape and doesn’t slide down the whisk.
- Gently fold the whipped cream into the lemon mascarpone mixture, making sure not to deflate the whipped cream too much. The goal is to keep the light and airy texture intact.
- Transfer the lemon filling into a piping bag and refrigerate it while you prepare the meringue and cannoli shells. The cool filling will be easier to pipe into the shells.
Step 2: Make the Meringue
- In a clean bowl, whip the egg whites and cream of tartar on medium speed until soft peaks form. This means the peaks will gently bend over when you lift the whisk out of the bowl.
- Gradually add the granulated sugar, 1 tablespoon at a time, while continuing to beat the mixture on high speed. The goal is to create stiff, glossy peaks. Keep beating until the meringue has a smooth and shiny appearance.
- Once the meringue reaches stiff peaks, mix in the vanilla extract for added flavor.
Step 3: Assemble the Cannolis
- Take the cannoli shells (store-bought or homemade) and pipe the lemon filling into both ends of each shell. Make sure the filling is evenly distributed throughout the shell. If you’re using store-bought shells, be gentle when filling them, as they can break easily.
- Using another piping bag or spoon, carefully pipe or spread the meringue on top of each cannoli, ensuring the meringue covers the entire length of the shell. This step is what gives the cannolis their signature golden brown topping after torched.
Step 4: Torch the Meringue
- Using a kitchen torch, carefully torch the meringue until golden brown. Keep the torch moving to avoid burning any areas. The meringue should have a light, crisp texture and a toasted appearance. If you don’t have a kitchen torch, you can also place the cannolis under a broiler for a few minutes, but keep a close eye on them to prevent burning.
- Be cautious and go slow, as you want the meringue to caramelize without overdoing it.
Step 5: Serve and Enjoy
- Once your Lemon Meringue Pie Cannolis are beautifully toasted, serve them immediately for the best crispy texture.
- If you’re making them ahead of time, you can store the filled cannolis in the refrigerator for up to 24 hours. Just be aware that the cannoli shells may soften slightly as they sit, so they’re best enjoyed fresh!
Notes
- Whipping the Meringue: If your meringue doesn’t form stiff peaks, don’t worry! Simply continue beating it until it reaches the right consistency. The cream of tartar helps stabilize the egg whites, making it easier to achieve the desired texture.
- Choosing the Right Cannoli Shells: If you’re using store-bought shells, make sure to choose a brand that is sturdy enough to hold the filling without breaking. If you prefer homemade shells, you can easily make them in advance.
- Whipped Cream: When whipping cream, make sure your bowl and beaters are clean and free of any grease. This helps the cream whip properly. Also, if you find that your whipped cream isn’t thickening, try chilling the bowl and beaters for a few minutes before whipping.
- Prep Time: 20 minutes
- Cook Time: 10 minutes
This recipe is perfect for beginners because it uses store-bought or homemade cannoli shells, and while the meringue may seem intimidating, it’s actually quite easy to make! With just a few steps and ingredients, you can create this gorgeous dessert in no time. Whether you’re looking to impress guests at a summer gathering or treat yourself to something sweet, Lemon Meringue Pie Cannolis offer the perfect balance of simplicity, time efficiency, and refreshing flavors.
Ingredients and Preparation
For the Cannoli Shells
- 12 cannoli shells (store-bought or homemade)
For the Lemon Filling
- 1 cup lemon curd (store-bought or homemade)
- 1/2 cup mascarpone cheese (softened)
- 1/2 cup heavy whipping cream
- 2 tbsp powdered sugar
For the Meringue Topping
- 2 large egg whites
- 1/2 cup granulated sugar
- 1/4 tsp cream of tartar
- 1/2 tsp vanilla extract
Feel free to swap the lemon curd with homemade lemon filling if you prefer a more personalized touch. The mascarpone cheese adds a smooth, creamy texture that perfectly complements the tanginess of the lemon curd. If you want to experiment with flavors, you could even try adding a splash of vanilla or almond extract to the lemon filling!
Step-by-Step Instructions
Step 1: Prepare the Lemon Filling
- In a mixing bowl, beat the mascarpone cheese until smooth.
- Add the lemon curd to the mascarpone and mix until fully combined, ensuring the texture is creamy and uniform.
- In a separate bowl, whip the heavy cream and powdered sugar together until stiff peaks form. You’ll know it’s ready when the whipped cream holds its shape and doesn’t slide down the whisk.
- Gently fold the whipped cream into the lemon mascarpone mixture, making sure not to deflate the whipped cream too much. The goal is to keep the light and airy texture intact.
- Transfer the lemon filling into a piping bag and refrigerate it while you prepare the meringue and cannoli shells. The cool filling will be easier to pipe into the shells.
Step 2: Make the Meringue
- In a clean bowl, whip the egg whites and cream of tartar on medium speed until soft peaks form. This means the peaks will gently bend over when you lift the whisk out of the bowl.
- Gradually add the granulated sugar, 1 tablespoon at a time, while continuing to beat the mixture on high speed. The goal is to create stiff, glossy peaks. Keep beating until the meringue has a smooth and shiny appearance.
- Once the meringue reaches stiff peaks, mix in the vanilla extract for added flavor.
Step 3: Assemble the Cannolis
- Take the cannoli shells (store-bought or homemade) and pipe the lemon filling into both ends of each shell. Make sure the filling is evenly distributed throughout the shell. If you’re using store-bought shells, be gentle when filling them, as they can break easily.
- Using another piping bag or spoon, carefully pipe or spread the meringue on top of each cannoli, ensuring the meringue covers the entire length of the shell. This step is what gives the cannolis their signature golden brown topping after torched.
Step 4: Torch the Meringue
- Using a kitchen torch, carefully torch the meringue until golden brown. Keep the torch moving to avoid burning any areas. The meringue should have a light, crisp texture and a toasted appearance. If you don’t have a kitchen torch, you can also place the cannolis under a broiler for a few minutes, but keep a close eye on them to prevent burning.
- Be cautious and go slow, as you want the meringue to caramelize without overdoing it.
Step 5: Serve and Enjoy
- Once your Lemon Meringue Pie Cannolis are beautifully toasted, serve them immediately for the best crispy texture.
- If you’re making them ahead of time, you can store the filled cannolis in the refrigerator for up to 24 hours. Just be aware that the cannoli shells may soften slightly as they sit, so they’re best enjoyed fresh!
Beginner Tips and Notes
- Whipping the Meringue: If your meringue doesn’t form stiff peaks, don’t worry! Simply continue beating it until it reaches the right consistency. The cream of tartar helps stabilize the egg whites, making it easier to achieve the desired texture.
- Choosing the Right Cannoli Shells: If you’re using store-bought shells, make sure to choose a brand that is sturdy enough to hold the filling without breaking. If you prefer homemade shells, you can easily make them in advance.
- Whipped Cream: When whipping cream, make sure your bowl and beaters are clean and free of any grease. This helps the cream whip properly. Also, if you find that your whipped cream isn’t thickening, try chilling the bowl and beaters for a few minutes before whipping.

Serving Suggestions
These Lemon Meringue Pie Cannolis are a perfect standalone dessert, but you can elevate the dish even further with a few creative touches:
- Fresh Berries: Serve your cannolis with a side of fresh berries like raspberries or blueberries for a burst of color and flavor.
- Mint Garnish: A few sprigs of fresh mint can add a refreshing herbal note to the dessert.
- Lemon Zest: Sprinkle some freshly grated lemon zest over the meringue for an extra pop of citrus flavor.
If you have leftover cannolis, keep them refrigerated, but know that the meringue topping may soften over time. It’s best to enjoy them within 24 hours for optimal freshness.
Engagement Features
Now it’s your turn to try these Lemon Meringue Pie Cannolis! Let me know how your version turned out in the comments below, and share any creative twists you added to the recipe. Don’t forget to tag me on social media when you make these, so I can see your delicious creations! Whether you’re making them for a summer celebration or just treating yourself, this dessert is sure to be a hit. Happy baking, and I can’t wait to hear all about your cannoli adventures!