
Craving something sweet, rich, and indulgent—but don’t want to deal with baking, waiting, or a long list of ingredients? These No-Bake Pistachio Brownies are the answer. They’re a satisfying and nourishing dessert made with only five main ingredients, yet the result feels gourmet. The best part? They’re gluten-free, dairy-free, and egg-free, making them suitable for a variety of diets without compromising on taste.
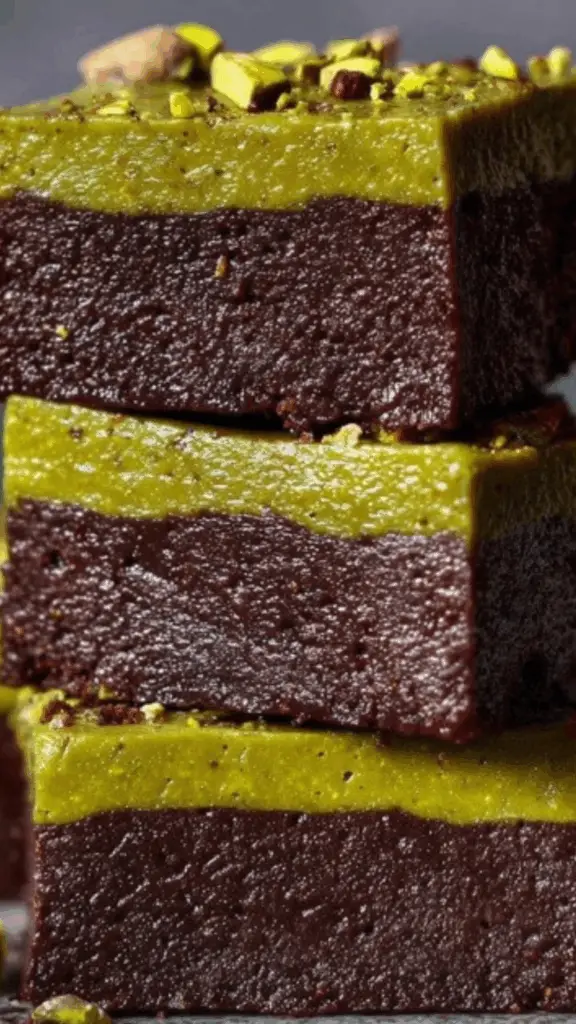
These brownies are built on a chewy, fudgy base made from soft Medjool dates and rich cocoa powder. Pistachio butter adds a velvety, nutty richness and complements the sweetness of the dates perfectly. A melted dark chocolate topping provides just the right contrast with its bittersweet snap. Because the recipe doesn’t require an oven, it’s ideal for warm weather days or quick snack preparation. All the layers firm up in the freezer, giving each bite an incredible texture—soft underneath, creamy in the middle, and a crisp finish from the chocolate.
Whether you’re new to cooking or a seasoned pro looking for something low-effort but impressive, this recipe is a go-to. You can prepare the entire batch in under 30 minutes (plus chilling time), and it stores beautifully, making it perfect for make-ahead snacks or healthier dessert options.
Let’s take a look at how to make it happen.
Ingredients and Preparation
Main Ingredients
- 220 g Medjool dates, pitted
- If your dates are dry, soak them in warm water for 10 minutes and drain well before using.
- 150 g pistachio butter
- You’ll use some for the base and the rest for the creamy middle layer.
- 40 g unsweetened cocoa powder
- This gives the brownies their deep chocolate flavor.
- A pinch of fine sea salt
- Just enough to enhance flavor and balance the sweetness.
- 100 g dark chocolate, chopped
- Use high-quality dark chocolate (70% cocoa or more) for best results.
Optional Add-ins
- 2 teaspoons greens powder (optional)
- Adds a subtle sweet-earthy flavor and a bonus of vitamins and minerals.
- ¼ cup chopped pistachios (optional)
- Fold into the base mixture for added texture and crunch.
Equipment Needed
- Food processor or high-speed blender
- 22 × 12 cm loaf tin (or a small square/rectangular dish)
- Baking/parchment paper
- Small saucepan or microwave-safe bowl (for melting chocolate)
- Spatula or spoon for spreading layers
Prep Steps
- Line your loaf tin with parchment paper so the brownies are easy to remove once set.
- Make sure all ingredients are measured and ready before starting, especially if you’re working quickly or in a warm kitchen where chocolate may firm up fast.
Step-by-Step Instructions
1. Blend the brownie base
- Place the pitted dates into the food processor and blend until a smooth paste begins to form.
- Add in 150 g of pistachio butter and unsweetened cocoa powder.
- Add the pinch of salt and blend again until everything is fully incorporated.
- Scrape down the sides as needed to ensure all ingredients are well combined.
2. Press the base into the tin
- Transfer the blended mixture to your prepared tin.
- Use the back of a spoon or spatula to press the mixture evenly into the base, making sure it’s compact and level.
- Chill the base layer in the freezer while you prepare the next step.
3. Make the pistachio layer
- In a bowl, mix the remaining pistachio butter with optional greens powder until smooth.
- Spread this mixture carefully over the chilled brownie base. Use a spatula to smooth the top evenly.
- Return the tin to the freezer for 1 to 2 hours, or until the pistachio layer is firm to the touch.
4. Prepare and add the chocolate topping
- Melt the chopped dark chocolate gently, either in a microwave (in 30-second increments) or using a double boiler on the stove.
- Once melted, pour the chocolate over the firm pistachio layer.
- Use a spoon or spatula to spread the chocolate evenly over the top.
5. Let the brownies set
- Allow the top layer to cool and harden at room temperature, or return the tin to the freezer for quicker setting (about 20–30 minutes).
- Once fully set, lift the entire block out of the tin using the parchment paper.
6. Slice and serve
- Use a sharp knife to cut the brownies into squares or bars.
- For clean cuts, wipe the knife between slices.
- Serve immediately or store as desired.
Beginner Tips and Notes
- Softening dates: Always soak your dates if they feel dry or firm. Soft dates help create a smoother, more cohesive base.
- Texture test: The base should stick together when pressed but shouldn’t be too wet. If it’s too sticky, add a teaspoon of cocoa. If too dry, add a teaspoon of water or more pistachio butter.
- Layering tip: Freeze between each step to make sure each layer sets firmly before adding the next.
- Melting chocolate: Don’t overheat it. Stir frequently and stop heating once it’s 80% melted. Residual heat will finish the job.
- Pistachio butter: If your pistachio butter is too runny, refrigerate it briefly before spreading the middle layer to avoid it mixing with the base.
- No greens powder? Skip it entirely. The flavor and texture will still be excellent.
- Nut-free alternative: Try sunflower seed butter for a different spin.
- Chocolate substitutes: You can also use vegan chocolate chips or mix in a teaspoon of coconut oil to make the topping smoother.
Serving Suggestions
- On its own: These brownies are rich enough to enjoy solo as a dessert or snack.
- With fruit: Serve with fresh berries or sliced bananas for a naturally sweet pairing.
- Plated dessert: Add a scoop of coconut milk ice cream on top for an indulgent but allergy-friendly treat.
- Party platter: Cut them into bite-sized squares and sprinkle with chopped pistachios or sea salt flakes before serving.
- Lunchbox idea: Store individually wrapped squares in the fridge for an energy-dense, portable snack.
Storage
- Room temperature: Store in an airtight container for up to 2 days.
- Refrigerator: Keeps fresh for up to 5 days.
- Freezer: Freeze slices in a sealed container for up to 2 months. Thaw at room temperature for 10–15 minutes before serving.
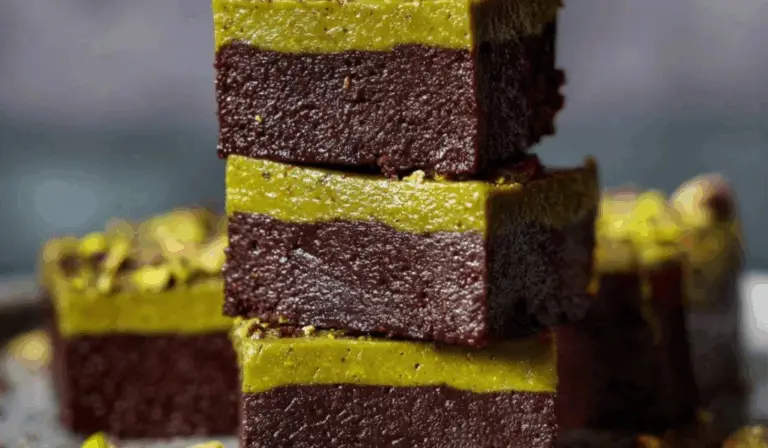
Decadent No-Bake Pistachio Brownies – A Five-Ingredient Treat You’ll Make on Repeat
Rich, nutty, and incredibly easy! 💚🍫 These No-Bake Pistachio Brownies come together with just five wholesome ingredients—no oven required. 🥄✨ Chewy, chocolatey, and loaded with pistachio crunch, they’re a naturally sweet treat you’ll crave again and again. Perfect for healthy snacking, dessert, or sharing (if you must)!
- Total Time: 25 minutes
- Yield: 10 squares 1x
Ingredients
Main Ingredients
- 220 g Medjool dates, pitted
- If your dates are dry, soak them in warm water for 10 minutes and drain well before using.
- 150 g pistachio butter
- You’ll use some for the base and the rest for the creamy middle layer.
- 40 g unsweetened cocoa powder
- This gives the brownies their deep chocolate flavor.
- A pinch of fine sea salt
- Just enough to enhance flavor and balance the sweetness.
- 100 g dark chocolate, chopped
- Use high-quality dark chocolate (70% cocoa or more) for best results.
Optional Add-ins
- 2 teaspoons greens powder (optional)
- Adds a subtle sweet-earthy flavor and a bonus of vitamins and minerals.
- ¼ cup chopped pistachios (optional)
- Fold into the base mixture for added texture and crunch.
Equipment Needed
- Food processor or high-speed blender
- 22 × 12 cm loaf tin (or a small square/rectangular dish)
- Baking/parchment paper
- Small saucepan or microwave-safe bowl (for melting chocolate)
- Spatula or spoon for spreading layers
Prep Steps
- Line your loaf tin with parchment paper so the brownies are easy to remove once set.
- Make sure all ingredients are measured and ready before starting, especially if you’re working quickly or in a warm kitchen where chocolate may firm up fast.
Instructions
1. Blend the brownie base
- Place the pitted dates into the food processor and blend until a smooth paste begins to form.
- Add in 150 g of pistachio butter and unsweetened cocoa powder.
- Add the pinch of salt and blend again until everything is fully incorporated.
- Scrape down the sides as needed to ensure all ingredients are well combined.
2. Press the base into the tin
- Transfer the blended mixture to your prepared tin.
- Use the back of a spoon or spatula to press the mixture evenly into the base, making sure it’s compact and level.
- Chill the base layer in the freezer while you prepare the next step.
3. Make the pistachio layer
- In a bowl, mix the remaining pistachio butter with optional greens powder until smooth.
- Spread this mixture carefully over the chilled brownie base. Use a spatula to smooth the top evenly.
- Return the tin to the freezer for 1 to 2 hours, or until the pistachio layer is firm to the touch.
4. Prepare and add the chocolate topping
- Melt the chopped dark chocolate gently, either in a microwave (in 30-second increments) or using a double boiler on the stove.
- Once melted, pour the chocolate over the firm pistachio layer.
- Use a spoon or spatula to spread the chocolate evenly over the top.
5. Let the brownies set
- Allow the top layer to cool and harden at room temperature, or return the tin to the freezer for quicker setting (about 20–30 minutes).
- Once fully set, lift the entire block out of the tin using the parchment paper.
6. Slice and serve
- Use a sharp knife to cut the brownies into squares or bars.
- For clean cuts, wipe the knife between slices.
- Serve immediately or store as desired.
Notes
- Softening dates: Always soak your dates if they feel dry or firm. Soft dates help create a smoother, more cohesive base.
- Texture test: The base should stick together when pressed but shouldn’t be too wet. If it’s too sticky, add a teaspoon of cocoa. If too dry, add a teaspoon of water or more pistachio butter.
- Layering tip: Freeze between each step to make sure each layer sets firmly before adding the next.
- Melting chocolate: Don’t overheat it. Stir frequently and stop heating once it’s 80% melted. Residual heat will finish the job.
- Pistachio butter: If your pistachio butter is too runny, refrigerate it briefly before spreading the middle layer to avoid it mixing with the base.
- No greens powder? Skip it entirely. The flavor and texture will still be excellent.
- Nut-free alternative: Try sunflower seed butter for a different spin.
- Chocolate substitutes: You can also use vegan chocolate chips or mix in a teaspoon of coconut oil to make the topping smoother.
- Prep Time: 25 minutes
Engagement Features
- Try this twist: Have you made this with almond or cashew butter instead? Share your version and let us know how it turned out.
- Add your topping: Did you drizzle white chocolate or sprinkle with freeze-dried raspberries? Tell us your creative touch.
- Question for readers: What’s your favorite no-bake dessert? Drop it in the comments—I’m always looking for ideas to try next.
- Challenge prompt: Make these with kids or friends and challenge yourselves to create your own layered flavors. Tag your version to share the inspiration.