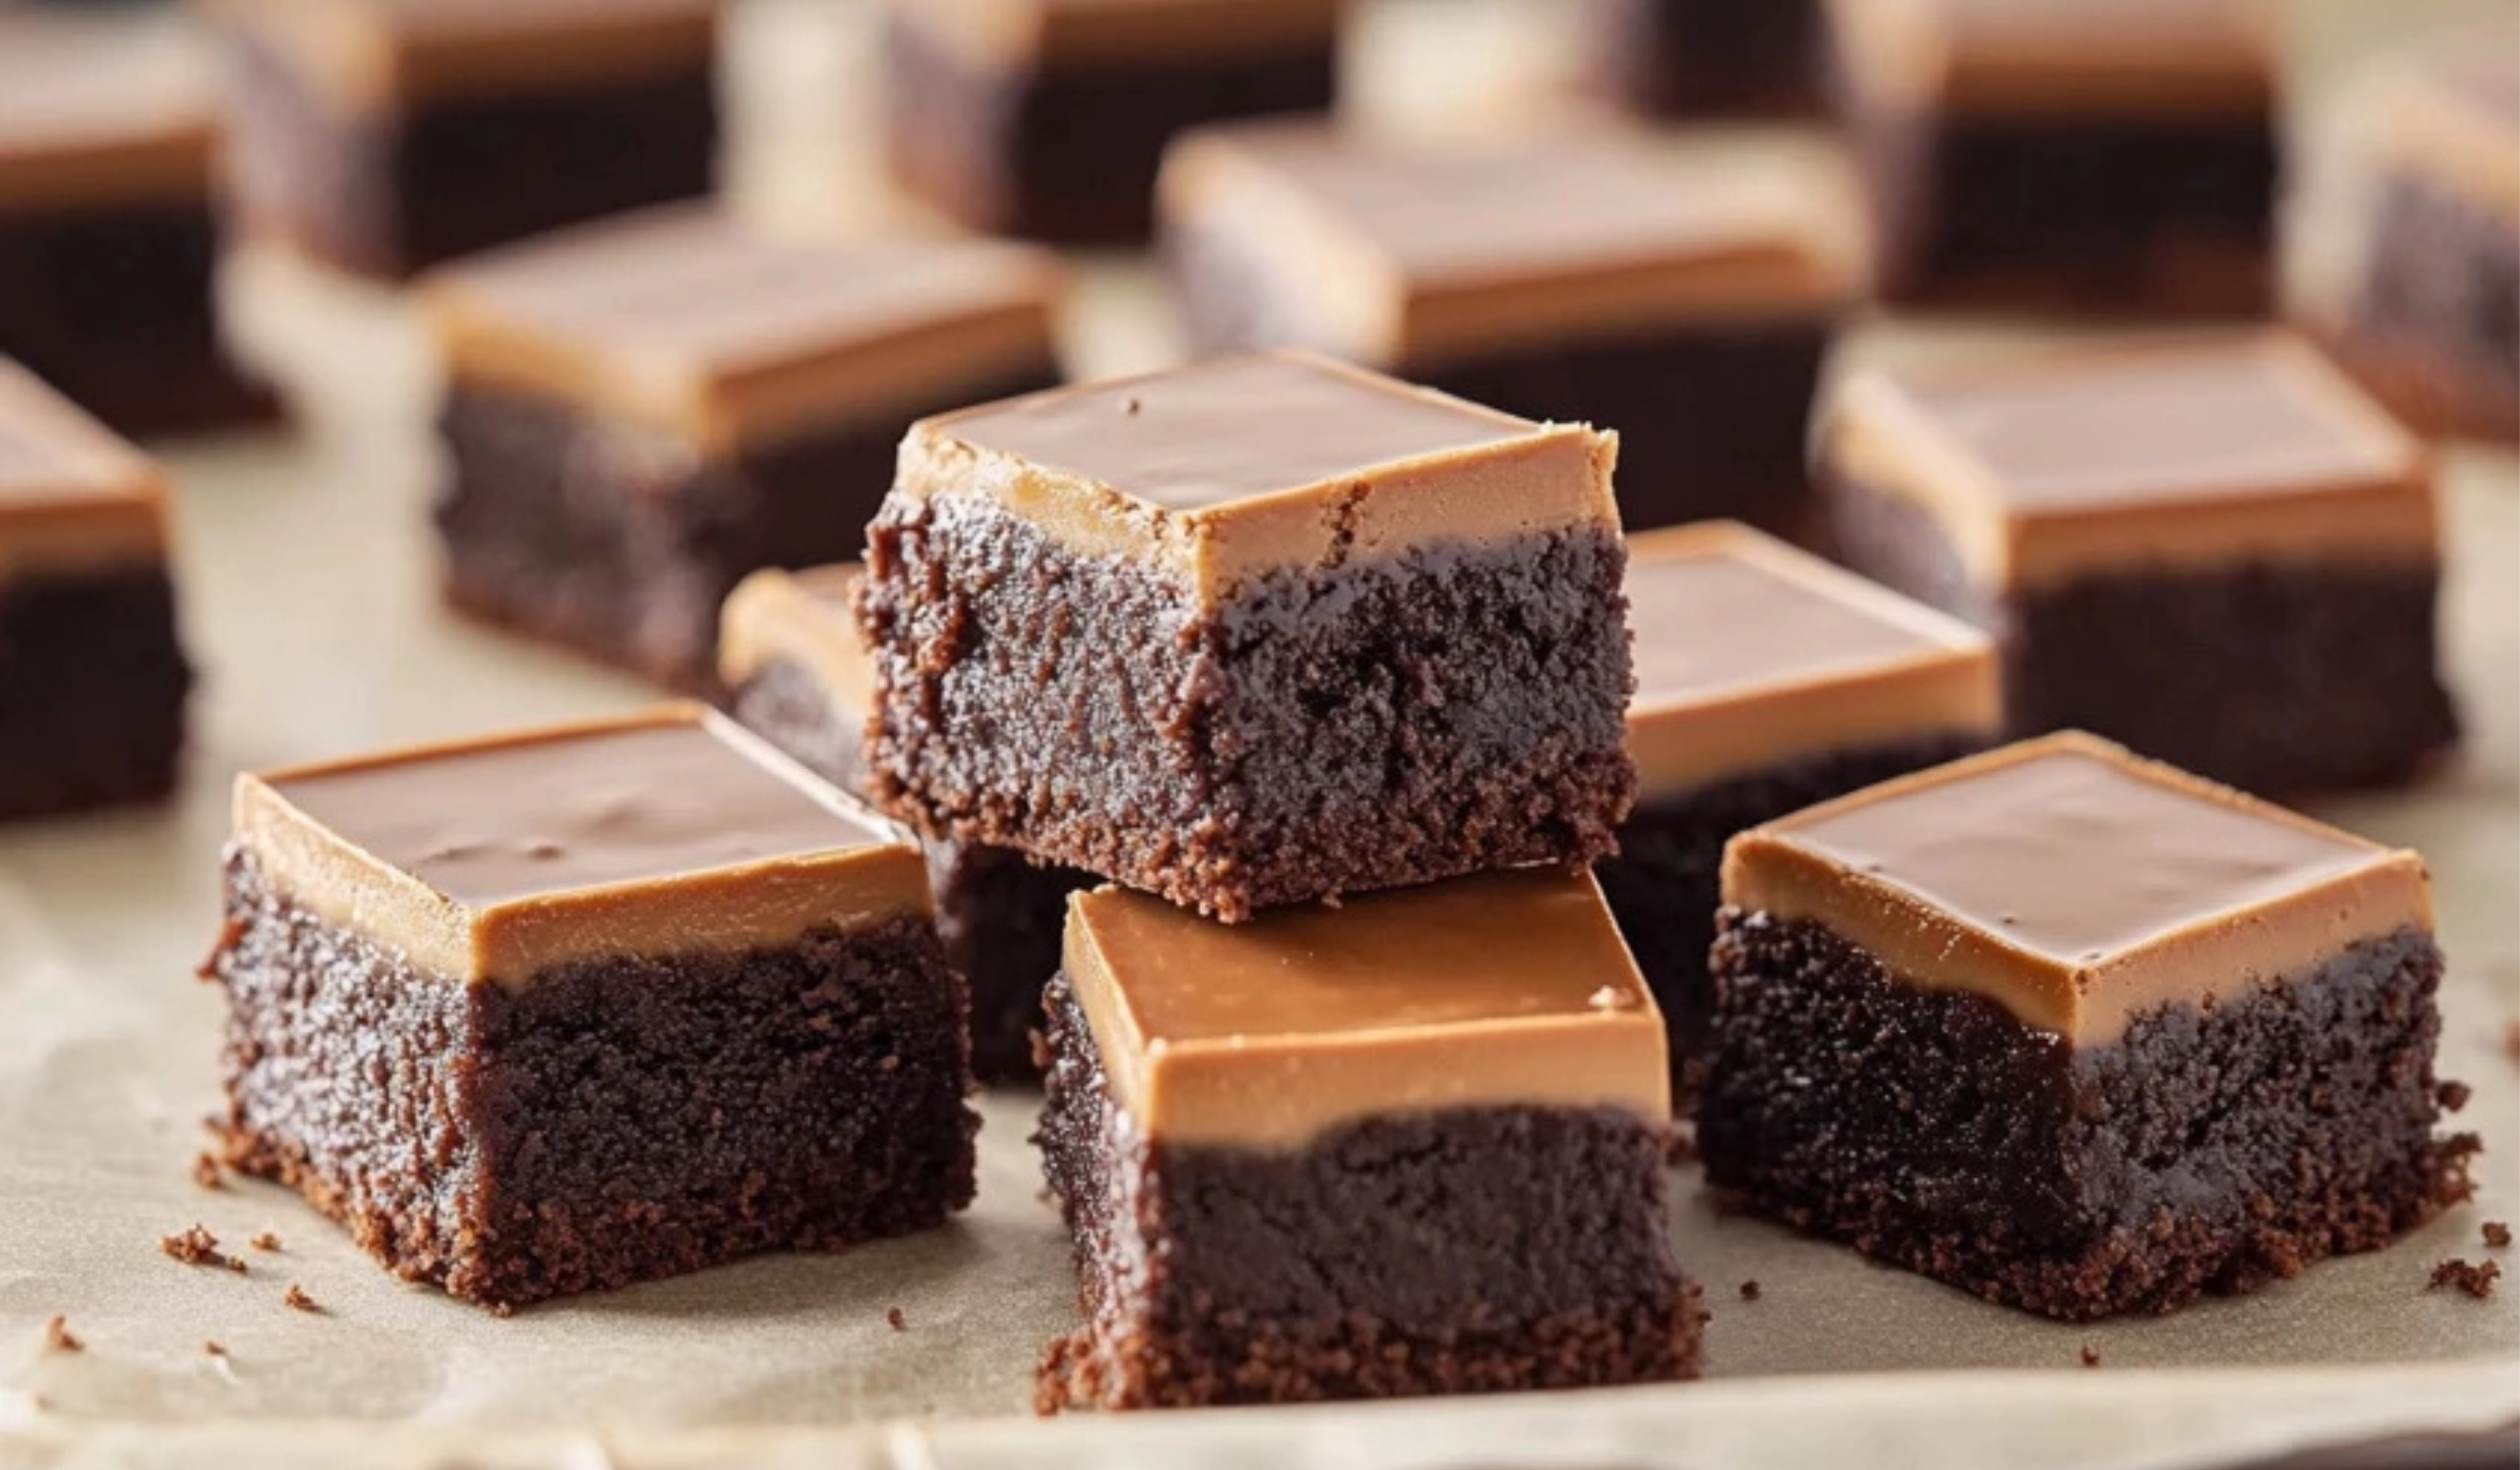
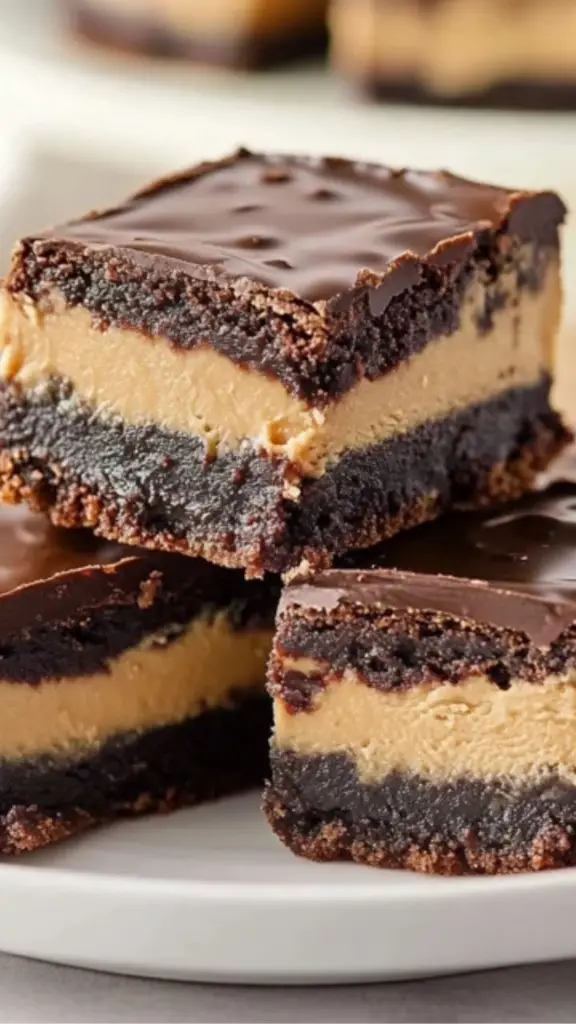
Few dessert combinations are as beloved as chocolate and peanut butter. The contrast of rich, fudgy chocolate with the creamy nuttiness of peanut butter creates a perfect balance of flavors. Buckeye Brownies take this classic pairing to another level by layering a peanut butter filling between a dense brownie base and a smooth chocolate topping.
Print
The Ultimate Guide to Making Buckeye Brownies: A Beginner-Friendly Recipe
Rich, fudgy brownies meet creamy peanut butter bliss! 🍫🥜 These Buckeye Brownies are the perfect blend of decadent chocolate and smooth peanut butter, creating an irresistible dessert. This beginner-friendly guide walks you through each step for bakery-quality results at home! ✨
- Total Time: 50 minutes
- Yield: 15 servings 1x
Ingredients
For the Brownie Base:
- 1 box brownie mix (plus ingredients listed on the box, usually eggs, oil, and water)
Alternative: If you prefer homemade brownies, you can replace the boxed mix with a simple homemade brownie batter using flour, cocoa powder, sugar, butter, eggs, and vanilla extract.
For the Peanut Butter Layer:
- 2 cups powdered sugar
- ½ cup butter, softened
- 1 cup creamy peanut butter
Alternatives: If you have a peanut allergy or prefer a different flavor, almond butter or sunflower seed butter can be used instead.
For the Chocolate Topping:
- 1 cup milk chocolate chips
- 6 tablespoons butter
Instructions
Step 1: Prepare and Bake the Brownie Base
- Preheat the oven according to the brownie mix instructions.
- Grease a 9×13-inch baking pan or line it with parchment paper for easy removal.
- In a mixing bowl, prepare the brownie batter according to the package instructions.
- Pour the batter into the prepared baking pan and spread it evenly.
- Bake the brownies according to the time specified on the box. The exact baking time may vary depending on the brand. To check for doneness, insert a toothpick into the center—if it comes out with a few moist crumbs, the brownies are ready.
- Allow the brownies to cool completely before adding the next layer.
Step 2: Make the Peanut Butter Layer
- In a medium-sized bowl, combine powdered sugar, ½ cup softened butter, and peanut butter.
- Mix well until fully incorporated. The consistency should be similar to playdough, firm but easy to spread.
- Using your hands or a spatula, gently press the peanut butter mixture evenly over the cooled brownies. A light dusting of powdered sugar on your hands can prevent sticking.
Step 3: Prepare the Chocolate Topping
- In a small saucepan over low heat, melt chocolate chips and 6 tablespoons of butter, stirring occasionally.
- Once smooth and fully melted, remove from heat.
- Immediately pour the melted chocolate over the peanut butter layer, spreading evenly with a spatula.
- Let the brownies cool at room temperature until the chocolate sets. If you are in a hurry, placing the pan in the refrigerator for about 30 minutes will help speed up the process.
Notes
- Brownies Not Baking Evenly: If the edges cook faster than the center, try reducing the oven temperature slightly and baking for a longer time. Using a glass or light-colored metal pan can also help distribute heat more evenly.
- Peanut Butter Mixture Too Sticky: If the peanut butter layer is sticking to your hands, dust them lightly with powdered sugar or chill the mixture for a few minutes before handling.
- Chocolate Topping Not Spreading Smoothly: Melt the chocolate over low heat and stir continuously to prevent burning. If it thickens too quickly, add a teaspoon of melted butter or coconut oil to smooth it out.
- Chocolate Cracks When Cutting: Let the brownies come to room temperature before slicing to prevent the chocolate from breaking. Running a knife under warm water before cutting can also help achieve cleaner slices.
- Prep Time: 25 minutes
- Cook Time: 25 minutes
This recipe is ideal for beginner bakers because it requires minimal ingredients, straightforward steps, and no special equipment. It also allows room for creativity, making it a great way to build confidence in the kitchen. Whether you are baking for a family gathering, a special occasion, or simply treating yourself, Buckeye Brownies are a foolproof dessert that will impress without causing stress.
Why This Recipe is Perfect for Beginners
- Simple Ingredients – Most of the ingredients are pantry staples, reducing the need for multiple grocery store trips.
- Easy Steps – With only three layers to assemble, this recipe is beginner-friendly while still producing a visually appealing dessert.
- No Complicated Techniques – Unlike more advanced desserts that require precise baking temperatures or delicate folding techniques, Buckeye Brownies are forgiving and easy to assemble.
- Minimal Equipment – No special baking tools are required beyond a mixing bowl, a baking pan, and a saucepan.
- Crowd-Pleasing Flavor – The combination of chocolate and peanut butter is a universal favorite, making this a reliable dessert choice for any occasion.
Ingredients and Substitutions
This recipe makes 15 servings in a 9×13-inch pan. If you need to make a smaller or larger batch, the ingredients can be easily adjusted.
For the Brownie Base:
- 1 box brownie mix (plus ingredients listed on the box, usually eggs, oil, and water)
Alternative: If you prefer homemade brownies, you can replace the boxed mix with a simple homemade brownie batter using flour, cocoa powder, sugar, butter, eggs, and vanilla extract.
For the Peanut Butter Layer:
- 2 cups powdered sugar
- ½ cup butter, softened
- 1 cup creamy peanut butter
Alternatives: If you have a peanut allergy or prefer a different flavor, almond butter or sunflower seed butter can be used instead.
For the Chocolate Topping:
- 1 cup milk chocolate chips
- 6 tablespoons butter
Alternatives: Dark chocolate or semi-sweet chocolate chips can be used for a richer flavor. Coconut oil can replace butter for a dairy-free option.
Step-by-Step Instructions
Step 1: Prepare and Bake the Brownie Base
- Preheat the oven according to the brownie mix instructions.
- Grease a 9×13-inch baking pan or line it with parchment paper for easy removal.
- In a mixing bowl, prepare the brownie batter according to the package instructions.
- Pour the batter into the prepared baking pan and spread it evenly.
- Bake the brownies according to the time specified on the box. The exact baking time may vary depending on the brand. To check for doneness, insert a toothpick into the center—if it comes out with a few moist crumbs, the brownies are ready.
- Allow the brownies to cool completely before adding the next layer.
Step 2: Make the Peanut Butter Layer
- In a medium-sized bowl, combine powdered sugar, ½ cup softened butter, and peanut butter.
- Mix well until fully incorporated. The consistency should be similar to playdough, firm but easy to spread.
- Using your hands or a spatula, gently press the peanut butter mixture evenly over the cooled brownies. A light dusting of powdered sugar on your hands can prevent sticking.
Step 3: Prepare the Chocolate Topping
- In a small saucepan over low heat, melt chocolate chips and 6 tablespoons of butter, stirring occasionally.
- Once smooth and fully melted, remove from heat.
- Immediately pour the melted chocolate over the peanut butter layer, spreading evenly with a spatula.
- Let the brownies cool at room temperature until the chocolate sets. If you are in a hurry, placing the pan in the refrigerator for about 30 minutes will help speed up the process.
Beginner Tips and Troubleshooting
- Brownies Not Baking Evenly: If the edges cook faster than the center, try reducing the oven temperature slightly and baking for a longer time. Using a glass or light-colored metal pan can also help distribute heat more evenly.
- Peanut Butter Mixture Too Sticky: If the peanut butter layer is sticking to your hands, dust them lightly with powdered sugar or chill the mixture for a few minutes before handling.
- Chocolate Topping Not Spreading Smoothly: Melt the chocolate over low heat and stir continuously to prevent burning. If it thickens too quickly, add a teaspoon of melted butter or coconut oil to smooth it out.
- Chocolate Cracks When Cutting: Let the brownies come to room temperature before slicing to prevent the chocolate from breaking. Running a knife under warm water before cutting can also help achieve cleaner slices.
Serving Suggestions
Pairing Options
- With Ice Cream: Serve warm brownies with a scoop of vanilla or chocolate ice cream for an extra indulgent dessert.
- With Fresh Fruit: A side of sliced strawberries or bananas complements the chocolate and peanut butter flavors beautifully.
- With Whipped Cream: A dollop of freshly whipped cream adds a light, airy contrast to the dense brownies.
Storage and Make-Ahead Tips
- Room Temperature: Store brownies in an airtight container at room temperature for up to 3 days.
- Refrigeration: For longer freshness, refrigerate the brownies for up to one week. Allow them to come to room temperature before serving for the best texture.
- Freezing: These brownies freeze well. Wrap individual squares in plastic wrap, then store them in an airtight container for up to 3 months. Thaw at room temperature before eating.
How to Make This Recipe Your Own
- Add a Crunchy Element: Stir chopped peanuts or crushed pretzels into the peanut butter layer for added texture.
- Use a Different Nut Butter: Try almond butter, cashew butter, or even hazelnut spread for a unique twist.
- Spice It Up: Add a pinch of cinnamon or a dash of sea salt to the chocolate topping for extra depth of flavor.
- Make It Healthier: Use a dark chocolate topping and replace some of the powdered sugar with honey or maple syrup.
Final Thoughts
Buckeye Brownies are an ideal dessert for beginner bakers because they offer a perfect balance of ease, indulgence, and flexibility. This simple recipe delivers an impressive treat with minimal effort, making it a great confidence booster for anyone new to baking.
If you try this recipe, share your experience and any modifications you made. Baking is all about experimenting and finding what works best for your taste. Whether you follow the recipe exactly or put your own spin on it, these brownies are sure to be a hit.
Now that you have mastered Buckeye Brownies, what will you bake next?