
There’s something magical about the combination of peaches and cream. This iconic duo has graced many desserts, from pies to parfaits, and now, it takes center stage in these irresistible Peaches and Cream Bars. With a buttery shortbread crust, a luscious creamy filling studded with fresh peaches, and a crumbly topping that adds just the right amount of crunch, these bars are the perfect balance of indulgence and comfort.
Print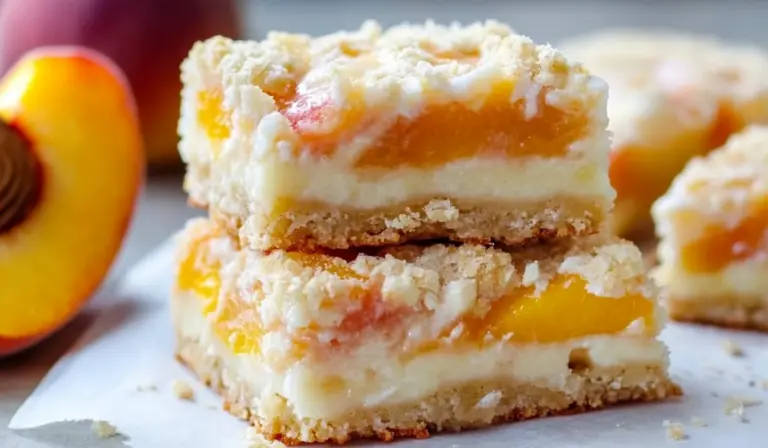
Peaches and Cream Bars
Dreamy layers of peaches and cream in every bite! 🍑💫 These Peaches and Cream Bars are a dessert lover’s dream come true. A velvety cream filling meets the sweet juiciness of peaches on a golden, buttery base. ✨ Whether it’s for a party or a cozy afternoon treat, these bars will be a hit every time. 😋💛 One slice won’t be enough!
#PeachyDreams #CreamyDesserts #SweetIndulgence #FruitAndCream #BakingGoals #SummerFlavor #FoodieFaves #DessertCravings #GoldenGoodness #PerfectlyPeachy 🍑✨💛
- Total Time: 1 hour 10 minutes
Ingredients
Crust and Topping
- 3 cups all-purpose flour 🌾: Forms the base and crumble topping, giving structure and a light, flaky texture.
- 1 1/2 cups sugar 🍬: Adds sweetness to balance the tanginess of the filling.
- 1/4 teaspoon salt 🧂: Enhances the flavors and balances the sweetness.
- 1 1/2 cups unsalted butter, chilled 🧈: Provides richness and a tender crumb. Chilled butter is crucial for achieving the right texture.
Filling
- 4 large eggs 🥚: Bind the filling, adding structure and a custard-like texture.
- 2 cups sugar 🍬: Sweetens the creamy filling and complements the peaches’ natural sugars.
- 1 cup sour cream 🥛: Adds tanginess and creaminess to the filling.
- 3/4 cup all-purpose flour 🌾: Thickens the filling to ensure it sets properly.
- Pinch of salt 🧂: Highlights the natural flavors of the ingredients.
- 2 pounds peaches, pitted and sliced thin 🍑: The star of the dish! Fresh peaches bring sweetness, juiciness, and vibrant flavor.
Instructions
1️⃣ Preheat the Oven
Preheat your oven to 350ºF (175ºC). Grease a 9×13-inch baking pan with cooking spray or line it with parchment paper for easy removal. Proper preparation ensures even baking and prevents sticking.
2️⃣ Prepare the Crust and Topping
- In a large mixing bowl or stand mixer, combine the flour, sugar, and salt.
- Cut in the chilled butter using a pastry cutter or your mixer’s paddle attachment. The mixture should resemble coarse crumbs. Be patient—this step is essential for a tender, flaky crust.
- Reserve 1 1/2 cups of this mixture for the topping. Press the remaining mixture firmly into the prepared pan, forming an even layer.
3️⃣ Bake the Crust
- Bake the crust in the preheated oven for 12-15 minutes or until lightly golden. This initial bake ensures the crust doesn’t become soggy when you add the filling.
- Remove from the oven and let it cool for about 10 minutes. This resting period helps maintain the crust’s integrity when layering the filling.
4️⃣ Make the Creamy Filling
- In a large bowl, whisk together the eggs and sugar until smooth.
- Gradually stir in the sour cream, flour, and a pinch of salt. Whisk until well combined, ensuring no lumps remain.
- Gently fold in the thinly sliced peaches, taking care not to crush them. The slices should remain intact for a beautiful presentation and texture.
5️⃣ Assemble the Bars
- Pour the peach mixture evenly over the baked crust. Spread it out to ensure an even distribution of peaches and cream.
- Sprinkle the reserved crumble topping evenly over the filling, ensuring every corner is covered.
6️⃣ Bake to Perfection
- Return the pan to the oven and bake for 45-50 minutes, or until the top is lightly golden and the filling is set. You’ll know it’s ready when the center jiggles slightly but is mostly firm.
- Allow the bars to cool at room temperature for at least 1 hour. For cleaner slices, refrigerate them for a couple of hours before cutting.
7️⃣ Slice and Serve
- Use a sharp knife to cut the bars into squares or rectangles. Serve them chilled, room temperature, or slightly warm with a dollop of whipped cream or a scoop of vanilla ice cream for an extra treat.
Notes
- Choose the Best Peaches: Use ripe but firm peaches for the best flavor and texture. If peaches are out of season, canned or frozen peaches can work—just be sure to drain them well.
- Chill the Butter: Keeping the butter cold is crucial for a flaky crust and crumbly topping.
- Cool Before Slicing: Patience pays off! Cooling ensures clean slices and prevents the filling from oozing out.
- Use Parchment Paper: Line the pan with parchment for easy lifting and cleaner edges.
- Enhance the Topping: Add a pinch of cinnamon or nutmeg to the topping for a warm, spiced twist.
- Prep Time: 20 minutes
- Cook Time: 50 minutes
Whether you’re a seasoned baker or a kitchen newbie, this recipe is straightforward and rewarding. It transforms simple ingredients into a dessert that’s both elegant and approachable. Imagine biting into a bar where the tangy sweetness of peaches melds seamlessly with the creaminess of the filling and the buttery crunch of the crust. Let’s dive into what makes these bars a must-try!
The Allure of Peaches and Cream Bars 🌟
Why are Peaches and Cream Bars so special? First, they capture the essence of summer. Peaches, with their vibrant color, juicy texture, and sweet aroma, are a highlight of the season. These bars let you enjoy that summery freshness any time of the year, especially if you freeze or preserve peaches during peak season.
Secondly, the combination of textures makes them irresistible. From the firm, buttery crust to the silky filling and crumbly topping, each bite is a delightful journey for your taste buds. Finally, their versatility is a significant draw. Whether served warm with a dollop of whipped cream, cold as a refreshing treat, or as part of a dessert buffet, these bars are sure to impress.
Ingredients Breakdown: Simple, Everyday Ingredients 🌈
Crust and Topping
- 3 cups all-purpose flour 🌾: Forms the base and crumble topping, giving structure and a light, flaky texture.
- 1 1/2 cups sugar 🍬: Adds sweetness to balance the tanginess of the filling.
- 1/4 teaspoon salt 🧂: Enhances the flavors and balances the sweetness.
- 1 1/2 cups unsalted butter, chilled 🧈: Provides richness and a tender crumb. Chilled butter is crucial for achieving the right texture.
Filling
- 4 large eggs 🥚: Bind the filling, adding structure and a custard-like texture.
- 2 cups sugar 🍬: Sweetens the creamy filling and complements the peaches’ natural sugars.
- 1 cup sour cream 🥛: Adds tanginess and creaminess to the filling.
- 3/4 cup all-purpose flour 🌾: Thickens the filling to ensure it sets properly.
- Pinch of salt 🧂: Highlights the natural flavors of the ingredients.
- 2 pounds peaches, pitted and sliced thin 🍑: The star of the dish! Fresh peaches bring sweetness, juiciness, and vibrant flavor.
Step-by-Step Instructions: Baking Made Easy 🧁
1️⃣ Preheat the Oven
Preheat your oven to 350ºF (175ºC). Grease a 9×13-inch baking pan with cooking spray or line it with parchment paper for easy removal. Proper preparation ensures even baking and prevents sticking.
2️⃣ Prepare the Crust and Topping
- In a large mixing bowl or stand mixer, combine the flour, sugar, and salt.
- Cut in the chilled butter using a pastry cutter or your mixer’s paddle attachment. The mixture should resemble coarse crumbs. Be patient—this step is essential for a tender, flaky crust.
- Reserve 1 1/2 cups of this mixture for the topping. Press the remaining mixture firmly into the prepared pan, forming an even layer.
3️⃣ Bake the Crust
- Bake the crust in the preheated oven for 12-15 minutes or until lightly golden. This initial bake ensures the crust doesn’t become soggy when you add the filling.
- Remove from the oven and let it cool for about 10 minutes. This resting period helps maintain the crust’s integrity when layering the filling.
4️⃣ Make the Creamy Filling
- In a large bowl, whisk together the eggs and sugar until smooth.
- Gradually stir in the sour cream, flour, and a pinch of salt. Whisk until well combined, ensuring no lumps remain.
- Gently fold in the thinly sliced peaches, taking care not to crush them. The slices should remain intact for a beautiful presentation and texture.
5️⃣ Assemble the Bars
- Pour the peach mixture evenly over the baked crust. Spread it out to ensure an even distribution of peaches and cream.
- Sprinkle the reserved crumble topping evenly over the filling, ensuring every corner is covered.
6️⃣ Bake to Perfection
- Return the pan to the oven and bake for 45-50 minutes, or until the top is lightly golden and the filling is set. You’ll know it’s ready when the center jiggles slightly but is mostly firm.
- Allow the bars to cool at room temperature for at least 1 hour. For cleaner slices, refrigerate them for a couple of hours before cutting.
7️⃣ Slice and Serve
- Use a sharp knife to cut the bars into squares or rectangles. Serve them chilled, room temperature, or slightly warm with a dollop of whipped cream or a scoop of vanilla ice cream for an extra treat.
The Flavors and Textures: A Symphony in Every Bite 🎶
When you take your first bite of Peaches and Cream Bars, the flavors and textures come together beautifully:
- The Crust: Buttery and crumbly, it provides a sturdy base that contrasts wonderfully with the creamy filling.
- The Filling: Silky, sweet, and slightly tangy, it wraps the juicy peaches in a custard-like embrace.
- The Topping: Adds a delightful crunch and enhances the dessert’s rustic charm.
- The Peaches: Juicy, sweet, and slightly tart, they bring the dish to life with their fresh, summery flavor.
Tips for Perfect Peaches and Cream Bars 🧡
- Choose the Best Peaches: Use ripe but firm peaches for the best flavor and texture. If peaches are out of season, canned or frozen peaches can work—just be sure to drain them well.
- Chill the Butter: Keeping the butter cold is crucial for a flaky crust and crumbly topping.
- Cool Before Slicing: Patience pays off! Cooling ensures clean slices and prevents the filling from oozing out.
- Use Parchment Paper: Line the pan with parchment for easy lifting and cleaner edges.
- Enhance the Topping: Add a pinch of cinnamon or nutmeg to the topping for a warm, spiced twist.
Variations to Try 🌟
- Add Berries: Mix in blueberries or raspberries for a colorful and flavorful variation.
- Spiced Filling: Incorporate cinnamon, ginger, or cardamom into the filling for added warmth.
- Citrus Kick: Add a teaspoon of lemon or orange zest to the filling for a bright, zesty twist.
- Nutty Crunch: Sprinkle chopped pecans or almonds into the topping for extra texture.

Serving Suggestions 🍽️
Peaches and Cream Bars are versatile and can be served in various ways:
- Elegant Dessert: Serve on a plate with a drizzle of caramel or a dusting of powdered sugar.
- Casual Treat: Pack them in a lunchbox or serve at a picnic.
- A La Mode: Pair warm bars with a scoop of vanilla or peach ice cream.
Storing and Freezing 🍑
- Refrigerate: Store in an airtight container in the refrigerator for up to 5 days. They taste even better after a day as the flavors meld.
- Freeze: Wrap individual bars in plastic wrap and store in a freezer-safe bag for up to 3 months. Thaw in the fridge or at room temperature before serving.
Why You’ll Love This Recipe 💕
Peaches and Cream Bars are a dessert that feels like a warm hug. They’re simple to make, full of comforting flavors, and perfect for sharing with loved ones. Whether you’re celebrating a special occasion or simply indulging in a sweet treat, these bars are sure to bring joy. So roll up your sleeves, gather your ingredients, and let the magic of peaches and cream transform your kitchen into a haven of deliciousness. Happy baking! 🎉