
If you’re a fan of sweet indulgence, you’ll absolutely love this Oreo Cheesecake Cookie Dough! With its creamy texture, rich flavor, and delightful crunch from the Oreo pieces, this edible cookie dough is a true treat. Plus, it’s completely safe to eat raw, making it the perfect snack when you crave something sweet but don’t want to bake. Whether you’re looking for a late-night dessert or a fun snack for kids and adults alike, this Oreo Cheesecake Cookie Dough will quickly become a favorite.
Print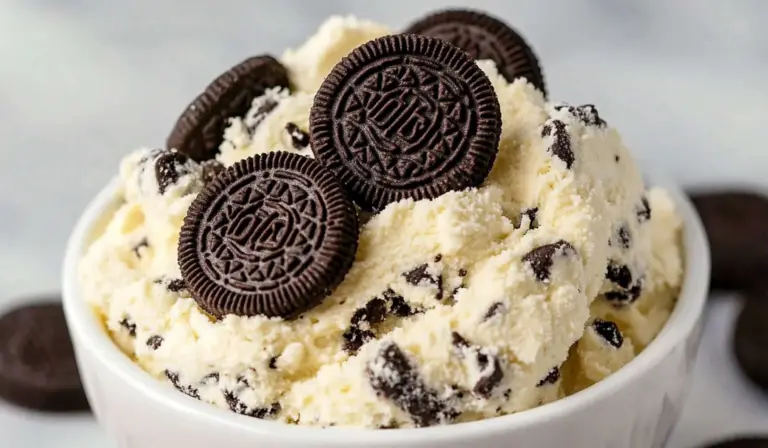
Oreo Cheesecake Cookie Dough
🍪🧀 Craving a sweet, indulgent treat? This Oreo Cheesecake Cookie Dough is all your dessert dreams come true! 😍 Packed with crushed Oreos and a creamy cheesecake twist, this edible cookie dough is perfect for spooning right out of the jar or using in your favorite baking creations. 🍪✨ No bake, no hassle, just pure cookie dough bliss! 😋💖
#OreoCheesecakeDough #EdibleCookieDough #CookieDoughLovers #CheesecakeMagic #OreoGoodness #DessertGoals #NoBakeTreats #SweetIndulgence #SpoonableDelight #CookieCravings 🍪🧀✨
- Total Time: 5 minutes
Ingredients
- ½ cup butter (room temperature)
- 4 ounces cream cheese (room temperature)
- ¾ cup granulated sugar
- 1 cup + 3 tbsp all-purpose flour
- 12 Oreo cookies (crushed into pieces)
Instructions
- Combine the Cream Cheese and Butter:
- Start by placing the softened butter and cream cheese in a large mixing bowl. Use an electric mixer or hand mixer to beat them together until they become light and fluffy. This will only take about 2-3 minutes. It’s important to mix the butter and cream cheese well so that you get a smooth, homogenous base for your cookie dough.
- Add Sugar and Blend:
- Next, add the granulated sugar to the bowl. Continue beating the mixture until the sugar is fully incorporated and the dough is smooth. The sugar will add sweetness and help the butter and cream cheese blend together into a creamy consistency.
- Slowly Incorporate the Flour:
- Gradually add the flour to the mixture while mixing at a low speed. Be careful not to add too much flour at once, as this could cause the mixture to become too dry or clumpy. Once the flour is incorporated, the dough should start coming together.
- Fold in the Crushed Oreos:
- Finally, fold in the crushed Oreos by hand or on the lowest speed setting of your mixer. The Oreo pieces should be evenly distributed throughout the dough, giving it that classic crunchy texture.
- Taste and Adjust:
- Taste your dough at this point to ensure it has the right balance of sweetness and texture. If you prefer a sweeter dough, you can add a little more sugar. If you want more Oreo crunch, feel free to add extra crushed Oreos.
- Refrigerate and Serve:
- Once your dough is ready, transfer it to an airtight container and refrigerate for about 1 hour. Chilling the dough allows the flavors to meld and gives the dough a firmer texture, making it easier to scoop and enjoy. You can also refrigerate it overnight if you prefer.
- Serve and Enjoy:
- Once the dough is chilled, it’s ready to be served! Enjoy it by the spoonful or scoop it into little bite-sized portions. You can also roll it into small balls and serve them as little cookie dough truffles.
Notes
- Make Cookie Dough Truffles:
- Roll the dough into bite-sized balls and dip them in melted chocolate for a decadent treat. You can use dark, milk, or white chocolate, depending on your preference.
- Pair with Ice Cream:
- Add spoonfuls of the cookie dough on top of your favorite ice cream for a fun, indulgent dessert. The creamy dough pairs beautifully with cold ice cream.
- Serve as a Dip:
- Serve the chilled dough as a dip with graham crackers, pretzels, or fresh fruit. The sweet and creamy dough is perfect for dipping!
- Top with Whipped Cream:
- For an extra creamy texture, top your cookie dough with a dollop of whipped cream. You can also sprinkle crushed Oreos on top for added texture.
- Prep Time: 5 minutes
- Cook Time: 0 minutes
Not only is this recipe quick and easy to prepare, but it’s also customizable to suit your taste preferences. The smoothness of the cream cheese combined with the crunch of the Oreos creates the perfect balance of flavors. And because it’s made with simple ingredients you likely already have in your pantry, there’s no need to rush out to the store. Let’s dive into the details of this irresistible no-bake dessert!
Ingredients Overview
This Oreo Cheesecake Cookie Dough recipe only requires a handful of ingredients, and you probably have most of them in your kitchen. Let’s break them down to understand their role in creating this delectable treat.
Butter (½ cup, room temperature)
Butter is a key ingredient that provides both flavor and moisture to the dough. The fat content in butter helps make the dough soft and gives it that melt-in-your-mouth texture. It also enhances the overall richness of the dough. Make sure your butter is at room temperature, as this will help it blend smoothly with the other ingredients, ensuring a creamy dough texture.
Cream Cheese (4 ounces, room temperature)
Cream cheese is another critical ingredient that elevates the flavor of this cookie dough. It gives the dough its characteristic cheesecake taste and contributes to the creamy texture. Similar to the butter, it’s important to use softened cream cheese to avoid any lumps or uneven texture in the final dough. The cream cheese balances out the sweetness and provides a tangy depth of flavor that complements the Oreos.
Granulated Sugar (¾ cup)
Sugar is the sweetener in this recipe, and it’s essential for achieving that delicious, sugary taste we all love in desserts. The granulated sugar blends perfectly with the butter and cream cheese to create a smooth and sweet dough. The sugar also plays a role in the texture by providing slight crispness when the dough is chilled, making it even more enjoyable to eat.
All-Purpose Flour (1 cup + 3 tbsp)
Flour provides structure to the cookie dough. It holds everything together, making the dough firm enough to scoop and enjoy. Since this is an edible cookie dough, we’ll be using heat-treated flour to ensure it’s safe to eat raw. Flour also helps to balance the texture, preventing the dough from becoming too gooey or overly soft.
Oreo Cookies (12, crushed into pieces)
The Oreo cookies are the star of the show in this recipe. Their chocolatey crunch and creamy filling add a delicious contrast to the smooth cream cheese base. As you crush the Oreos, the small pieces will distribute throughout the dough, creating little pockets of flavor in every bite. The iconic taste of Oreos is one of the main reasons why this cookie dough is so irresistible. Feel free to adjust the number of Oreos to your preference—more cookies mean more crunch!
Preparation Time and Storage Tips
Prep Time: 5 minutes
Yes, that’s right! This recipe takes less than 5 minutes to prepare. You’ll be mixing up a rich and creamy dough in no time. Whether you’re making it for a party, a snack, or just because, you won’t need to spend hours in the kitchen. This is a no-bake recipe, which makes it even easier to whip up on a whim.
Storage Tips
If you’re not planning to eat all of the dough right away (though that might be difficult), store the remaining dough in an airtight container. It can be refrigerated for up to 10 days. Just make sure to allow it to come to room temperature before eating, as it may firm up a little in the fridge.
How to Make Oreo Cheesecake Cookie Dough
Making Oreo Cheesecake Cookie Dough is as simple as 1-2-3. Let’s go through the process step by step:
- Combine the Cream Cheese and Butter:
- Start by placing the softened butter and cream cheese in a large mixing bowl. Use an electric mixer or hand mixer to beat them together until they become light and fluffy. This will only take about 2-3 minutes. It’s important to mix the butter and cream cheese well so that you get a smooth, homogenous base for your cookie dough.
- Add Sugar and Blend:
- Next, add the granulated sugar to the bowl. Continue beating the mixture until the sugar is fully incorporated and the dough is smooth. The sugar will add sweetness and help the butter and cream cheese blend together into a creamy consistency.
- Slowly Incorporate the Flour:
- Gradually add the flour to the mixture while mixing at a low speed. Be careful not to add too much flour at once, as this could cause the mixture to become too dry or clumpy. Once the flour is incorporated, the dough should start coming together.
- Fold in the Crushed Oreos:
- Finally, fold in the crushed Oreos by hand or on the lowest speed setting of your mixer. The Oreo pieces should be evenly distributed throughout the dough, giving it that classic crunchy texture.
- Taste and Adjust:
- Taste your dough at this point to ensure it has the right balance of sweetness and texture. If you prefer a sweeter dough, you can add a little more sugar. If you want more Oreo crunch, feel free to add extra crushed Oreos.
- Refrigerate and Serve:
- Once your dough is ready, transfer it to an airtight container and refrigerate for about 1 hour. Chilling the dough allows the flavors to meld and gives the dough a firmer texture, making it easier to scoop and enjoy. You can also refrigerate it overnight if you prefer.
- Serve and Enjoy:
- Once the dough is chilled, it’s ready to be served! Enjoy it by the spoonful or scoop it into little bite-sized portions. You can also roll it into small balls and serve them as little cookie dough truffles.
Serving Suggestions
Although Oreo Cheesecake Cookie Dough is perfect on its own, there are plenty of creative ways to enjoy it. Here are a few ideas:
- Make Cookie Dough Truffles:
- Roll the dough into bite-sized balls and dip them in melted chocolate for a decadent treat. You can use dark, milk, or white chocolate, depending on your preference.
- Pair with Ice Cream:
- Add spoonfuls of the cookie dough on top of your favorite ice cream for a fun, indulgent dessert. The creamy dough pairs beautifully with cold ice cream.
- Serve as a Dip:
- Serve the chilled dough as a dip with graham crackers, pretzels, or fresh fruit. The sweet and creamy dough is perfect for dipping!
- Top with Whipped Cream:
- For an extra creamy texture, top your cookie dough with a dollop of whipped cream. You can also sprinkle crushed Oreos on top for added texture.
Why This Recipe Works
- No-Bake Convenience:
- One of the best features of this Oreo Cheesecake Cookie Dough is that it requires no baking. In a world where everyone seems to be in a hurry, this no-bake dessert makes it easy to satisfy a sweet craving in just a few minutes.
- Edible and Safe to Eat Raw:
- Raw cookie dough often has concerns about raw eggs or flour, but this recipe eliminates those worries. The flour is heat-treated, and there are no eggs, so you can enjoy this dough without any concerns. It’s completely safe to eat raw!
- Perfect for Sharing:
- This recipe makes about 2 cups of cookie dough, so it’s perfect for sharing at parties, family gatherings, or casual hangouts. The creamy cheesecake flavor and crunchy Oreo bits are sure to be a crowd-pleaser.

Customization Tips
While this recipe is already amazing as is, there are plenty of ways to make it your own:
- Use Different Cookies:
- If you’re not a fan of Oreos, try using other cookies like chocolate chip cookies, graham crackers, or even peanut butter cookies. The beauty of this recipe is that it can be customized to suit your taste.
- Add Toppings:
- Consider topping your cookie dough with additional crushed Oreos, sprinkles, or mini chocolate chips for added texture and visual appeal.
- Make It Gluten-Free:
- If you need a gluten-free version, you can substitute the all-purpose flour with a gluten-free flour blend. Just make sure to check that all other ingredients are certified gluten-free.
- Flavor Variations:
- You can add flavor extracts like almond or hazelnut for a different twist. A pinch of cinnamon or cocoa powder would also enhance the flavor.
Conclusion
This Oreo Cheesecake Cookie Dough recipe is the perfect sweet treat for any occasion. It’s quick, easy, and versatile, and it delivers all the indulgent flavors of cheesecake and cookies in one bite. Whether you enjoy it by the spoonful, as a topping for ice cream, or as truffles, it’s sure to satisfy your cravings. Give it a try the next time you’re in need of a no-bake dessert, and watch how quickly it disappears!