
Cooking doesn’t have to be a complicated affair—even on those hectic days when time is short but your hunger for something delicious is strong. I still remember the first time I tried a one-pan pasta recipe on a particularly busy workday. I came home after a long day, rummaged through my pantry, and found a jar of sun-dried tomatoes. Inspired by the vibrant color and rich flavor they promised, I decided to experiment. Within minutes, I whipped up this one-pan Sun-dried Tomato Pasta, and it quickly became my go-to recipe. Today, I’m excited to share this delightful recipe with you—a perfect dish for beginner cooks who crave simplicity, speed, and a burst of flavor.
Print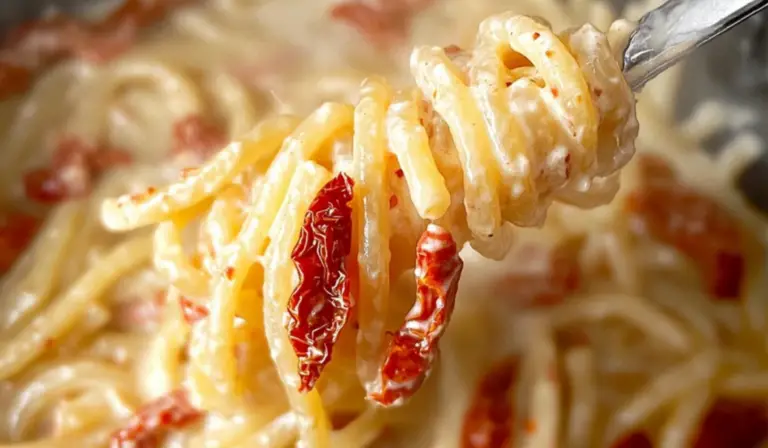
One-Pan Sun-Dried Tomato Pasta: A Beginner’s Dream Meal
Dreaming of a restaurant-quality pasta dish without the hassle? This One-Pan Sun-Dried Tomato Pasta is creamy, savory, and incredibly easy to make! With just one pan and a handful of ingredients, you’ll have a rich, flavorful meal ready in no time. The sun-dried tomatoes add the perfect tangy-sweet kick, making every bite irresistible. Whether you’re a beginner or a pasta lover, this recipe is a must-try. Ready to cook?
#EasyPastaRecipe #OnePotMeals #SunDriedTomatoes #CreamyPasta #QuickAndEasy #HomeCooked #FlavorfulEats #WeeknightCooking #ComfortFood #SimpleAndDelicious
- Total Time: 15 minutes
- Yield: 2 servings 1x
Ingredients
- Butter: 3 tablespoons
- Garlic: 3 cloves, minced
- Chicken Stock or Bone Broth: 2 cups
- Alternative: Use vegetable broth for a vegetarian version.
- Half and Half or Whole Milk: 1/2 cup (room temperature)
- Alternative: For a lighter version, you can use any unsweetened plant-based milk.
- Sun-Dried Tomatoes in Oil: 1 jar (8 oz), oil drained
- Tip: Reserve a bit of the oil if you want an extra kick of flavor.
- Angel Hair Pasta: 8 oz
- Alternative: Spaghetti or bucatini can be used instead. Note that these might require a slightly longer cooking time to reach al dente.
- Parmesan Cheese: 1/3 cup, grated
- Optional – Cream Cheese: 2 tablespoons, softened (for extra creaminess)
Instructions
- Prep Your Skillet:
Begin by placing a large skillet on the stove over medium-low heat. Add 3 tablespoons of butter and 3 minced garlic cloves to the pan. Allow the butter to melt completely, and let the garlic sauté for about 1 minute until it becomes fragrant. Keep an eye on it to ensure it doesn’t burn—this is key for achieving a rich, savory base. - Build the Flavor Base:
Once the garlic is aromatic, pour in 2 cups of chicken stock (or your chosen broth). Add your drained 8 oz jar of sun-dried tomatoes along with the Italian seasoning, cracked black pepper, and salt. If you’re using red pepper flakes for an extra kick, add them now. Stir gently to combine all these flavors. - Incorporate the Creaminess:
Slowly pour in 1/2 cup of half and half (or whole milk) into the skillet. Stir continuously as you do this to ensure the liquid blends seamlessly with the stock and seasonings. Bring the mixture to a gentle boil—this will form the flavorful sauce that will envelop your pasta. - Add the Pasta:
Now, it’s time to introduce the star of the show—the pasta. Lay 8 oz of angel hair pasta into the skillet. Let it sit undisturbed for about 30 seconds so that it begins to soften and bend, making it easier to submerge fully into the liquid. Carefully maneuver the pasta into the sauce without breaking it. It’s perfectly fine if a few strands don’t immediately sink; they will soften as the dish continues to cook. - Cook the Pasta:
Allow the pasta to cook in the simmering liquid for about 5 minutes. During this time, the pasta will absorb the rich flavors of the broth, tomatoes, and seasonings. After 5 minutes, reduce the heat to a low simmer. If you’re opting for extra creaminess, now is the moment to add 2 tablespoons of softened cream cheese. Stir it in until it melts completely, enhancing the sauce’s texture. - Finish to Perfection:
Continue cooking the pasta until it reaches an al dente texture—tender with a slight bite in the center. This usually takes just a few more minutes. Once the pasta is perfectly cooked, sprinkle 1/3 cup of grated Parmesan cheese over the top. Taste the dish and add a bit more salt and pepper if necessary. If you notice that the pasta has absorbed too much liquid and the sauce seems too thick, add a splash more chicken stock or half and half to achieve the desired consistency.
Notes
- Ingredient Prep:
Always have all your ingredients measured and prepped before you start cooking. This “mise en place” practice not only makes the process smoother but also minimizes the risk of missing an ingredient. - Temperature Control:
Keeping the heat at medium-low is essential in this recipe. High heat can cause the garlic to burn, turning it bitter. A gentle, controlled heat ensures that your butter and garlic create a perfect base. - Pasta Submersion:
When adding the pasta, be gentle. Angel hair pasta is delicate, and you don’t want to break it into too many pieces. If using sturdier pasta types like spaghetti or bucatini, you may need to allow an extra minute or two for the pasta to cook fully. - Consistency Adjustments:
Don’t worry if the sauce seems too thick or too thin. The pasta will absorb liquid as it cooks. Keep an extra bit of chicken stock or half and half on hand to adjust the sauce consistency as needed. - Flavor Boosters:
The optional cream cheese is a great addition if you’re looking for a richer, creamier sauce. Similarly, if you love a bit of spice, the red pepper flakes can transform the dish with a subtle heat. Feel free to experiment with these optional ingredients to suit your personal taste. - Pan Selection:
Using a non-stick skillet can help prevent the pasta from sticking and make the stirring process easier. However, if you prefer a stainless-steel pan, just be sure to keep stirring to avoid any sticking or burning. - Troubleshooting Overcooked Pasta:
If you find that your pasta is absorbing too much liquid and overcooking, simply add a bit more broth to keep it in check. Always aim for that perfect “al dente” texture, as overcooked pasta can lose its charm and become mushy. - Kitchen Efficiency:
Multi-tasking in the kitchen can seem daunting. Use the time while the pasta cooks to prepare any complementary sides or to clean up as you go. This not only keeps your workspace tidy but also helps you feel more in control of the process.
- Prep Time: 5 minutes
- Cook Time: 10 minutes
Whether you’re stepping into the kitchen for the first time or just need a quick meal that doesn’t skimp on taste, this recipe ticks all the boxes. In just 15 minutes, you’ll have a hearty, comforting dish that’s versatile enough to adjust according to your pantry supplies or dietary needs. Let’s dive into the details and learn how to create this magic in your very own kitchen.
Why This Recipe is Perfect for Beginners
Simplicity & Speed:
The beauty of this one-pan pasta is its straightforward process. With a short list of ingredients and minimal prep work, you can have a gourmet meal on your plate in less than 15 minutes. No complicated techniques or fancy equipment is required—just a trusty skillet and a willingness to experiment!
Time Efficiency:
For those busy weeknights when every minute counts, this recipe comes to the rescue. It’s designed to cook quickly without sacrificing flavor. The one-pan method not only cuts down on clean-up time but also ensures that all the ingredients meld together perfectly.
Health Benefits & Versatility:
Using chicken stock or bone broth as a base infuses the dish with extra protein and nutrients, while the sun-dried tomatoes provide a rich burst of flavor and antioxidants. Plus, you have the flexibility to swap ingredients around—whether you need a dairy-free option or prefer a vegetarian twist, there are plenty of alternatives to suit your dietary needs.
Ingredients and Preparation
Before we start cooking, let’s gather all the ingredients. Having everything prepped and measured is key, especially for beginners. Here’s a comprehensive list of what you’ll need:
Ingredients
- Butter: 3 tablespoons
- Garlic: 3 cloves, minced
- Chicken Stock or Bone Broth: 2 cups
- Alternative: Use vegetable broth for a vegetarian version.
- Half and Half or Whole Milk: 1/2 cup (room temperature)
- Alternative: For a lighter version, you can use any unsweetened plant-based milk.
- Sun-Dried Tomatoes in Oil: 1 jar (8 oz), oil drained
- Tip: Reserve a bit of the oil if you want an extra kick of flavor.
- Angel Hair Pasta: 8 oz
- Alternative: Spaghetti or bucatini can be used instead. Note that these might require a slightly longer cooking time to reach al dente.
- Parmesan Cheese: 1/3 cup, grated
- Optional – Cream Cheese: 2 tablespoons, softened (for extra creaminess)
Seasonings
- Italian Seasoning: 1 teaspoon
- Freshly Cracked Black Pepper: 1/2 teaspoon
- Salt: 1/4 teaspoon
- Optional – Red Pepper Flakes: 1/2 teaspoon (for a touch of heat)
Step-by-Step Instructions
Let’s break down the cooking process into easy-to-follow, manageable steps:
- Prep Your Skillet:Begin by placing a large skillet on the stove over medium-low heat. Add 3 tablespoons of butter and 3 minced garlic cloves to the pan. Allow the butter to melt completely, and let the garlic sauté for about 1 minute until it becomes fragrant. Keep an eye on it to ensure it doesn’t burn—this is key for achieving a rich, savory base.
- Build the Flavor Base:Once the garlic is aromatic, pour in 2 cups of chicken stock (or your chosen broth). Add your drained 8 oz jar of sun-dried tomatoes along with the Italian seasoning, cracked black pepper, and salt. If you’re using red pepper flakes for an extra kick, add them now. Stir gently to combine all these flavors.
- Incorporate the Creaminess:Slowly pour in 1/2 cup of half and half (or whole milk) into the skillet. Stir continuously as you do this to ensure the liquid blends seamlessly with the stock and seasonings. Bring the mixture to a gentle boil—this will form the flavorful sauce that will envelop your pasta.
- Add the Pasta:Now, it’s time to introduce the star of the show—the pasta. Lay 8 oz of angel hair pasta into the skillet. Let it sit undisturbed for about 30 seconds so that it begins to soften and bend, making it easier to submerge fully into the liquid. Carefully maneuver the pasta into the sauce without breaking it. It’s perfectly fine if a few strands don’t immediately sink; they will soften as the dish continues to cook.
- Cook the Pasta:Allow the pasta to cook in the simmering liquid for about 5 minutes. During this time, the pasta will absorb the rich flavors of the broth, tomatoes, and seasonings. After 5 minutes, reduce the heat to a low simmer. If you’re opting for extra creaminess, now is the moment to add 2 tablespoons of softened cream cheese. Stir it in until it melts completely, enhancing the sauce’s texture.
- Finish to Perfection:Continue cooking the pasta until it reaches an al dente texture—tender with a slight bite in the center. This usually takes just a few more minutes. Once the pasta is perfectly cooked, sprinkle 1/3 cup of grated Parmesan cheese over the top. Taste the dish and add a bit more salt and pepper if necessary. If you notice that the pasta has absorbed too much liquid and the sauce seems too thick, add a splash more chicken stock or half and half to achieve the desired consistency.
Beginner Tips and Notes
Cooking for the first time (or even as a seasoned beginner) can sometimes be a little intimidating. Here are some tips and troubleshooting advice to help you along the way:
- Ingredient Prep:Always have all your ingredients measured and prepped before you start cooking. This “mise en place” practice not only makes the process smoother but also minimizes the risk of missing an ingredient.
- Temperature Control:Keeping the heat at medium-low is essential in this recipe. High heat can cause the garlic to burn, turning it bitter. A gentle, controlled heat ensures that your butter and garlic create a perfect base.
- Pasta Submersion:When adding the pasta, be gentle. Angel hair pasta is delicate, and you don’t want to break it into too many pieces. If using sturdier pasta types like spaghetti or bucatini, you may need to allow an extra minute or two for the pasta to cook fully.
- Consistency Adjustments:Don’t worry if the sauce seems too thick or too thin. The pasta will absorb liquid as it cooks. Keep an extra bit of chicken stock or half and half on hand to adjust the sauce consistency as needed.
- Flavor Boosters:The optional cream cheese is a great addition if you’re looking for a richer, creamier sauce. Similarly, if you love a bit of spice, the red pepper flakes can transform the dish with a subtle heat. Feel free to experiment with these optional ingredients to suit your personal taste.
- Pan Selection:Using a non-stick skillet can help prevent the pasta from sticking and make the stirring process easier. However, if you prefer a stainless-steel pan, just be sure to keep stirring to avoid any sticking or burning.
- Troubleshooting Overcooked Pasta:If you find that your pasta is absorbing too much liquid and overcooking, simply add a bit more broth to keep it in check. Always aim for that perfect “al dente” texture, as overcooked pasta can lose its charm and become mushy.
- Kitchen Efficiency:Multi-tasking in the kitchen can seem daunting. Use the time while the pasta cooks to prepare any complementary sides or to clean up as you go. This not only keeps your workspace tidy but also helps you feel more in control of the process.

Serving Suggestions
Now that your One-Pan Sun-Dried Tomato Pasta is ready, here are some creative ideas for serving and enjoying your meal:
- Complementary Sides:Pair your pasta with a crisp green salad drizzled with a light vinaigrette. The fresh, tangy notes of a salad balance the rich, creamy pasta beautifully. Garlic bread or a slice of crusty artisan bread is also a wonderful side—perfect for soaking up any extra sauce.
- Garnishing:For an added burst of flavor and a pop of color, sprinkle a few fresh basil leaves or a drizzle of extra virgin olive oil over the finished dish. A little lemon zest can also brighten the flavors even further.
- Sauce Variations:If you’d like to switch things up, consider serving the pasta with a side of marinara sauce or pesto. These can be mixed in for a different flavor profile and offer a fun twist to the standard recipe.
- Leftover Storage:Should you have any leftovers (if that’s even possible with something this good!), store them in an airtight container in the refrigerator for up to 2 days. To reheat, simply add a splash of chicken stock or half and half to rehydrate the pasta before microwaving or warming it on the stovetop over low heat. Stir occasionally to ensure even heating.
- Customization:Feel free to add your favorite veggies such as spinach, mushrooms, or even cherry tomatoes during the cooking process. Simply toss them in along with the garlic for an extra layer of nutrition and flavor. This recipe is wonderfully versatile—make it your own!
Conclusion: Let’s Get Cooking!
Cooking is a journey, and every great recipe starts with that first step. This One-Pan Sun-Dried Tomato Pasta is more than just a meal; it’s an invitation to explore your culinary creativity with ease. Its simplicity, quick preparation, and bold flavors make it an ideal choice for beginners. Remember, every chef starts somewhere, and the kitchen is a place to experiment, learn, and enjoy the process.
I encourage you to try this recipe on your next busy night. Whether you’re cooking for yourself, your family, or hosting friends, this dish is sure to impress without overwhelming you. Share your experience, your tweaks, or even your questions in the comments below—I’d love to hear how you made this recipe your own!
Happy cooking, and may your kitchen adventures be filled with flavor, fun, and a dash of creativity.