
It was a rainy afternoon the first time I made lemon meringue anything. I had a few eggs, some sugar, and an unexpected craving for something bright and sweet. What I didn’t have? A pie crust, time to spare, or much baking experience. What came out of that rainy-day improvisation was a delightful surprise—small, crisp meringue nests filled with luscious, tangy lemon curd. These Lemon Meringue Pie Bites were born out of curiosity and constraint, and they’ve since become one of my favorite go-to treats for birthdays, baby showers, or just because.
Print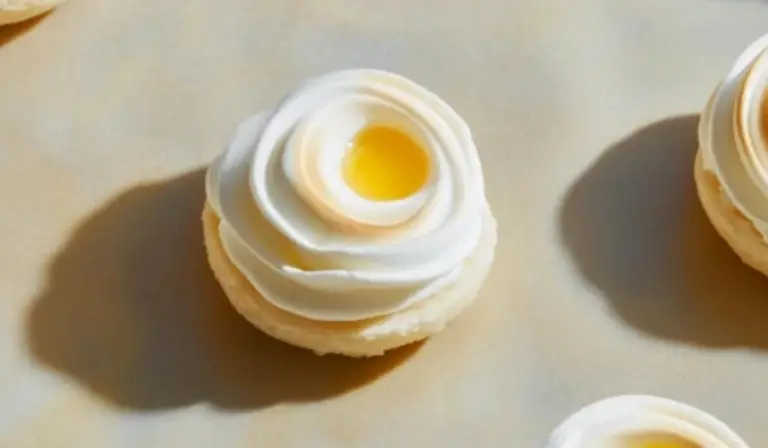
Mini Sunshine in Every Bite: Lemon Meringue Pie Bites for Beginners
Bright, zesty lemon filling and pillowy meringue in cute bite-sized form—these mini pies are like sunshine in every bite! Perfect for beginners and party platters! ☀️🥧🍋
- Total Time: 2 hours
- Yield: 45 pie bites 1x
Ingredients
Meringue Nests
- 4 large egg whites (at room temperature)
- ½ teaspoon cream of tartar
- 1 cup granulated sugar
Optional equipment: Stand mixer or hand mixer, piping bag with star tip (Wilton #21 recommended), parchment paper or silicone baking mats
Lemon Curd Filling
- 2 cups of lemon curd
You can use store-bought lemon curd for convenience, or make your own. If making from scratch, Ina Garten’s lemon curd recipe is a solid, reliable choice. It includes egg yolks, sugar, lemon zest, lemon juice, and butter. Details for a simple lemon curd recipe are available at the end of this guide.
Substitutions & Add-ons:
- Egg whites: Use carton egg whites only if they’re labeled for whipping.
- Cream of tartar: Helps stabilize meringue; substitute with 1 teaspoon lemon juice or white vinegar if needed.
- Sugar: White granulated sugar works best for structure. Avoid coarse or raw sugars.
- Lemon curd: Try a lime, orange, or passion fruit curd for a twist.
Instructions
Step 1: Preheat and Prepare
Preheat your oven to 300°F. Line two baking sheets with parchment paper or silicone mats. This helps the delicate meringue nests release easily once baked.
Step 2: Whip the Egg Whites
Place your egg whites into a clean, dry mixing bowl. Any trace of yolk or oil can prevent proper whipping, so make sure your tools are spotless.
Using a stand or hand mixer on high speed, beat the egg whites until they’re frothy and form soft peaks. This takes about 1–2 minutes. You’ll know you’ve hit soft peaks when you lift the beater and the tips of the whites droop slightly instead of standing straight up.
Step 3: Stabilize and Sweeten
Add cream of tartar to the whipped egg whites. Then, begin adding sugar one tablespoon at a time while continuing to beat on high speed. This process should take 5–10 minutes. Take your time; adding sugar slowly ensures it fully dissolves and stabilizes the structure.
You’ll know the meringue is ready when it forms stiff peaks—lift the beater, and the peaks should hold their shape and not collapse. The mixture should look glossy and thick.
Step 4: Pipe the Nests
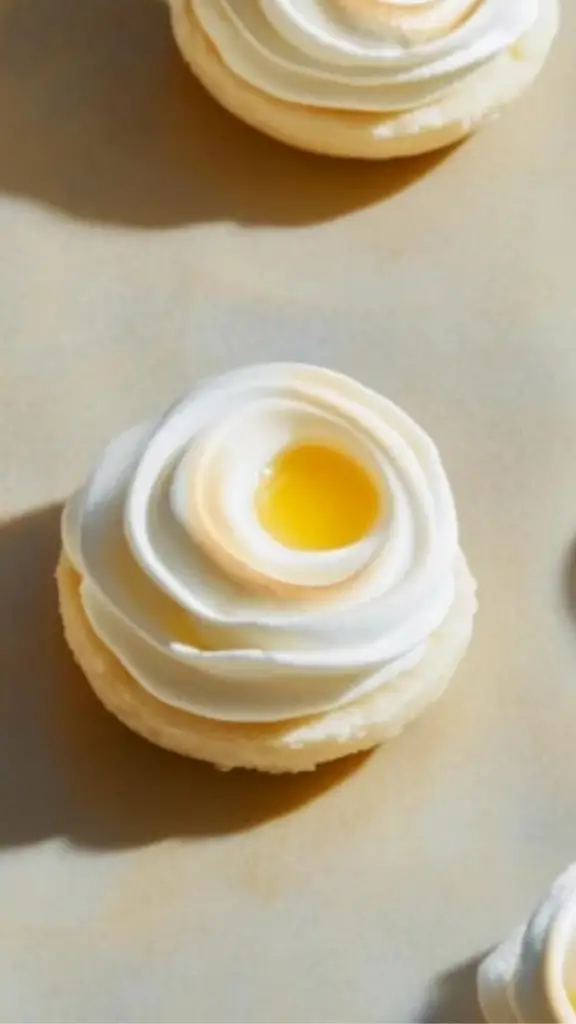
Spoon the meringue into a piping bag fitted with a star tip (Wilton #21 or similar). Pipe 3–5 cm wide circles onto your prepared baking sheets. Then, without lifting the piping tip, pipe a second and third layer around the edge to create a nest with a hollow center.
If you don’t have a piping bag, you can spoon dollops of meringue and shape them into nests with the back of a spoon.
Step 5: Bake Low and Slow
Bake the nests for 10 minutes at 300°F, then reduce the temperature to 250°F and bake for an additional 10–20 minutes. They should feel firm and dry to the touch with only a faint golden hue. Turn the oven off, crack the oven door slightly, and let the nests cool inside for at least an hour. This helps them finish drying out without cracking from temperature shock.
Step 6: Fill with Lemon Curd
Once the meringue nests are fully cooled, spoon lemon curd into the center of each one. Be generous, but don’t overfill. The contrast of the airy meringue and the rich, tangy curd is what makes each bite magical.
If not serving immediately, keep meringue nests and lemon curd stored separately. Assemble just before serving to maintain texture.
Notes
1. Be Patient with Meringue
Getting to stiff peaks takes time. Don’t rush the sugar—add it slowly, and give the mixer time to fully whip the whites. If you’re not sure you’ve reached stiff peaks, stop the mixer, lift the beaters, and check: the peak should hold its shape and not droop.
2. How to Fix Weepy Meringue
If your meringue turns grainy or weeps liquid, it’s often due to over-whipping or undissolved sugar. Next time, beat on slightly lower speed and test by rubbing a little meringue between your fingers to make sure it’s smooth.
3. Don’t Be Intimidated by Lemon Curd
If making your own lemon curd, you might panic when it looks curdled halfway through cooking. This is normal. Keep stirring over medium heat—it will smooth out as it thickens. Aim for a temperature of 170°F or until it coats the back of a spoon.
4. Room Temperature Egg Whites Whip Better
Cold egg whites are more stable but slower to whip. For best results, separate your eggs cold from the fridge, then let the whites sit at room temperature for 30 minutes before using.
5. Prep Ahead
You can make the meringue nests a day or two in advance and store them in an airtight container at room temperature. Lemon curd can also be made in advance and stored in the fridge for up to a week.
- Prep Time: 30 minutes
- Cook Time: 1 hour 30 minutes
If you’re a beginner in the kitchen, this recipe is for you. It’s just four ingredients, gluten-free, and involves no pie crust rolling, kneading, or fussing. The hardest part is waiting for the meringues to bake and cool. They look elegant, taste incredible, and store beautifully if you plan ahead. Plus, these bites are a brilliant introduction to two techniques many find intimidating: making meringue and working with lemon curd.
Let’s make this easy, clear, and absolutely worth your time.
Ingredients and Preparation
These pie bites consist of two components: the meringue nests and the lemon curd filling. Both are simple when broken down with a little patience and the right tools.
Meringue Nests
- 4 large egg whites (at room temperature)
- ½ teaspoon cream of tartar
- 1 cup granulated sugar
Optional equipment: Stand mixer or hand mixer, piping bag with star tip (Wilton #21 recommended), parchment paper or silicone baking mats
Lemon Curd Filling
- 2 cups of lemon curd
You can use store-bought lemon curd for convenience, or make your own. If making from scratch, Ina Garten’s lemon curd recipe is a solid, reliable choice. It includes egg yolks, sugar, lemon zest, lemon juice, and butter. Details for a simple lemon curd recipe are available at the end of this guide.
Substitutions & Add-ons:
- Egg whites: Use carton egg whites only if they’re labeled for whipping.
- Cream of tartar: Helps stabilize meringue; substitute with 1 teaspoon lemon juice or white vinegar if needed.
- Sugar: White granulated sugar works best for structure. Avoid coarse or raw sugars.
- Lemon curd: Try a lime, orange, or passion fruit curd for a twist.
Step-by-Step Instructions
Step 1: Preheat and Prepare
Preheat your oven to 300°F. Line two baking sheets with parchment paper or silicone mats. This helps the delicate meringue nests release easily once baked.
Step 2: Whip the Egg Whites
Place your egg whites into a clean, dry mixing bowl. Any trace of yolk or oil can prevent proper whipping, so make sure your tools are spotless.
Using a stand or hand mixer on high speed, beat the egg whites until they’re frothy and form soft peaks. This takes about 1–2 minutes. You’ll know you’ve hit soft peaks when you lift the beater and the tips of the whites droop slightly instead of standing straight up.
Step 3: Stabilize and Sweeten
Add cream of tartar to the whipped egg whites. Then, begin adding sugar one tablespoon at a time while continuing to beat on high speed. This process should take 5–10 minutes. Take your time; adding sugar slowly ensures it fully dissolves and stabilizes the structure.
You’ll know the meringue is ready when it forms stiff peaks—lift the beater, and the peaks should hold their shape and not collapse. The mixture should look glossy and thick.
Step 4: Pipe the Nests
Spoon the meringue into a piping bag fitted with a star tip (Wilton #21 or similar). Pipe 3–5 cm wide circles onto your prepared baking sheets. Then, without lifting the piping tip, pipe a second and third layer around the edge to create a nest with a hollow center.
If you don’t have a piping bag, you can spoon dollops of meringue and shape them into nests with the back of a spoon.
Step 5: Bake Low and Slow
Bake the nests for 10 minutes at 300°F, then reduce the temperature to 250°F and bake for an additional 10–20 minutes. They should feel firm and dry to the touch with only a faint golden hue. Turn the oven off, crack the oven door slightly, and let the nests cool inside for at least an hour. This helps them finish drying out without cracking from temperature shock.
Step 6: Fill with Lemon Curd
Once the meringue nests are fully cooled, spoon lemon curd into the center of each one. Be generous, but don’t overfill. The contrast of the airy meringue and the rich, tangy curd is what makes each bite magical.
If not serving immediately, keep meringue nests and lemon curd stored separately. Assemble just before serving to maintain texture.
Beginner Tips and Notes
1. Be Patient with Meringue
Getting to stiff peaks takes time. Don’t rush the sugar—add it slowly, and give the mixer time to fully whip the whites. If you’re not sure you’ve reached stiff peaks, stop the mixer, lift the beaters, and check: the peak should hold its shape and not droop.
2. How to Fix Weepy Meringue
If your meringue turns grainy or weeps liquid, it’s often due to over-whipping or undissolved sugar. Next time, beat on slightly lower speed and test by rubbing a little meringue between your fingers to make sure it’s smooth.
3. Don’t Be Intimidated by Lemon Curd
If making your own lemon curd, you might panic when it looks curdled halfway through cooking. This is normal. Keep stirring over medium heat—it will smooth out as it thickens. Aim for a temperature of 170°F or until it coats the back of a spoon.
4. Room Temperature Egg Whites Whip Better
Cold egg whites are more stable but slower to whip. For best results, separate your eggs cold from the fridge, then let the whites sit at room temperature for 30 minutes before using.
5. Prep Ahead
You can make the meringue nests a day or two in advance and store them in an airtight container at room temperature. Lemon curd can also be made in advance and stored in the fridge for up to a week.
Serving Suggestions
These Lemon Meringue Pie Bites are perfect for brunches, showers, or as a light dessert at the end of a hearty meal. Here are a few ways to elevate or serve them:
- With Fresh Berries: Add a small raspberry or blueberry on top of each bite for a pop of color and texture.
- With Whipped Cream: A tiny dollop of unsweetened whipped cream next to the lemon curd adds creaminess.
- As Part of a Dessert Board: Pair with mini brownies, chocolate-covered fruit, or almond cookies for variety.
- Paired with Tea or Coffee: The brightness of the lemon pairs beautifully with a strong black tea or a light roast coffee.
- Make it a Mini Trifle: Crumble the meringue, layer with curd and whipped cream in a small glass for a twist on the presentation.
Leftover Storage: Store unfilled meringue nests in an airtight container for up to five days. Filled nests should be eaten within a day to avoid sogginess.
Engagement Features
So now it’s your turn—try making these Lemon Meringue Pie Bites and experience how just four simple ingredients can transform into something elegant, fun, and flavor-packed. Whether you’re prepping for a special event or simply testing your skills on a rainy afternoon, these are the kind of treats that bring joy in every bite.
If you give this recipe a go, let us know how it turned out. Did you try a citrus variation? Did you get creative with piping shapes? Drop your story in the comments or share a photo. We’d love to see how your kitchen adventure unfolds.