
There’s something special about the combination of fresh raspberries and creamy white chocolate nestled in a soft, buttery cookie. These Raspberry White Chocolate Cookies strike the perfect balance between tart and sweet, making them an irresistible treat for any occasion.
Print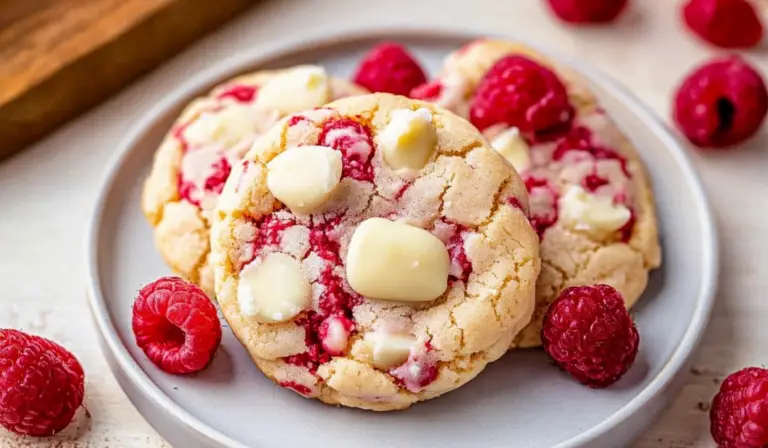
Mastering Raspberry White Chocolate Cookies: A Beginner’s Guide
Love the combination of fruity and creamy? These Raspberry White Chocolate Cookies are here to satisfy your cravings! Each bite is packed with juicy raspberries and rich white chocolate, making them soft, chewy, and absolutely irresistible. Plus, they’re so easy to make, even beginners can create a bakery-style treat in no time. Whether fresh from the oven or paired with a cup of coffee, these cookies are pure indulgence. Who’s ready to bake a batch of these beauties?
#EasyCookies #RaspberryLover #WhiteChocolateMagic #SimpleAndDelicious #SweetAndSoft #BakingMadeEasy #HomemadeTreats #CookieAddict #QuickDesserts #IrresistibleBites
- Total Time: 27 minutes
- Yield: 26 cookies 1x
Ingredients
- ⅔ cup salted butter, softened to room temperature (for richness and texture)
- ⅔ cup granulated sugar (for sweetness and crisp edges)
- ½ cup light brown sugar, packed (adds moisture and chewiness)
- 1 large egg (binds the ingredients together)
- 1 teaspoon almond extract (adds a subtle nutty aroma)
- 2 cups all-purpose flour (provides structure)
- 1 cup white chocolate chips (for creamy sweetness)
- 1 ⅓ cup frozen raspberries (for a tart contrast)
Instructions
1. Preheat the Oven and Prepare the Baking Sheets
Set your oven to 350°F (175°C). Line two large baking sheets with parchment paper to prevent sticking and ensure easy cleanup.
2. Cream the Butter and Sugars
In a large mixing bowl, use a hand mixer or stand mixer to beat together ⅔ cup softened butter, ⅔ cup granulated sugar, and ½ cup light brown sugar. Beat on medium speed until the mixture is light, fluffy, and fully combined (about 2 minutes). This step helps incorporate air into the dough, resulting in softer cookies.
3. Add the Egg and Almond Extract
Crack one large egg into the bowl and pour in 1 teaspoon almond extract. Beat until just combined. Overmixing at this stage can cause tougher cookies.
4. Incorporate the Flour
Gradually add 2 cups of all-purpose flour to the wet ingredients, mixing slowly until a dough forms. Stop mixing once the flour is fully incorporated to avoid overworking the dough. Overmixing can lead to dense, tough cookies.
5. Add the White Chocolate Chips
Stir in 1 cup white chocolate chips using a spoon or spatula rather than a mixer. This ensures even distribution without breaking the chocolate pieces.
6. Gently Fold in the Raspberries
Carefully fold in 1 ⅓ cup frozen raspberries. It’s best to do this step by hand to prevent crushing the berries. If using fresh raspberries, be extra delicate to maintain their shape.
7. Scoop and Arrange the Dough
Use a 1 ½ tablespoon cookie scoop or a spoon to form dough balls. Place them on the lined baking sheets, leaving about 1 ½ inches of space between each cookie to allow for spreading.
8. Bake One Tray at a Time
Bake the cookies for 14-17 minutes, or until the edges turn light golden brown. Baking one sheet at a time helps cookies bake evenly.
9. Cool Before Serving
Let the cookies rest on the baking sheet for 5 minutes before transferring them to a wire rack to cool completely. Enjoy them warm, or store them for later!
Notes
How to Prevent Common Cookie Mistakes
- Overmixing the Dough: Mix until ingredients are just combined. Overworking the dough makes cookies tough.
- Flat Cookies? Ensure your butter isn’t too soft or melted before mixing. Chilling the dough for 10-15 minutes before baking can help prevent excessive spreading.
- Dough Too Dry? If the dough feels crumbly, add 1 teaspoon of milk at a time until it comes together.
- Burning on the Bottom? Use parchment paper and avoid dark-colored baking sheets, which absorb more heat.
How to Tell When the Cookies Are Done
- The edges should be slightly golden brown.
- The centers should still look soft but set.
- The cookies will continue firming up as they cool.
- Prep Time: 10 minutes
- Cook Time: 17 minutes
As a beginner-friendly recipe, this is an ideal introduction to baking. The steps are simple, the ingredients are easy to find, and the process is quick—less than 30 minutes from start to finish. If you’ve never baked cookies from scratch before, this is a great place to start. You’ll learn the fundamentals of creaming butter and sugar, folding in ingredients gently, and achieving the perfect texture.
Plus, these cookies are perfect for customizing. You can adjust the sweetness, swap ingredients to suit your preferences, and even make small modifications to turn them into a completely different dessert. Let’s get started!
Ingredients and Preparation
Ingredients
Here’s what you’ll need to make these delicious cookies:
- ⅔ cup salted butter, softened to room temperature (for richness and texture)
- ⅔ cup granulated sugar (for sweetness and crisp edges)
- ½ cup light brown sugar, packed (adds moisture and chewiness)
- 1 large egg (binds the ingredients together)
- 1 teaspoon almond extract (adds a subtle nutty aroma)
- 2 cups all-purpose flour (provides structure)
- 1 cup white chocolate chips (for creamy sweetness)
- 1 ⅓ cup frozen raspberries (for a tart contrast)
Ingredient Substitutions
- Butter Alternatives: Unsalted butter with a pinch of salt or even plant-based butter for a dairy-free option.
- Almond Extract Swap: If you don’t have almond extract, vanilla extract works well.
- Flour Variations: Gluten-free all-purpose flour can be used for a gluten-free version.
- Chocolate Options: Swap white chocolate chips for milk or dark chocolate if you prefer a deeper chocolate flavor.
- Fresh vs. Frozen Raspberries: Frozen raspberries hold their shape better in the dough, but fresh raspberries can also work. Just be extra gentle when mixing.
Step-by-Step Instructions
1. Preheat the Oven and Prepare the Baking Sheets
Set your oven to 350°F (175°C). Line two large baking sheets with parchment paper to prevent sticking and ensure easy cleanup.
2. Cream the Butter and Sugars
In a large mixing bowl, use a hand mixer or stand mixer to beat together ⅔ cup softened butter, ⅔ cup granulated sugar, and ½ cup light brown sugar. Beat on medium speed until the mixture is light, fluffy, and fully combined (about 2 minutes). This step helps incorporate air into the dough, resulting in softer cookies.
3. Add the Egg and Almond Extract
Crack one large egg into the bowl and pour in 1 teaspoon almond extract. Beat until just combined. Overmixing at this stage can cause tougher cookies.
4. Incorporate the Flour
Gradually add 2 cups of all-purpose flour to the wet ingredients, mixing slowly until a dough forms. Stop mixing once the flour is fully incorporated to avoid overworking the dough. Overmixing can lead to dense, tough cookies.
5. Add the White Chocolate Chips
Stir in 1 cup white chocolate chips using a spoon or spatula rather than a mixer. This ensures even distribution without breaking the chocolate pieces.
6. Gently Fold in the Raspberries
Carefully fold in 1 ⅓ cup frozen raspberries. It’s best to do this step by hand to prevent crushing the berries. If using fresh raspberries, be extra delicate to maintain their shape.
7. Scoop and Arrange the Dough
Use a 1 ½ tablespoon cookie scoop or a spoon to form dough balls. Place them on the lined baking sheets, leaving about 1 ½ inches of space between each cookie to allow for spreading.
8. Bake One Tray at a Time
Bake the cookies for 14-17 minutes, or until the edges turn light golden brown. Baking one sheet at a time helps cookies bake evenly.
9. Cool Before Serving
Let the cookies rest on the baking sheet for 5 minutes before transferring them to a wire rack to cool completely. Enjoy them warm, or store them for later!
Beginner Tips and Notes
How to Prevent Common Cookie Mistakes
- Overmixing the Dough: Mix until ingredients are just combined. Overworking the dough makes cookies tough.
- Flat Cookies? Ensure your butter isn’t too soft or melted before mixing. Chilling the dough for 10-15 minutes before baking can help prevent excessive spreading.
- Dough Too Dry? If the dough feels crumbly, add 1 teaspoon of milk at a time until it comes together.
- Burning on the Bottom? Use parchment paper and avoid dark-colored baking sheets, which absorb more heat.
How to Tell When the Cookies Are Done
- The edges should be slightly golden brown.
- The centers should still look soft but set.
- The cookies will continue firming up as they cool.

Serving Suggestions
Pairing Ideas
These cookies taste great on their own but can be even better with:
- A Glass of Cold Milk: The perfect classic pairing.
- Vanilla Ice Cream: Create a cookie sandwich with a scoop of ice cream between two cookies.
- Drizzle of Dark Chocolate: Adds an extra layer of richness.
Storage Tips
- Room Temperature: Store cookies in an airtight container for up to 5 days.
- Freezing: Freeze baked cookies for up to 3 months. When ready to eat, let them thaw at room temperature.
- Freezing Cookie Dough: Scoop dough into balls, freeze on a tray, then store in a freezer-safe bag for up to 3 months. Bake directly from frozen, adding 1-2 extra minutes.
Conclusion: Bake with Confidence
Baking Raspberry White Chocolate Cookies is an easy and rewarding experience, even for beginners. This recipe teaches essential baking techniques while allowing room for creativity and personalization. Whether you’re making them for a special occasion or just as a sweet treat, these cookies are sure to impress.
Now it’s your turn! Try the recipe, experiment with variations, and share your experience. What did you love about these cookies? Do you have a favorite twist? Let us know in the comments and keep baking with confidence!