Few desserts offer the visual charm and indulgent taste that marble cupcakes bring to the table. With their delicate swirl of dark and white chocolate batters, these black and white cupcakes strike the perfect balance between aesthetic elegance and satisfying flavor. Originally a European innovation, the marbling technique has become a beloved method in kitchens worldwide. It’s a simple yet sophisticated way to elevate an ordinary cupcake into something truly special. Whether you’re preparing for a celebration, surprising guests, or treating yourself to a weekend baking project, this recipe is approachable, rewarding, and guaranteed to impress.
These marble cupcakes combine the deep richness of dark chocolate with the creamy sweetness of white chocolate, offering layers of taste and texture in every bite. And thanks to the marbling method, no two cupcakes look exactly the same—each one is a little edible work of art. Even if you’re a beginner baker, this guide will walk you through each step with clarity, helping you create bakery-quality results at home. Let’s get started.
Ingredients and Preparation
For the Cupcakes
- 1 cup (125g) all-purpose flour
- 1/2 cup (100g) granulated sugar
- 1/4 cup (25g) cocoa powder (used for chocolate-only batter option)
- 1/2 teaspoon baking powder
- 1/2 teaspoon baking soda
- 1/4 teaspoon salt
- 1/2 cup (115g) unsalted butter, softened
- 2 large eggs
- 1/2 cup (120ml) buttermilk
- 1 teaspoon vanilla extract
- 1/4 cup (50g) melted dark chocolate
- 1/4 cup (50g) melted white chocolate
For the Frosting
- 1/2 cup (115g) unsalted butter, softened
- 1 to 2 tablespoons heavy cream or milk
- 1 teaspoon vanilla extract
- 1 1/2 cups (190g) powdered sugar
- 2 tablespoons cocoa powder
- 2 oz (55g) white chocolate, melted
- 2 oz (55g) dark chocolate, melted
These ingredients come together to form the foundation of both flavor and appearance. You can opt for a full chocolate base or embrace the visual and taste contrasts by creating a two-toned swirl.
Step-by-Step Instructions
1. Preheat the Oven
Set your oven to 350°F (175°C). Prepare a standard 12-cup muffin tin with cupcake liners. This step ensures your batter will bake evenly and the cupcakes won’t stick.
2. Prepare Dry Ingredients
In a medium bowl, whisk together the flour, sugar, baking powder, baking soda, and salt. Set this bowl aside while you prepare the wet mixture.
3. Mix the Wet Ingredients
In a large mixing bowl, beat the softened butter until creamy using a hand mixer or stand mixer. Add the eggs one at a time, mixing thoroughly after each addition. Stir in the vanilla extract.
4. Combine Wet and Dry Mixtures
Add the dry ingredients to the wet mixture in three batches, alternating with the buttermilk. Start and end with the dry mix. Mix just until combined to avoid overworking the batter, which can result in dense cupcakes.
5. Choose Your Batter Style
Option 1: All-Chocolate Base
- Add cocoa powder to the entire batter.
- Fold in the melted dark chocolate.
- This yields rich, uniform chocolate cupcakes.
Option 2: Marbled Chocolate and Vanilla Base
- Divide the batter evenly into two bowls.
- In one bowl, mix in the cocoa powder and melted dark chocolate.
- In the second, fold in the melted white chocolate.
- Spoon about a tablespoon of the dark batter into each liner, followed by a spoonful of the white batter.
- Use a toothpick or skewer to gently swirl the two batters together.
6. Bake
Place the muffin tin in the center rack of your oven. Bake for 18–20 minutes, or until a toothpick inserted in the center comes out clean. Let cupcakes cool in the tin for 5 minutes before transferring them to a wire rack to cool completely.
7. Make the Frosting
Beat softened butter until smooth and creamy. Gradually add powdered sugar and mix on low to avoid a sugar cloud. Divide the frosting evenly into two bowls.
- In one bowl, add cocoa powder and melted dark chocolate.
- In the other, add melted white chocolate and vanilla.
- Add milk or cream to each, one teaspoon at a time, until the frosting reaches a pipeable consistency.
8. Frost the Cupcakes
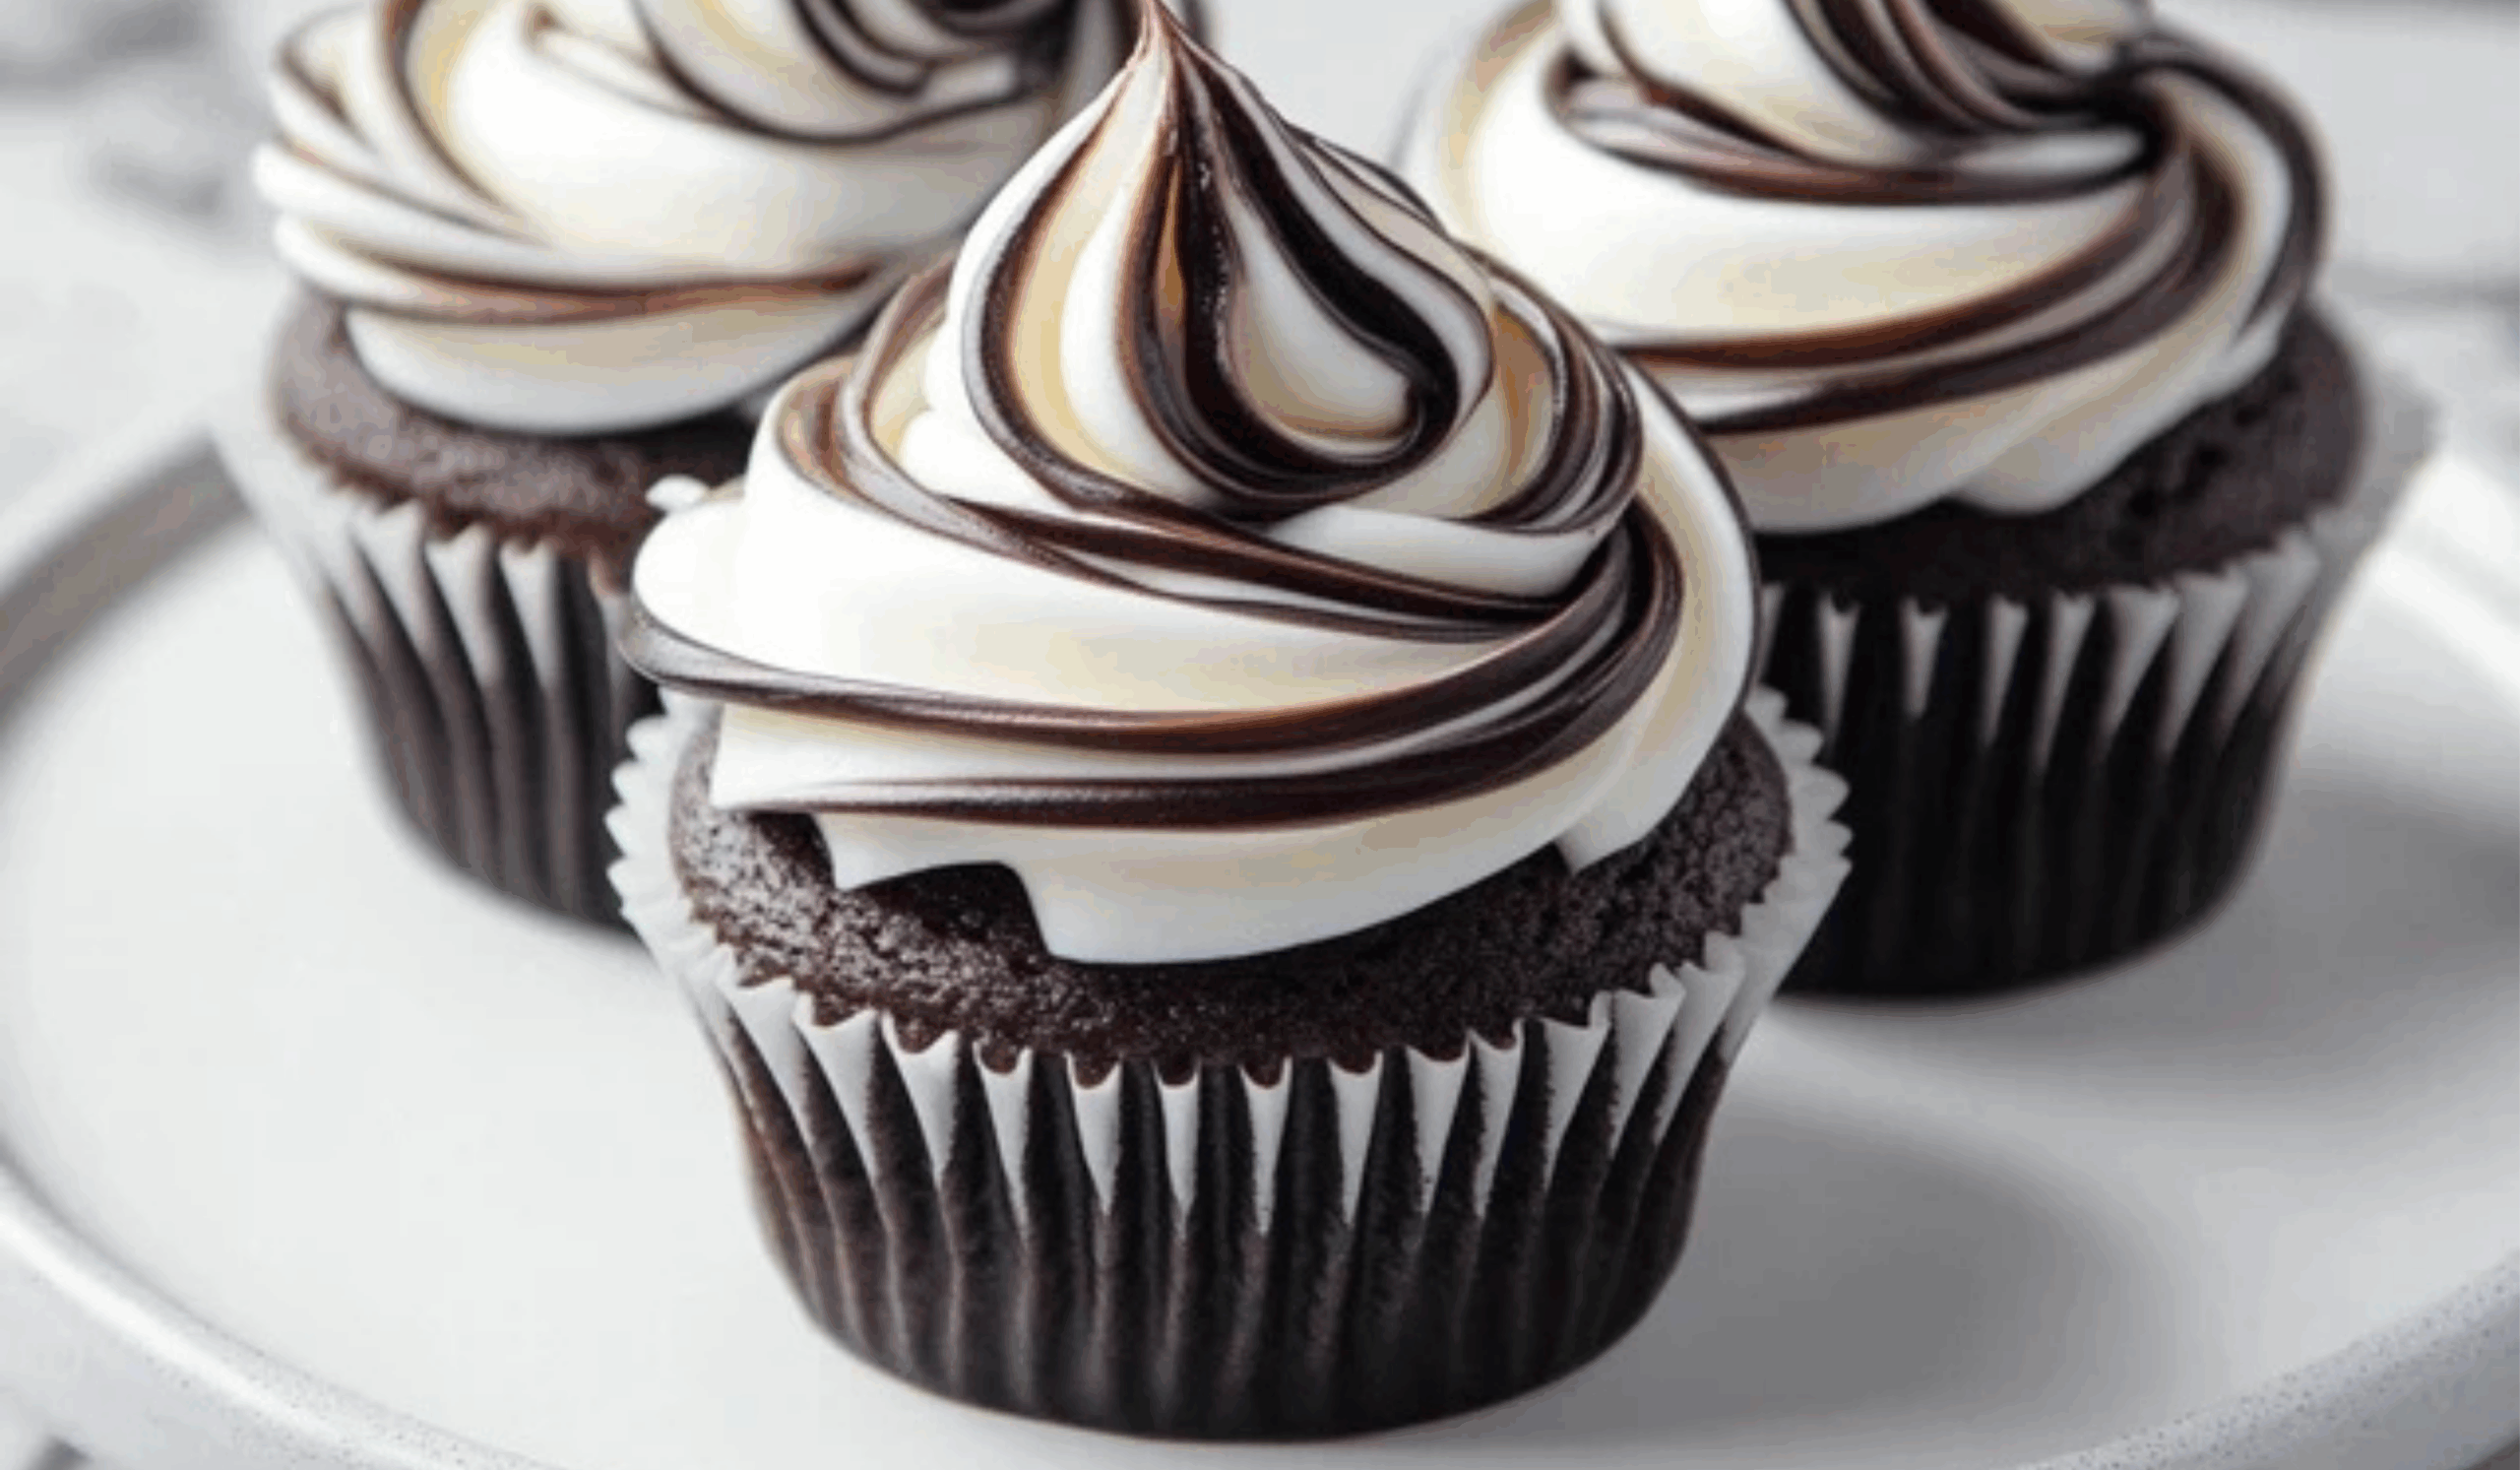
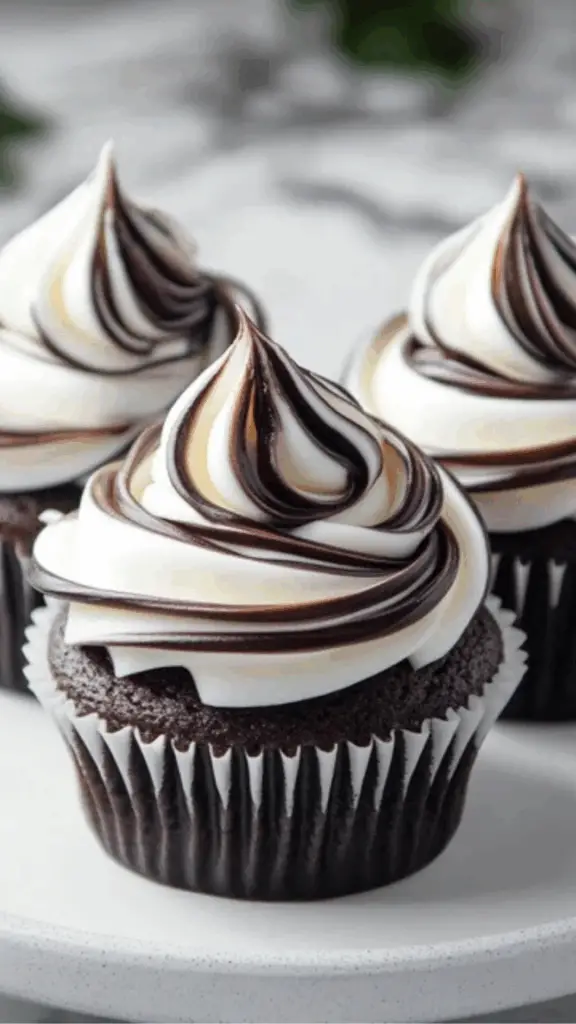
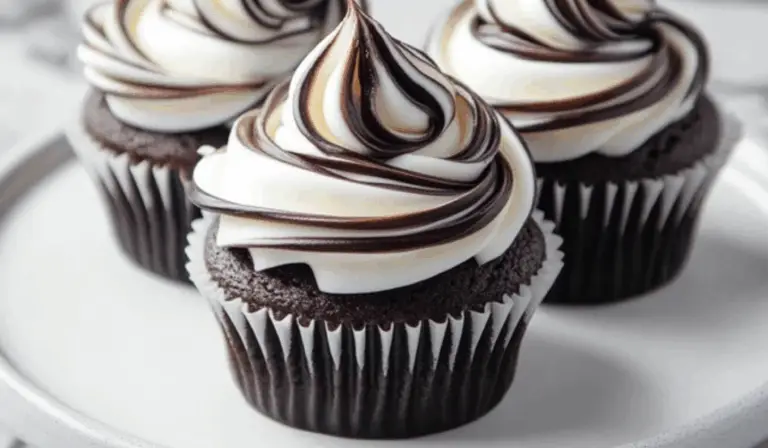
Prepare a piping bag fitted with a large star tip. To create a marbled frosting effect, fill one side of the bag with dark chocolate frosting and the other side with white chocolate frosting. Pipe a swirl onto each cupcake. Each cupcake will have its own unique design.
9. Optional Decoration
For a finishing touch, lightly dust with edible gold flakes or a small amount of pearl powder. This adds elegance and a subtle shimmer, perfect for special occasions.
Beginner Tips and Notes
Don’t Overmix the Batter
When combining wet and dry ingredients, mix only until the flour disappears. Overmixing leads to dense, chewy cupcakes rather than soft and fluffy ones.
Room Temperature Ingredients Matter
Use room-temperature butter, eggs, and buttermilk. This helps everything emulsify smoothly, creating a consistent batter that rises evenly.
Perfecting the Swirl
When swirling the two batters, go easy—just two or three figure-eight motions with a toothpick are enough. Too much mixing will blend the colors instead of marbling them.
Frosting Consistency Control
If the frosting is too thick to pipe, gradually add milk or cream. If too thin, add extra powdered sugar one tablespoon at a time.
High-Quality Chocolate
Using high-quality chocolate (both dark and white) will significantly enhance the flavor. Try to avoid baking chocolate chips, as they can be waxy and less flavorful than couverture chocolate or high-grade bars.
Marble Black and White Cupcakes: A Stunning Swirl of Chocolate Delight
Swirls of sweet perfection await! 🖤🤍 These Marble Black and White Cupcakes combine the best of both worlds — velvety vanilla and deep chocolate in one delicious bite. 🧁🍫 Perfect for beginner bakers, this easy recipe delivers big flavor with beautiful results. 💫 Top with your favorite frosting and you’ve got a treat that’s both classic and fun! 🎉 Whether for dessert tables or sweet cravings, these cupcakes always steal the show! 😍🍴
- Total Time: 40 minutes
- Yield: 12 cupcakes 1x
Ingredients
For the Cupcakes
-
1 cup (125g) all-purpose flour
-
1/2 cup (100g) granulated sugar
-
1/4 cup (25g) cocoa powder (used for chocolate-only batter option)
-
1/2 teaspoon baking powder
-
1/2 teaspoon baking soda
-
1/4 teaspoon salt
-
1/2 cup (115g) unsalted butter, softened
-
2 large eggs
-
1/2 cup (120ml) buttermilk
-
1 teaspoon vanilla extract
-
1/4 cup (50g) melted dark chocolate
-
1/4 cup (50g) melted white chocolate
For the Frosting
-
1/2 cup (115g) unsalted butter, softened
-
1 to 2 tablespoons heavy cream or milk
-
1 teaspoon vanilla extract
-
1 1/2 cups (190g) powdered sugar
-
2 tablespoons cocoa powder
-
2 oz (55g) white chocolate, melted
-
2 oz (55g) dark chocolate, melted
These ingredients come together to form the foundation of both flavor and appearance. You can opt for a full chocolate base or embrace the visual and taste contrasts by creating a two-toned swirl.
Instructions
1. Preheat the Oven
Set your oven to 350°F (175°C). Prepare a standard 12-cup muffin tin with cupcake liners. This step ensures your batter will bake evenly and the cupcakes won’t stick.
2. Prepare Dry Ingredients
In a medium bowl, whisk together the flour, sugar, baking powder, baking soda, and salt. Set this bowl aside while you prepare the wet mixture.
3. Mix the Wet Ingredients
In a large mixing bowl, beat the softened butter until creamy using a hand mixer or stand mixer. Add the eggs one at a time, mixing thoroughly after each addition. Stir in the vanilla extract.
4. Combine Wet and Dry Mixtures
Add the dry ingredients to the wet mixture in three batches, alternating with the buttermilk. Start and end with the dry mix. Mix just until combined to avoid overworking the batter, which can result in dense cupcakes.
5. Choose Your Batter Style
Option 1: All-Chocolate Base
- Add cocoa powder to the entire batter.
- Fold in the melted dark chocolate.
- This yields rich, uniform chocolate cupcakes.
Option 2: Marbled Chocolate and Vanilla Base
- Divide the batter evenly into two bowls.
- In one bowl, mix in the cocoa powder and melted dark chocolate.
- In the second, fold in the melted white chocolate.
- Spoon about a tablespoon of the dark batter into each liner, followed by a spoonful of the white batter.
- Use a toothpick or skewer to gently swirl the two batters together.
6. Bake
Place the muffin tin in the center rack of your oven. Bake for 18–20 minutes, or until a toothpick inserted in the center comes out clean. Let cupcakes cool in the tin for 5 minutes before transferring them to a wire rack to cool completely.
7. Make the Frosting
Beat softened butter until smooth and creamy. Gradually add powdered sugar and mix on low to avoid a sugar cloud. Divide the frosting evenly into two bowls.
- In one bowl, add cocoa powder and melted dark chocolate.
- In the other, add melted white chocolate and vanilla.
- Add milk or cream to each, one teaspoon at a time, until the frosting reaches a pipeable consistency.
8. Frost the Cupcakes
Prepare a piping bag fitted with a large star tip. To create a marbled frosting effect, fill one side of the bag with dark chocolate frosting and the other side with white chocolate frosting. Pipe a swirl onto each cupcake. Each cupcake will have its own unique design.
9. Optional Decoration
For a finishing touch, lightly dust with edible gold flakes or a small amount of pearl powder. This adds elegance and a subtle shimmer, perfect for special occasions.
Notes
Don’t Overmix the Batter When combining wet and dry ingredients, mix only until the flour disappears. Overmixing leads to dense, chewy cupcakes rather than soft and fluffy ones.
Room Temperature Ingredients Matter Use room-temperature butter, eggs, and buttermilk. This helps everything emulsify smoothly, creating a consistent batter that rises evenly.
Perfecting the Swirl When swirling the two batters, go easy—just two or three figure-eight motions with a toothpick are enough. Too much mixing will blend the colors instead of marbling them.
Frosting Consistency Control If the frosting is too thick to pipe, gradually add milk or cream. If too thin, add extra powdered sugar one tablespoon at a time.
High-Quality Chocolate Using high-quality chocolate (both dark and white) will significantly enhance the flavor. Try to avoid baking chocolate chips, as they can be waxy and less flavorful than couverture chocolate or high-grade bars.
- Prep Time: 20 minutes
- Cook Time: 20 minutes
Serving Suggestions
These cupcakes are best enjoyed fresh the day they are made, but they can be stored at room temperature in an airtight container for up to three days. If you need to make them ahead of time, store unfrosted cupcakes in the refrigerator for up to a week. Allow them to come to room temperature before frosting and serving.
Marble cupcakes make excellent additions to dessert tables at birthdays, weddings, or baby showers. Serve them alongside a selection of other chocolate treats or pair them with fresh berries and a cup of tea or coffee.
For a more festive variation, consider using colored white chocolate in the frosting—for example, adding a tiny bit of pink food coloring to the white chocolate half of the frosting for a romantic twist.
Engagement Features
Customizable Flavors
Encourage readers to try a mocha variation by adding a teaspoon of instant coffee to the dark chocolate batter. For a more exotic twist, add a hint of orange zest or a few drops of peppermint extract to the white chocolate portion.
Dietary Swaps
This recipe can be adapted with dairy-free butter and plant-based milk to make it suitable for those avoiding dairy. You can also use gluten-free all-purpose flour blends to make the cupcakes gluten-free, though texture may vary slightly.
Try This Technique Elsewhere
The marbling technique used here isn’t just for cupcakes. Try applying it to loaf cakes, cheesecakes, or even pancakes for a fun, artistic effect.
Interactive Questions
- Have you tried a marbled frosting technique before?
- What’s your favorite flavor pairing with chocolate—raspberry, mint, or caramel?
- Would you prefer a white chocolate base with dark chocolate swirls?
Encourage readers to leave a comment or share photos of their results. It helps build community and inspires others to give it a try.