
Desserts have a magical way of bringing comfort and joy to the table, and among the most delightful of them is a layered dessert that combines creamy textures with bright, fruity flavors. Blueberry Cream Cheesecake Lasagna is one such indulgence—a no-bake treat that’s rich, refreshing, and beautifully layered to impress. Imagine a base of golden graham crackers or vanilla cookies layered with luscious cream cheese filling, blueberry pie topping, and a whipped topping that brings everything together into a light yet decadent finish. This dessert is perfect for gatherings, holidays, or anytime you want to serve something that looks impressive but is incredibly easy to assemble.

Originally inspired by the idea of dessert lasagnas—layered no-bake confections that mimic the stacked structure of savory lasagna—this version leans into fruity elegance with blueberries as the star. Whether you’re a beginner in the kitchen or a seasoned baker, this recipe is forgiving, flexible, and always a crowd-pleaser. Best of all, it doesn’t require the oven, making it ideal for warm weather or last-minute desserts. This version avoids pork, ham, or bacon, and is strictly vegetarian-friendly without compromising flavor or texture.
Ingredients and Preparation
Here is a breakdown of all the ingredients you will need for this recipe, along with some preparation notes.
For the crust:
- 1 package of golden Oreos or vanilla graham crackers (about 36 cookies)
- 6 tablespoons unsalted butter, melted
For the cream cheese layer:
- 8 ounces cream cheese, softened
- 1 cup powdered sugar
- 1 teaspoon vanilla extract
- 1 ½ cups whipped topping (like Cool Whip), thawed
For the pudding layer:
- 1 package (3.4 ounces) instant vanilla pudding mix
- 1 ½ cups cold milk
- 1 teaspoon lemon zest (optional, but enhances flavor)
For the blueberry topping:
- 1 can (21 ounces) blueberry pie filling
For the top layer:
- 1 ½ cups whipped topping
- Fresh blueberries (optional, for garnish)
- White chocolate shavings (optional, for garnish)
Preparation Notes:
- Make sure the cream cheese is softened before mixing—it should sit at room temperature for 30–45 minutes.
- Whipped topping should be thawed in the refrigerator, not at room temperature, to preserve its consistency.
- If using golden Oreos, remove the cream filling before crushing if you want a firmer crust.
- Use a 9×13-inch dish to build your layers—it offers the best ratio of crust to cream.
Step-by-Step Instructions
Step 1: Prepare the Crust Crush the cookies or graham crackers in a food processor until finely ground. Transfer to a mixing bowl and add melted butter. Stir until all crumbs are evenly moistened. Press the mixture into the bottom of a 9×13-inch baking dish to form a firm, even crust. Place it in the refrigerator for at least 10 minutes while preparing the next layer.
Step 2: Make the Cream Cheese Layer In a large mixing bowl, beat the softened cream cheese with powdered sugar and vanilla extract until smooth and fluffy. Fold in 1 ½ cups of whipped topping gently to create a light, mousse-like texture. Spread this layer evenly over the chilled crust, making sure to cover all edges. Return to the refrigerator while preparing the pudding.
Step 3: Mix the Pudding Layer In a clean bowl, whisk the instant vanilla pudding mix with cold milk until it thickens—about 2 minutes. Add the lemon zest if using. The mixture should be pourable but thick. Carefully spoon or spread the pudding over the cream cheese layer, smoothing it out with a spatula. Refrigerate for another 10–15 minutes to help it set.
Step 4: Add the Blueberry Layer Spoon the blueberry pie filling over the pudding layer. Use the back of a spoon to spread it gently, taking care not to disturb the layers underneath. Try to distribute the blueberries as evenly as possible for balanced flavor in each bite.
Step 5: Top with Whipped Layer Spread the remaining 1 ½ cups of whipped topping over the blueberry layer. You can swirl it gently for a decorative look or smooth it out flat. If desired, add fresh blueberries and white chocolate shavings on top for garnish. Cover with plastic wrap and refrigerate the entire dessert for at least 4 hours, or overnight for best results.
Beginner Tips and Notes
- Use stabilized whipped topping: Homemade whipped cream can be used but will not hold up as long as store-bought stabilized versions like Cool Whip.
- Chill between layers: Letting each layer chill before adding the next helps maintain the structure and prevents mixing of textures.
- Crust too soft? Add a tablespoon of granulated sugar to the crust mix to firm it up.
- Low-fat options: You can use reduced-fat cream cheese and sugar-free pudding, but the texture may be slightly different.
- Serving prep: For clean slices, chill the lasagna overnight and use a sharp knife dipped in hot water when cutting.
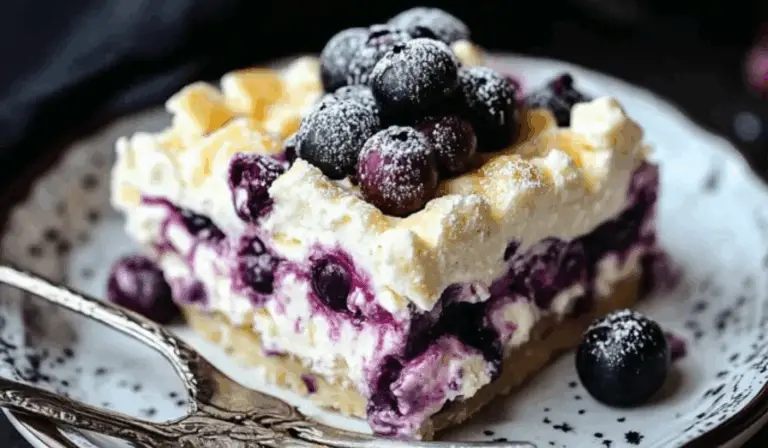
Blueberry Cream Cheesecake Lasagna
No oven? No problem! 🙌🫐 This Blueberry Cream Cheesecake Lasagna is a dreamy, no-bake dessert that’s layered with creamy cheesecake, juicy blueberries, and a graham cracker crust. 🍰💜 Beginner-approved and bursting with flavor, it’s the perfect make-ahead treat for gatherings or just a cozy night in. 🏡✨ Light, luscious, and refreshingly sweet — one bite and you’ll be obsessed! 😍🍇 Stack it, chill it, love it! Dessert just got a whole lot easier (and tastier)! 🎉🥄
- Total Time: 25 minutes
- Yield: 12 servings 1x
Ingredients
For the crust:
- 1 package of golden Oreos or vanilla graham crackers (about 36 cookies)
- 6 tablespoons unsalted butter, melted
For the cream cheese layer:
- 8 ounces cream cheese, softened
- 1 cup powdered sugar
- 1 teaspoon vanilla extract
- 1 ½ cups whipped topping (like Cool Whip), thawed
For the pudding layer:
- 1 package (3.4 ounces) instant vanilla pudding mix
- 1 ½ cups cold milk
- 1 teaspoon lemon zest (optional, but enhances flavor)
For the blueberry topping:
- 1 can (21 ounces) blueberry pie filling
For the top layer:
- 1 ½ cups whipped topping
- Fresh blueberries (optional, for garnish)
- White chocolate shavings (optional, for garnish)
Instructions
Step 1: Prepare the Crust Crush the cookies or graham crackers in a food processor until finely ground. Transfer to a mixing bowl and add melted butter. Stir until all crumbs are evenly moistened. Press the mixture into the bottom of a 9×13-inch baking dish to form a firm, even crust. Place it in the refrigerator for at least 10 minutes while preparing the next layer.
Step 2: Make the Cream Cheese Layer In a large mixing bowl, beat the softened cream cheese with powdered sugar and vanilla extract until smooth and fluffy. Fold in 1 ½ cups of whipped topping gently to create a light, mousse-like texture. Spread this layer evenly over the chilled crust, making sure to cover all edges. Return to the refrigerator while preparing the pudding.
Step 3: Mix the Pudding Layer In a clean bowl, whisk the instant vanilla pudding mix with cold milk until it thickens—about 2 minutes. Add the lemon zest if using. The mixture should be pourable but thick. Carefully spoon or spread the pudding over the cream cheese layer, smoothing it out with a spatula. Refrigerate for another 10–15 minutes to help it set.
Step 4: Add the Blueberry Layer Spoon the blueberry pie filling over the pudding layer. Use the back of a spoon to spread it gently, taking care not to disturb the layers underneath. Try to distribute the blueberries as evenly as possible for balanced flavor in each bite.
Step 5: Top with Whipped Layer Spread the remaining 1 ½ cups of whipped topping over the blueberry layer. You can swirl it gently for a decorative look or smooth it out flat. If desired, add fresh blueberries and white chocolate shavings on top for garnish. Cover with plastic wrap and refrigerate the entire dessert for at least 4 hours, or overnight for best results.
Notes
- Use stabilized whipped topping: Homemade whipped cream can be used but will not hold up as long as store-bought stabilized versions like Cool Whip.
- Chill between layers: Letting each layer chill before adding the next helps maintain the structure and prevents mixing of textures.
- Crust too soft? Add a tablespoon of granulated sugar to the crust mix to firm it up.
- Low-fat options: You can use reduced-fat cream cheese and sugar-free pudding, but the texture may be slightly different.
- Serving prep: For clean slices, chill the lasagna overnight and use a sharp knife dipped in hot water when cutting.
- Prep Time: 25 minutes
Serving Suggestions
This Blueberry Cream Cheesecake Lasagna is best served chilled and works beautifully as a dessert centerpiece. Here are a few ways to serve it:
- Plated elegantly: Cut into neat squares and serve on white dessert plates with a few fresh blueberries on the side and a drizzle of extra blueberry sauce.
- Buffet-style: Place the entire tray on the dessert table with a large serving spatula for guests to serve themselves.
- Personal cups: For events or parties, layer the dessert in clear plastic cups or mason jars—making it easy to grab and go.
- Flavor variation: Substitute blueberry pie filling with strawberry, raspberry, or cherry pie filling for a seasonal twist.
Engagement Features
While the recipe is straightforward, it invites creativity. Here are a few engagement prompts and ideas:
- Customize it: What if you swapped the blueberry layer with peach or mango? Would you add crushed nuts to the crust for texture?
- Make it lighter: Have you tried this with Greek yogurt instead of cream cheese? How did it turn out?
- Layering challenge: Can you layer it in a tall trifle dish and create a visual showstopper for a party?
- Kid-friendly tip: Let children add the blueberries or help spread the whipped topping—they’ll enjoy making dessert as much as eating it.
- Reader challenge: Try creating a chocolate version using chocolate pudding, chocolate graham crackers, and cherry topping.
Let us know how your version turned out or what creative changes you made. Was this a hit at your gathering? Would you try this with different fruits? Feel free to share your own twist on this no-bake classic.