
Mango mousse is one of those desserts that feels luxurious yet is surprisingly simple to make. The creamy texture, combined with the natural sweetness of mango, creates a treat that is both refreshing and satisfying. For beginner cooks, this recipe is an excellent introduction to making desserts from scratch without the need for baking or complicated techniques.
Print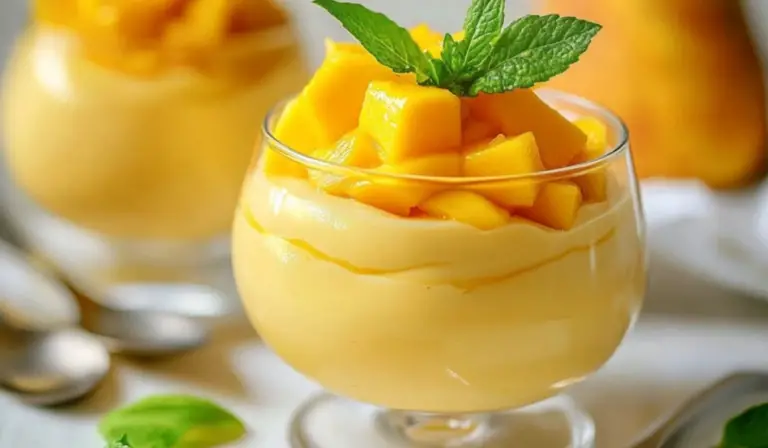
Easy Mango Mousse: A Delightful Dessert for Beginners
Light, creamy, and bursting with tropical mango flavor—this easy mango mousse is a dreamy dessert that comes together in minutes! Smooth, sweet, and perfect for any occasion! 🥭🍨✨
- Total Time: 2 hours 15 minutes
- Yield: 4 servings 1x
Ingredients
- 2 ripe mangoes, peeled and cubed
- 2 tablespoons honey, or to taste
- 1 cup heavy whipping cream
- Ripe mango slices, for serving
Instructions
Step 1: Blend the Mangoes
Start by adding the cubed mangoes and honey into a blender. Blend until smooth and creamy. If the mixture seems too thick, add one to two tablespoons of water or milk to help it blend smoothly. Taste the puree and adjust the sweetness if needed.
Step 2: Whip the Cream
In a large mixing bowl, pour in the chilled heavy whipping cream. Using an electric mixer, beat the cream on medium-high speed for about 3 to 5 minutes until stiff peaks form. This means when you lift the beaters, the cream should hold its shape without collapsing. Be careful not to overbeat, as this can turn the cream into butter.
Step 3: Fold the Mango Puree into the Whipped Cream
Using a rubber spatula, gently fold the mango puree into the whipped cream. Do this slowly to avoid deflating the cream. The goal is to create a smooth and airy mixture without losing the lightness of the whipped cream. Make sure everything is evenly combined.
Step 4: Chill the Mousse
Spoon the mousse into serving glasses or bowls. Place them in the refrigerator and chill for at least two hours, allowing the mousse to set. This step is crucial as it helps the flavors meld and the texture to firm up.
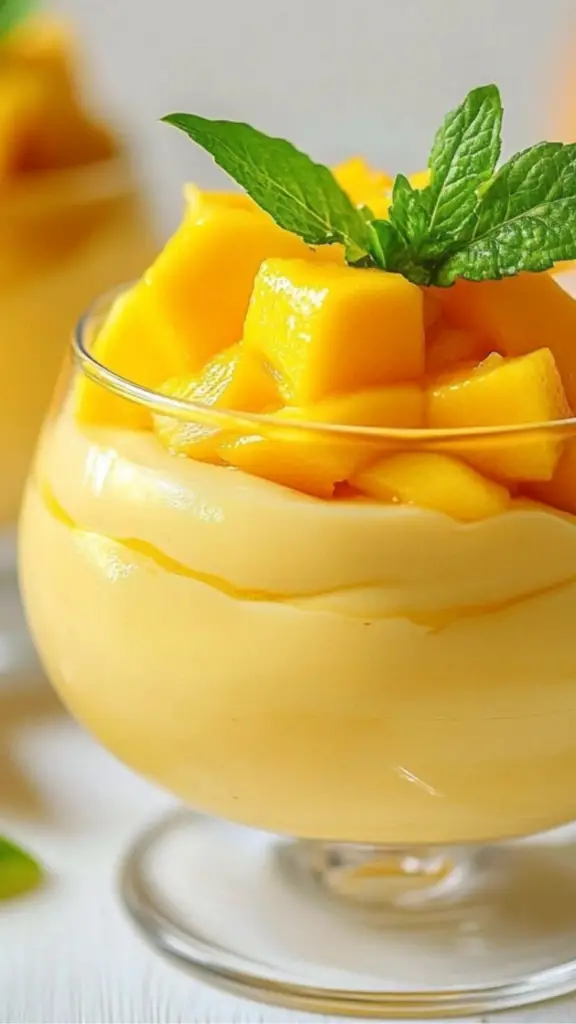
Step 5: Serve and Garnish
Before serving, garnish with fresh mango slices for an elegant presentation. You can also add a sprinkle of crushed nuts like almonds or pistachios for a bit of crunch.
Notes
Choosing the Right Mangoes
For the best flavor, use ripe and naturally sweet mangoes. Varieties like Ataulfo, Alphonso, or Haden work well due to their rich flavor and smooth texture. If using frozen mango, ensure it is fully thawed and drained to avoid excess water in the mousse.
How to Tell if Your Cream is Whipped Correctly
Beginners often wonder how to know when the cream is properly whipped. Here are some key signs:
- The cream should be thick and hold its shape when you lift the beaters.
- If it looks soft and droopy, it needs more whipping.
- If it turns grainy or starts separating, it has been overwhipped. If this happens, add a small amount of unwhipped cream and gently fold it in to restore the smooth texture.
What to Do If the Mousse is Too Runny
If your mousse turns out too runny, it could be due to:
- Overmixing the mango puree and whipped cream, which deflates the airiness.
- Using warm cream instead of chilled cream, preventing it from whipping properly.
- Not chilling the mousse long enough. If it’s too soft, refrigerate for an additional hour or two until it firms up.
Storage Tips
Mango mousse can be stored in an airtight container in the refrigerator for up to 3-4 days. However, it is best enjoyed within two days for maximum freshness. Avoid freezing, as the texture may become grainy once thawed.
- Prep Time: 15 minutes
- Cook Time: 2 hours (chilling time)
I remember the first time I made mango mousse. It was during a summer gathering, and I wanted to impress my guests without spending hours in the kitchen. The result was a light, airy dessert that disappeared within minutes. Since then, it has become my go-to recipe whenever I want to make something special with minimal effort. This mango mousse is perfect for beginners because it requires only three ingredients, takes just 15 minutes to prepare, and delivers restaurant-quality results.
With a few simple steps, you can create a dessert that looks elegant and tastes like it took hours to make. The natural sweetness of ripe mangoes means you don’t need much added sugar, making this a healthier option compared to store-bought desserts. The best part is that no special equipment is required other than a blender and a hand mixer, making it accessible to anyone just starting out in the kitchen.
Ingredients and Preparation
To make this easy mango mousse, you need just three main ingredients. Each plays a crucial role in achieving the perfect texture and flavor.
Ingredients
- 2 ripe mangoes, peeled and cubed
- 2 tablespoons honey, or to taste
- 1 cup heavy whipping cream
- Ripe mango slices, for serving
Alternative Ingredients
- If fresh mangoes are unavailable, you can use frozen mango chunks. Just let them thaw before blending.
- Instead of honey, you can use maple syrup or powdered sugar as a sweetener. Adjust the amount based on the sweetness of your mangoes.
- For a dairy-free version, replace the heavy cream with chilled coconut cream. This will add a tropical flavor while keeping the mousse creamy.
Before you start, ensure your ingredients are properly prepared. The mangoes should be ripe and sweet, as underripe mangoes will result in a tart mousse. The whipping cream should be chilled, and for best results, chill your mixing bowl and beaters before whipping the cream.
Step-by-Step Instructions
Step 1: Blend the Mangoes
Start by adding the cubed mangoes and honey into a blender. Blend until smooth and creamy. If the mixture seems too thick, add one to two tablespoons of water or milk to help it blend smoothly. Taste the puree and adjust the sweetness if needed.
Step 2: Whip the Cream
In a large mixing bowl, pour in the chilled heavy whipping cream. Using an electric mixer, beat the cream on medium-high speed for about 3 to 5 minutes until stiff peaks form. This means when you lift the beaters, the cream should hold its shape without collapsing. Be careful not to overbeat, as this can turn the cream into butter.
Step 3: Fold the Mango Puree into the Whipped Cream
Using a rubber spatula, gently fold the mango puree into the whipped cream. Do this slowly to avoid deflating the cream. The goal is to create a smooth and airy mixture without losing the lightness of the whipped cream. Make sure everything is evenly combined.
Step 4: Chill the Mousse
Spoon the mousse into serving glasses or bowls. Place them in the refrigerator and chill for at least two hours, allowing the mousse to set. This step is crucial as it helps the flavors meld and the texture to firm up.
Step 5: Serve and Garnish
Before serving, garnish with fresh mango slices for an elegant presentation. You can also add a sprinkle of crushed nuts like almonds or pistachios for a bit of crunch.
Beginner Tips and Notes
Choosing the Right Mangoes
For the best flavor, use ripe and naturally sweet mangoes. Varieties like Ataulfo, Alphonso, or Haden work well due to their rich flavor and smooth texture. If using frozen mango, ensure it is fully thawed and drained to avoid excess water in the mousse.
How to Tell if Your Cream is Whipped Correctly
Beginners often wonder how to know when the cream is properly whipped. Here are some key signs:
- The cream should be thick and hold its shape when you lift the beaters.
- If it looks soft and droopy, it needs more whipping.
- If it turns grainy or starts separating, it has been overwhipped. If this happens, add a small amount of unwhipped cream and gently fold it in to restore the smooth texture.
What to Do If the Mousse is Too Runny
If your mousse turns out too runny, it could be due to:
- Overmixing the mango puree and whipped cream, which deflates the airiness.
- Using warm cream instead of chilled cream, preventing it from whipping properly.
- Not chilling the mousse long enough. If it’s too soft, refrigerate for an additional hour or two until it firms up.
Storage Tips
Mango mousse can be stored in an airtight container in the refrigerator for up to 3-4 days. However, it is best enjoyed within two days for maximum freshness. Avoid freezing, as the texture may become grainy once thawed.
Serving Suggestions
This mango mousse is delicious on its own, but you can elevate it further with a few additions.
Pairing with Other Desserts
- Serve alongside a slice of vanilla sponge cake or butter cookies for a delightful combination.
- Pair with a scoop of coconut or vanilla ice cream for an extra indulgent treat.
Toppings for Extra Texture
- Crushed nuts like pistachios, almonds, or cashews add a crunchy contrast to the mousse’s creaminess.
- Toasted coconut flakes enhance the tropical flavor.
- A drizzle of dark chocolate or caramel sauce adds a rich and decadent touch.
Refreshing Drink Pairings
- A cold glass of mango juice complements the mousse beautifully.
- For a more sophisticated pairing, serve with chilled iced tea or a mango smoothie.
Engagement Features
This easy mango mousse is perfect for both beginners and experienced cooks who want a quick, no-fuss dessert that looks as good as it tastes. The simplicity of the recipe makes it a great choice for family gatherings, summer parties, or even as a personal treat after a long day.
If you try this recipe, share your experience. Did you add any personal touches? Maybe a different topping or a creative serving idea? Let us know how it turned out. Cooking is all about experimenting and finding what works best for you.
This mango mousse proves that you don’t need complex techniques to create something delicious. It’s a reminder that great cooking starts with simple, high-quality ingredients and a little bit of patience. Whether you’re making it for yourself or serving it to guests, this mousse is sure to impress.