
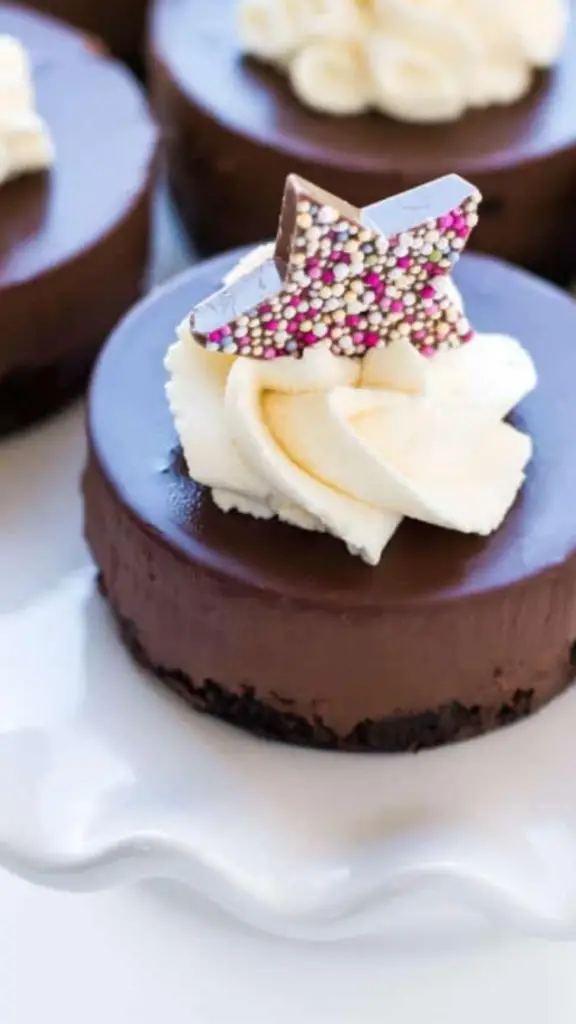
Imagine sinking your fork into a dessert that’s both luxuriously rich and delightfully simple to make. This Easy Chocolate Dessert combines the nostalgic crunch of Oreo cookies with the smooth, velvety texture of chocolate ganache, topped with a swirl of whipped cream that melts in your mouth. Whether you’re hosting a dinner party or treating yourself after a long day, this dessert is guaranteed to impress. With minimal ingredients and straightforward preparation, it’s perfect for both seasoned bakers and beginners.
Print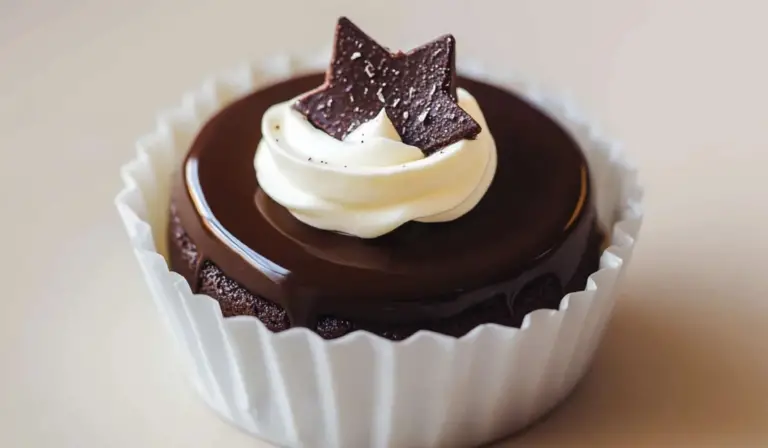
Easy Chocolate Dessert: A Delectable Indulgence for Every Occasion
- Total Time: 1 hour 15 minutes
- Yield: 12 servings 1x
Ingredients
For the Base:
- 20 Oreo Cookies (about 1½ cups crushed)
- 6 tablespoons butter, melted
For the Ganache:
- 12 oz semi-sweet chocolate (54% cocoa recommended, or dark chocolate for a less sweet option)
- 12 oz heavy cream
Optional Toppings:
- Whipped cream (homemade or store-bought)
- Decorative chocolate stars or sprinkles
Instructions
1. Prepare the Oreo Base
- Place the Oreo cookies in a food processor and blend until they turn into fine crumbs.
- If you don’t have a processor, place the cookies in a sealed ziplock bag and crush them with a rolling pin or mallet.
- In a bowl, combine the cookie crumbs with melted butter and mix until evenly moistened.
- Press the mixture firmly into the bottom of a 12-section mini cheesecake pan or an 8 to 9-inch springform pan to create an even base. Set aside.
2. Make the Ganache
- Heat the heavy cream in a small saucepan over medium heat until it’s hot but not boiling. Alternatively, you can use a microwave-safe bowl and heat the cream in short bursts.
- Place the chopped chocolate or chocolate chips in a medium mixing bowl.
- Pour the hot cream over the chocolate and whisk gently until the mixture is smooth and glossy.
3. Assemble the Dessert
- Pour the chocolate ganache evenly over the Oreo base, ensuring it spreads to the edges for a smooth finish.
- Cover the pan with plastic wrap and refrigerate. The dessert will need:
- 1 to 3 hours for mini cheesecake pans
- 6 to 8 hours for a full-sized springform pan
4. Add the Finishing Touches
- Once the ganache is set, remove the dessert from the refrigerator.
- Top with whipped cream. Homemade stabilized whipped cream works best, as it holds its shape for days. If using store-bought whipped cream, add it just before serving.
- For an extra touch, garnish with chocolate stars, sprinkles, or fresh berries.
Notes
- No Loose Base Pan?
- Spoon the cookie base into dessert glasses and pour the ganache over for an elegant, fuss-free presentation.
- Choosing the Right Chocolate:
- Opt for chocolate with around 54.5% cacao for a balanced sweetness. Avoid milk chocolate as it may make the ganache overly sweet.
- Handling the Cream:
- Be cautious not to boil the cream, as overheating can cause the ganache to separate.
- Make It Ahead:
- This dessert can be made a day in advance, making it a convenient option for entertaining.
- Storing Leftovers:
- Cover and refrigerate leftovers for up to 3 days. The whipped cream may lose its shape over time, so consider adding it fresh.
- Prep Time: 15 minutes
- Cook Time: 5 minutes
Let’s dive into everything you need to know about making this show-stopping dessert—from ingredients and step-by-step instructions to tips for customization and serving suggestions.
Ingredients: The Building Blocks of Bliss
For the Base:
- 20 Oreo Cookies (about 1½ cups crushed)
- 6 tablespoons butter, melted
For the Ganache:
- 12 oz semi-sweet chocolate (54% cocoa recommended, or dark chocolate for a less sweet option)
- 12 oz heavy cream
Optional Toppings:
- Whipped cream (homemade or store-bought)
- Decorative chocolate stars or sprinkles
Step-by-Step Instructions
1. Prepare the Oreo Base
- Place the Oreo cookies in a food processor and blend until they turn into fine crumbs.
- If you don’t have a processor, place the cookies in a sealed ziplock bag and crush them with a rolling pin or mallet.
- In a bowl, combine the cookie crumbs with melted butter and mix until evenly moistened.
- Press the mixture firmly into the bottom of a 12-section mini cheesecake pan or an 8 to 9-inch springform pan to create an even base. Set aside.
2. Make the Ganache
- Heat the heavy cream in a small saucepan over medium heat until it’s hot but not boiling. Alternatively, you can use a microwave-safe bowl and heat the cream in short bursts.
- Place the chopped chocolate or chocolate chips in a medium mixing bowl.
- Pour the hot cream over the chocolate and whisk gently until the mixture is smooth and glossy.
3. Assemble the Dessert
- Pour the chocolate ganache evenly over the Oreo base, ensuring it spreads to the edges for a smooth finish.
- Cover the pan with plastic wrap and refrigerate. The dessert will need:
- 1 to 3 hours for mini cheesecake pans
- 6 to 8 hours for a full-sized springform pan
4. Add the Finishing Touches
- Once the ganache is set, remove the dessert from the refrigerator.
- Top with whipped cream. Homemade stabilized whipped cream works best, as it holds its shape for days. If using store-bought whipped cream, add it just before serving.
- For an extra touch, garnish with chocolate stars, sprinkles, or fresh berries.
Flavors and Textures: What to Expect
- Base: The Oreo cookie crust offers a satisfying crunch and a hint of chocolatey sweetness that perfectly balances the richness of the ganache.
- Ganache: Luxuriously smooth and intensely chocolaty, the ganache melts in your mouth, delivering a deep cocoa flavor with a creamy finish.
- Topping: The whipped cream adds a light, airy contrast to the dense ganache, making every bite indulgent yet balanced.
Tips and Tricks for the Perfect Dessert
- No Loose Base Pan?
- Spoon the cookie base into dessert glasses and pour the ganache over for an elegant, fuss-free presentation.
- Choosing the Right Chocolate:
- Opt for chocolate with around 54.5% cacao for a balanced sweetness. Avoid milk chocolate as it may make the ganache overly sweet.
- Handling the Cream:
- Be cautious not to boil the cream, as overheating can cause the ganache to separate.
- Make It Ahead:
- This dessert can be made a day in advance, making it a convenient option for entertaining.
- Storing Leftovers:
- Cover and refrigerate leftovers for up to 3 days. The whipped cream may lose its shape over time, so consider adding it fresh.
Variations and Serving Suggestions
Variations:
- Nutty Delight: Add a layer of crushed roasted hazelnuts or almonds between the Oreo base and ganache.
- Minty Twist: Use mint-flavored Oreos for the base and top with crushed peppermint candies.
- Citrus Surprise: Add a teaspoon of orange zest to the ganache for a refreshing citrus note.
Serving Suggestions:
- Pair with a scoop of vanilla ice cream or a dollop of crème fraîche for added richness.
- Serve with fresh strawberries, raspberries, or cherries to balance the dessert’s sweetness.
Why You’ll Love This Recipe
- Ease: Minimal prep and no baking make this a breeze to create.
- Versatility: Perfect for both casual family dinners and elegant gatherings.
- Crowd-Pleaser: Its rich chocolate flavor and creamy texture are universally loved.
Conclusion
This Easy Chocolate Dessert truly embodies the perfect balance of indulgence and simplicity. From its rich, smooth chocolate ganache to the satisfying crunch of the Oreo cookie base, every bite is a delightful experience. Whether you’re making it for a special occasion or as a treat for yourself, it brings joy without requiring complicated techniques or an overwhelming list of ingredients.
What makes this dessert even more appealing is its versatility. You can customize it with different flavors and toppings to suit your tastes, making it an ideal option for a variety of occasions, whether you’re celebrating a birthday, hosting a dinner party, or simply enjoying a quiet evening at home. The best part? It’s incredibly easy to prepare and can be made ahead of time, saving you valuable minutes during your event.
This dessert also holds a timeless charm. Its classic chocolate and Oreo combination has been a fan favorite for years, and with good reason. It’s comforting, familiar, and indulgent—everything a great dessert should be. Plus, it’s visually stunning, making it perfect for impressing your guests with minimal effort.