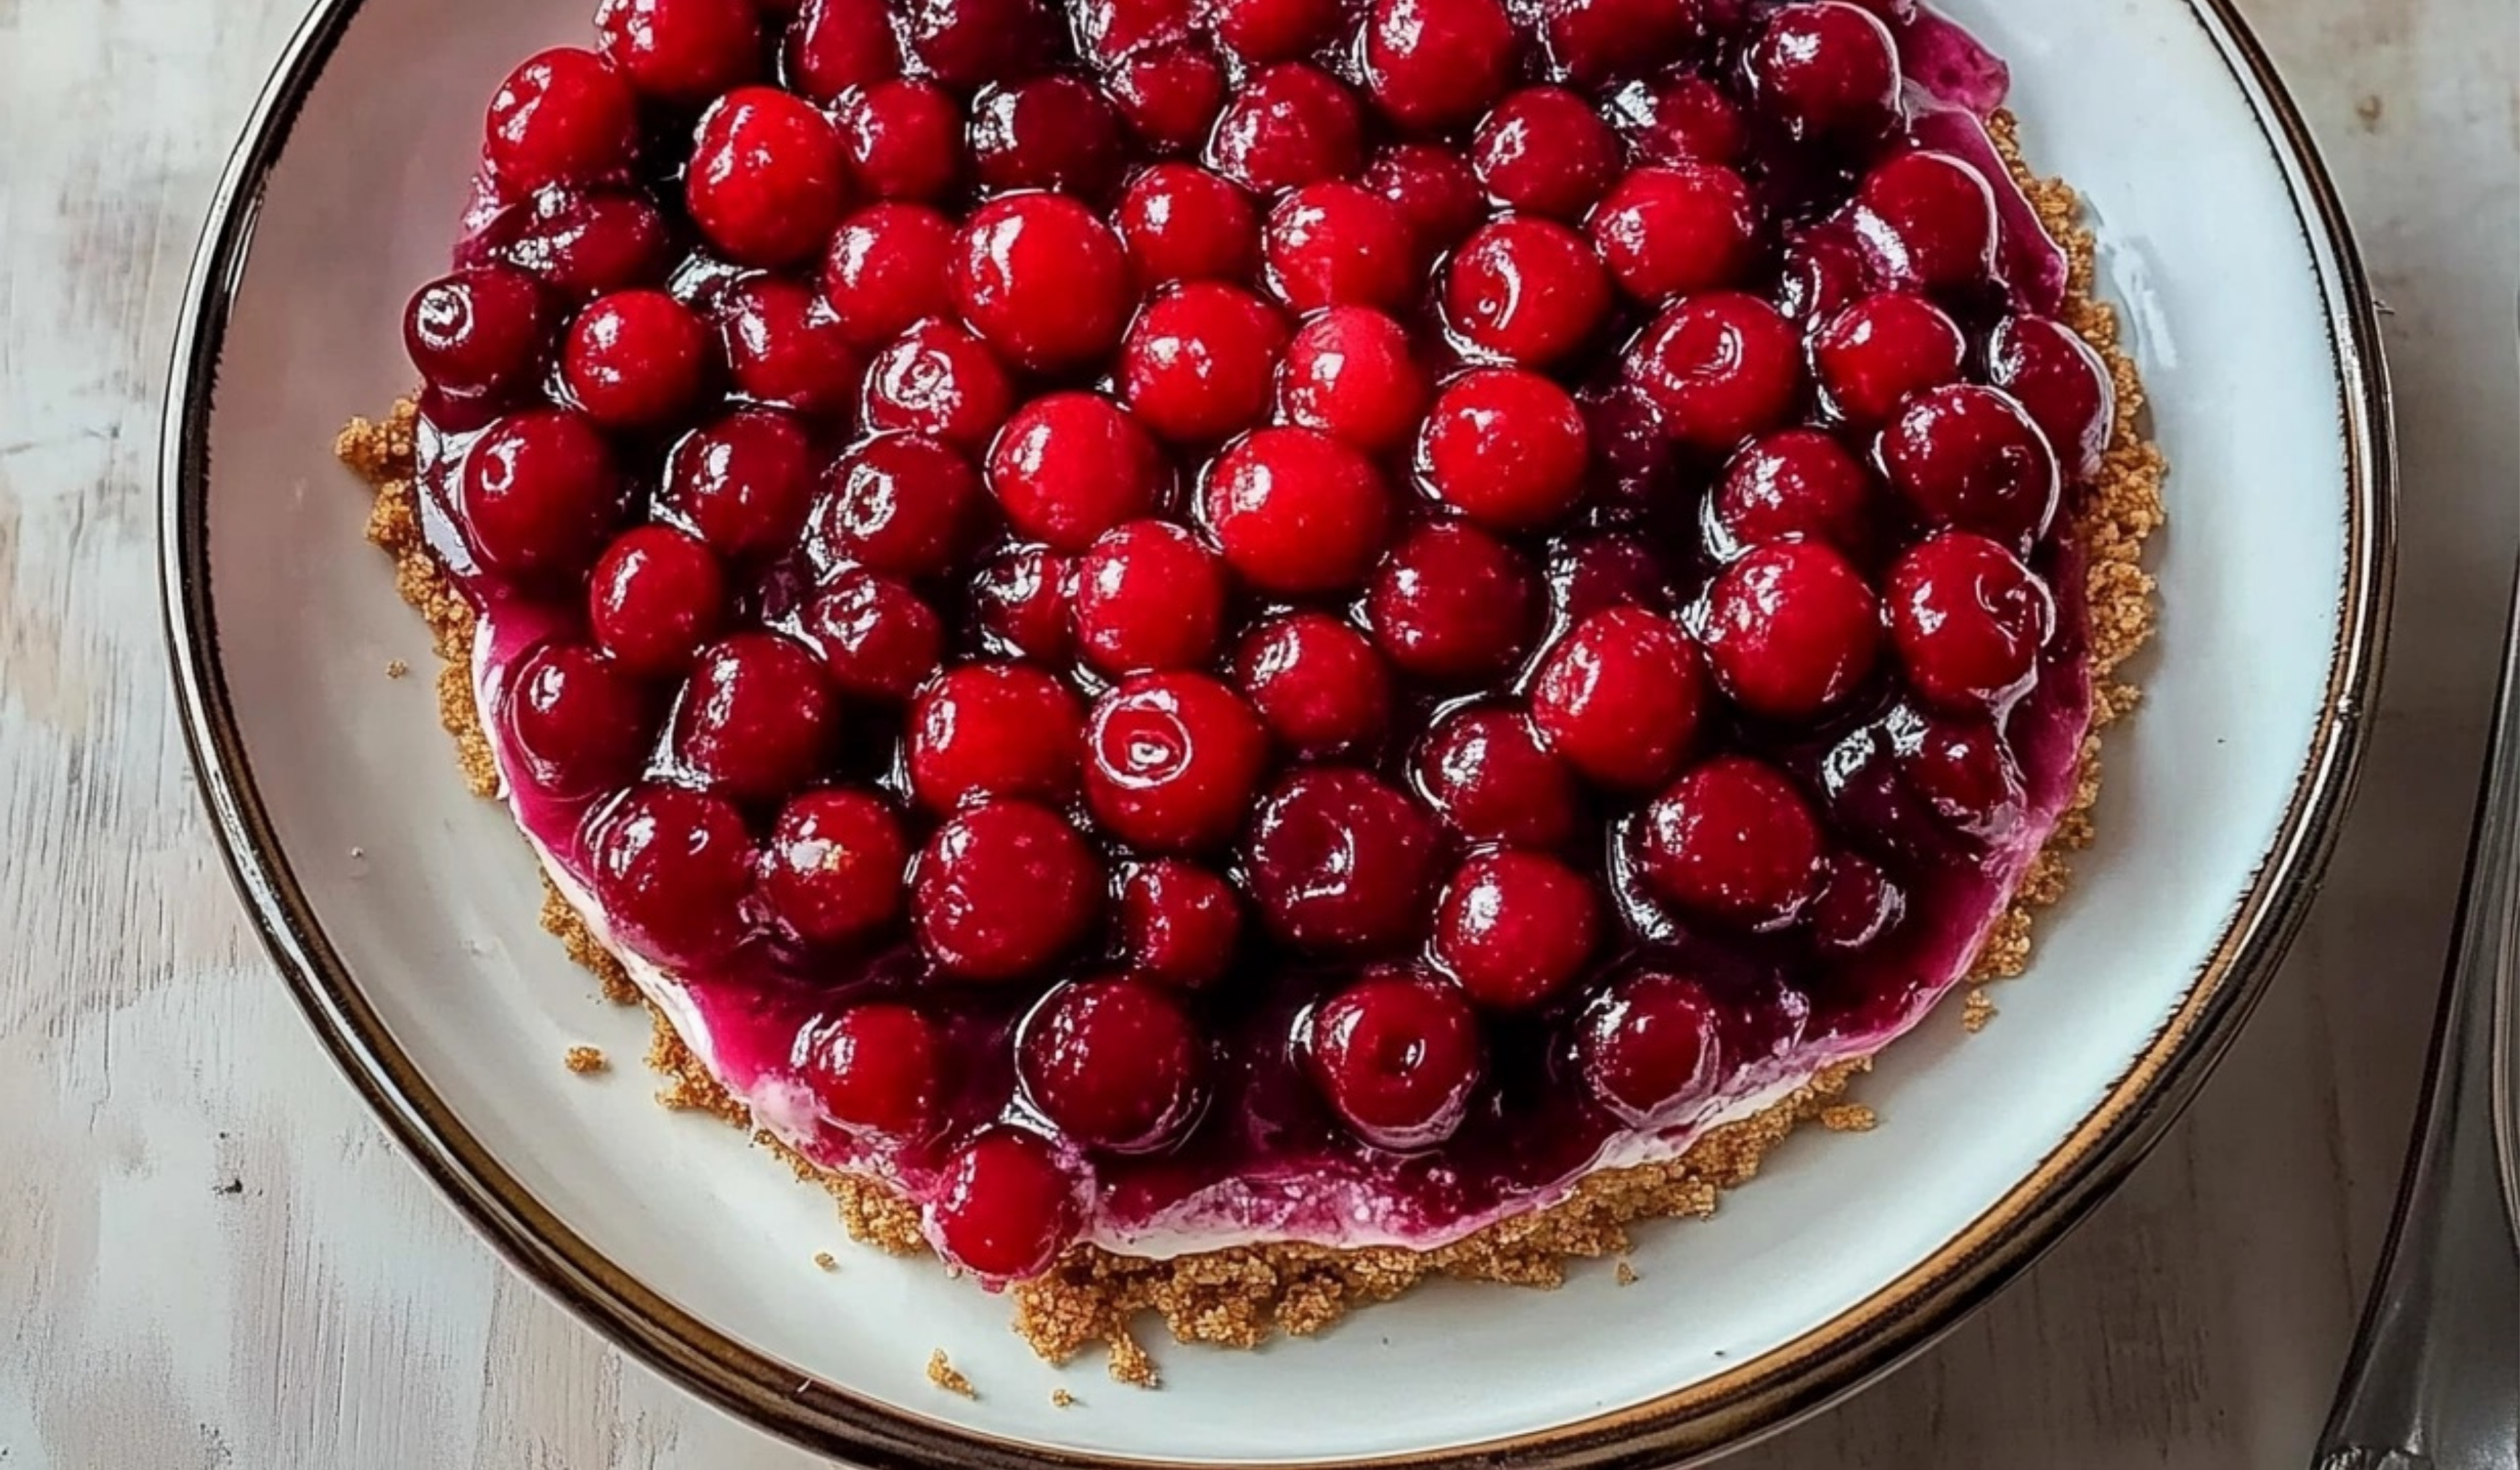
Craving a decadent cheesecake but don’t feel like turning on the oven? This no-bake cherry cheesecake is the answer! With a buttery graham cracker crust, creamy cheesecake filling, and a luscious cherry topping, it’s the perfect combination of flavors and textures. It’s so easy to make, even novice bakers can achieve perfection. Whether for a celebration or a cozy dessert night, this cheesecake will become your new favorite.
Print
Easiest No-Bake Cherry Cheesecake
🍒✨ Craving cheesecake without the hassle? This No-Bake Cherry Cheesecake is here to save the day! 🥄💖 Creamy, velvety cheesecake filling topped with luscious cherry pie filling on a buttery graham cracker crust—this dessert is as easy as it is irresistible. Perfect for any occasion or a sweet midweek treat! 😍🍰
#NoBakeCheesecake #CherryDelight #EasyDesserts #CheesecakeLovers #QuickAndSweet #NoOvenRequired #DessertGoals #CreamyAndDreamy #CherryLove #SweetIndulgence 🍒🍰✨
- Total Time: 20 minutes
Ingredients
For the Crust:
- Graham Cracker Crumbs (1 ½ cups): Adds a sweet, nutty base that pairs perfectly with the creamy filling.
- Granulated Sugar (1/3 cup): Sweetens the crust slightly and enhances the graham flavor.
- Unsalted Butter (½ cup, melted): Binds the crumbs together and adds richness.
For the Cheesecake Filling:
- Cream Cheese (16 oz, softened): The star ingredient, creating a tangy, creamy filling.
- Powdered Sugar (1 cup): Sweetens the filling without grittiness.
- Vanilla Extract (1 teaspoon): Adds warmth and depth of flavor.
- Heavy Whipping Cream (1 cup, cold): Whipped to stiff peaks for a light and fluffy texture.
For the Topping:
- Cherry Pie Filling (21 oz can): A sweet and tangy topping that’s ready to use straight from the can.
Instructions
1. Prepare the Crust
- In a medium bowl, mix the graham cracker crumbs and granulated sugar.
- Pour in the melted butter and stir until the mixture resembles wet sand.
- Press the crumb mixture firmly into the bottom of a 9-inch springform pan or pie dish. Use a flat-bottomed glass or measuring cup for even compression.
- Place the crust in the refrigerator to chill while you prepare the filling.
2. Make the Cheesecake Filling
- In a large bowl, beat the softened cream cheese, powdered sugar, and vanilla extract with an electric mixer until smooth and creamy.
- In a separate chilled bowl, whip the cold heavy cream to stiff peaks. This step is key for a light and fluffy filling.
- Gently fold the whipped cream into the cream cheese mixture. Be careful not to overmix to maintain the airy texture.
3. Assemble the Cheesecake
- Pour the cheesecake filling over the chilled crust, spreading it evenly with a spatula.
- Smooth the top for a clean finish.
- Cover the pan with plastic wrap or aluminum foil and refrigerate for at least 4 hours, or overnight for the best results.
4. Add the Cherry Topping
- Once the cheesecake is set, spread the cherry pie filling evenly over the top.
- Use the back of a spoon to create an even layer, ensuring every slice gets a generous helping of cherries.
5. Serve and Enjoy
- Carefully remove the sides of the springform pan, if using.
- Slice the cheesecake with a sharp knife, cleaning the blade between cuts for neat slices.
- Serve chilled and savor the creamy, tangy, sweet goodness!
Notes
Crust Success:
- Use a food processor to achieve uniform graham cracker crumbs.
- Press the crust firmly into the pan to ensure it holds together when sliced.
Filling Perfection:
- Let the cream cheese soften at room temperature to avoid lumps.
- Chill the mixing bowl and beaters for whipping the cream—it whips faster and holds better.
Topping Variations:
- Swap cherry pie filling for blueberry, strawberry, or mixed berry for a different flavor profile.
- Drizzle with chocolate or caramel sauce for an extra indulgence.
Storage Tips:
- Store the cheesecake in the refrigerator for up to 3 days.
- Freeze individual slices wrapped in plastic wrap and foil for up to 1 month. Thaw in the fridge before serving.
- Prep Time: 20 minutes
- Cook Time: 0 minutes
Why You’ll Love This Recipe
- No Baking Required: Perfect for hot days or when you need a fuss-free dessert.
- Quick Prep: Only 20 minutes of active prep time, and the rest is hands-off chilling.
- Creamy & Dreamy: The velvety filling pairs beautifully with the tangy cherry topping.
- Crowd-Pleaser: Always a hit at parties, potlucks, and family dinners.
Ingredients BreakdownFor the Crust:
- Graham Cracker Crumbs (1 ½ cups): Adds a sweet, nutty base that pairs perfectly with the creamy filling.
- Granulated Sugar (1/3 cup): Sweetens the crust slightly and enhances the graham flavor.
- Unsalted Butter (½ cup, melted): Binds the crumbs together and adds richness.
For the Cheesecake Filling:
- Cream Cheese (16 oz, softened): The star ingredient, creating a tangy, creamy filling.
- Powdered Sugar (1 cup): Sweetens the filling without grittiness.
- Vanilla Extract (1 teaspoon): Adds warmth and depth of flavor.
- Heavy Whipping Cream (1 cup, cold): Whipped to stiff peaks for a light and fluffy texture.
For the Topping:
- Cherry Pie Filling (21 oz can): A sweet and tangy topping that’s ready to use straight from the can.
Step-by-Step Directions1. Prepare the Crust
- In a medium bowl, mix the graham cracker crumbs and granulated sugar.
- Pour in the melted butter and stir until the mixture resembles wet sand.
- Press the crumb mixture firmly into the bottom of a 9-inch springform pan or pie dish. Use a flat-bottomed glass or measuring cup for even compression.
- Place the crust in the refrigerator to chill while you prepare the filling.
2. Make the Cheesecake Filling
- In a large bowl, beat the softened cream cheese, powdered sugar, and vanilla extract with an electric mixer until smooth and creamy.
- In a separate chilled bowl, whip the cold heavy cream to stiff peaks. This step is key for a light and fluffy filling.
- Gently fold the whipped cream into the cream cheese mixture. Be careful not to overmix to maintain the airy texture.
3. Assemble the Cheesecake
- Pour the cheesecake filling over the chilled crust, spreading it evenly with a spatula.
- Smooth the top for a clean finish.
- Cover the pan with plastic wrap or aluminum foil and refrigerate for at least 4 hours, or overnight for the best results.
4. Add the Cherry Topping
- Once the cheesecake is set, spread the cherry pie filling evenly over the top.
- Use the back of a spoon to create an even layer, ensuring every slice gets a generous helping of cherries.
5. Serve and Enjoy
- Carefully remove the sides of the springform pan, if using.
- Slice the cheesecake with a sharp knife, cleaning the blade between cuts for neat slices.
- Serve chilled and savor the creamy, tangy, sweet goodness!
Tips and Tricks for the Perfect No-Bake CheesecakeCrust Success:
- Use a food processor to achieve uniform graham cracker crumbs.
- Press the crust firmly into the pan to ensure it holds together when sliced.
Filling Perfection:
- Let the cream cheese soften at room temperature to avoid lumps.
- Chill the mixing bowl and beaters for whipping the cream—it whips faster and holds better.
Topping Variations:
- Swap cherry pie filling for blueberry, strawberry, or mixed berry for a different flavor profile.
- Drizzle with chocolate or caramel sauce for an extra indulgence.
Storage Tips:
- Store the cheesecake in the refrigerator for up to 3 days.
- Freeze individual slices wrapped in plastic wrap and foil for up to 1 month. Thaw in the fridge before serving.
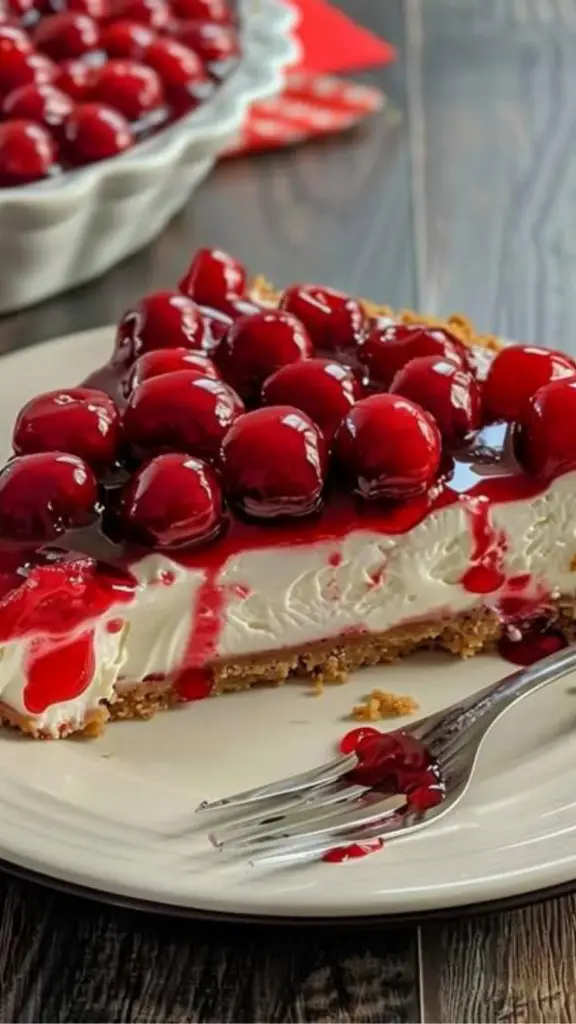
Flavors, Textures, and AromaThis no-bake cherry cheesecake is a symphony of flavors and textures:
- Flavors: The rich, tangy cream cheese filling pairs perfectly with the buttery crust and sweet-tart cherries.
- Textures: A crunchy crust contrasts beautifully with the creamy filling and juicy topping.
- Aroma: Sweet vanilla and the fruity scent of cherries create an irresistible dessert experience.
Why This Recipe is a Must-Try
The Easiest No-Bake Cherry Cheesecake is not just a recipe; it’s a testament to how simple ingredients can create something extraordinary. Perfect for any occasion, this dessert is a crowd favorite that looks and tastes like you spent hours in the kitchen.So grab your ingredients, set aside 20 minutes, and let your refrigerator do the rest. Get ready to impress your family and friends with this creamy, dreamy cheesecake that will have everyone asking for seconds!