
Chocolate pudding, a rich, creamy, and velvety dessert, is one of those classic recipes that never goes out of style. Whether you’re making it for a special occasion, a comforting treat after a long day, or simply indulging in a little sweetness, chocolate pudding hits the spot every time. There’s something magical about the process of making this simple yet luxurious dish from scratch. The ingredients come together effortlessly, and the result is a silky, indulgent treat that can be enjoyed by people of all ages.
Print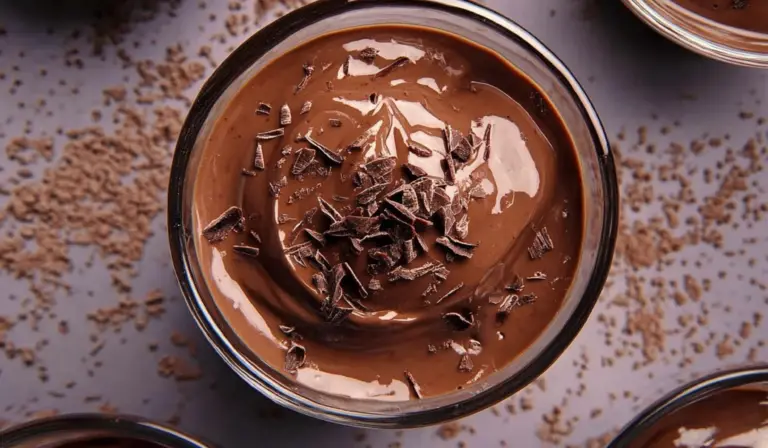
Classic Homemade Chocolate Pudding: A Delightful and Timeless Dessert
🍫💫 Classic Homemade Chocolate Pudding = the ultimate dessert for chocolate lovers! 😍 Rich, creamy, and oh-so-satisfying, this pudding is a perfect balance of smooth texture and intense chocolate flavor. Whether it’s for a family gathering or a cozy night in, this treat will always hit the spot. Ready to dive into this creamy indulgence? 🍮
#ChocolateDelight 🍫 #HomemadeDessert 🍮 #RichAndDecadent 💖 #ChocolateCravings 😋 #SweetToothGoals 🍰 #ClassicChocolateLove ✨ #ComfortingDesserts 🍽️ #VelvetyPudding ❤️ #IndulgeInSweets 🍭 #SatisfyYourCravings 🌟
- Total Time: 20 minutes
- Yield: 4 servings 1x
Ingredients
- ¾ cup White Granulated Sugar
The sugar is the base of the pudding’s sweetness. It blends seamlessly into the other ingredients, creating the perfect balance of sugary goodness. You could experiment with alternatives such as coconut sugar or maple syrup for a different flavor profile, but the white granulated sugar yields the best results for this particular recipe. - ⅓ cup Cocoa Powder (Unsweetened)
Cocoa powder is where the chocolate flavor really shines. Unsweetened cocoa powder gives the pudding a deep, pure chocolate taste that’s not overly sweet, allowing the richness of the chocolate to stand out. It dissolves into the mixture beautifully, giving the pudding its signature color and flavor. - 3 Tbsp Cornstarch
Cornstarch acts as the thickening agent in this pudding. When heated, it helps the mixture achieve that perfect, velvety texture that is neither too runny nor too firm. You can substitute cornstarch with arrowroot powder if you prefer a more natural option or have dietary restrictions. - ¼ tsp Salt
A pinch of salt elevates the flavors of chocolate, making it taste even richer. It balances out the sweetness of the sugar and the bitterness of the cocoa powder, creating a well-rounded dessert. - 2 and ¼ cups Whole Milk
Whole milk is the key to achieving that creamy, smooth texture in the pudding. The higher fat content in whole milk ensures the pudding is rich and indulgent. If you prefer, you can swap out whole milk for a plant-based alternative like almond milk or oat milk, but it may affect the consistency and flavor slightly. - 2 Tbsp Butter
Butter adds richness to the pudding, making it incredibly silky and smooth. It also enhances the flavor profile, giving the pudding a slight creaminess and an irresistible melt-in-your-mouth quality. If you’re looking for a dairy-free option, you can use margarine or a non-dairy butter substitute. - 1 tsp Vanilla Extract
Vanilla extract brings a warm, aromatic note to the pudding, enhancing the chocolate flavor. It provides a subtle contrast to the richness of the cocoa powder and creates depth in the dessert. You can experiment with other flavor extracts, like hazelnut or almond, for a unique twist, but vanilla is the classic choice.
For Serving (Optional)
- Whipped Cream
Whipped cream adds a light, airy contrast to the dense, creamy pudding. It provides a delightful balance in texture and sweetness. Homemade whipped cream is simple to make and can be flavored with vanilla or a hint of cocoa powder for a more chocolatey experience. - Chocolate Shavings
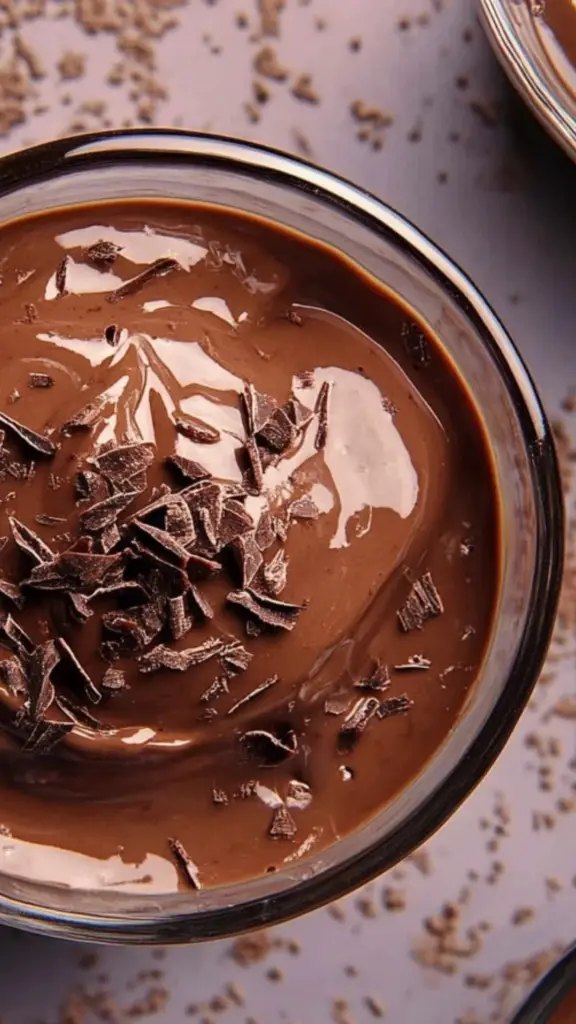
For an added touch of elegance, sprinkle some chocolate shavings on top of your pudding. The shaved chocolate melts slightly into the pudding, creating an extra layer of chocolate flavor. It also adds a beautiful visual element, making your homemade chocolate pudding feel like a high-end dessert.
Instructions
Step 1: Prepare the Dry Ingredients
Begin by adding the sugar, cocoa powder, cornstarch, and salt to a medium-sized saucepan. Mix them together using a whisk or a spoon to ensure the dry ingredients are evenly distributed. This step is important because it helps prevent lumps from forming when you add the wet ingredients later.
Step 2: Add the Milk Slowly
Next, slowly add the milk to the dry ingredients. It’s important to add the milk gradually and whisk it in as you go to create a smooth, lump-free mixture. Take your time during this step; rushing can lead to clumps that will be difficult to break down later.
Step 3: Heat the Mixture
Place the saucepan over medium heat. It’s crucial to stir constantly as the mixture heats up. This prevents the pudding from sticking to the bottom of the pan and burning. As the milk heats, you’ll notice the cocoa powder and sugar dissolving, creating a rich, dark mixture. Keep whisking, ensuring there are no lumps.
Step 4: Bring the Mixture to a Boil
Once the mixture begins to heat up, keep whisking until it starts to simmer. This is the stage where the pudding begins to thicken. Allow it to come to a boil and let it boil for one full minute. This step is essential for activating the cornstarch and ensuring that the pudding reaches the right consistency. Be sure to keep whisking during this time to prevent the mixture from sticking or forming clumps.
Step 5: Add Butter and Vanilla Extract
After the pudding has thickened, remove the saucepan from the heat. Stir in the butter and vanilla extract. The butter will melt into the warm pudding, creating a smooth and velvety texture. The vanilla extract adds a lovely depth of flavor, bringing the chocolate pudding to life.
Step 6: Pour the Pudding into Serving Dishes
Once the butter has fully melted and incorporated, pour the pudding into small glasses, ramekins, or individual serving bowls. Gently smooth the tops with a spoon to create an even surface. This is the stage where you can get creative with presentation, adding garnishes like chocolate shavings or sprinkles of cocoa powder.
Step 7: Prevent a Skin from Forming
To prevent a skin from forming on top of the pudding as it cools, cover each dish with plastic wrap. Press the plastic wrap directly onto the surface of the pudding to ensure it stays in contact with the mixture. This step is optional, as some people don’t mind the skin, but if you prefer a smooth surface, it’s worth the extra effort.
Step 8: Chill and Set the Pudding
Place the pudding in the refrigerator and allow it to chill for at least 2 to 3 hours, or until it has fully set. During this time, the pudding will firm up to a silky smooth texture, and the flavors will continue to develop. Once the pudding has set, it’s ready to be served!
Notes
- Don’t Rush the Heating Process:
Be patient while heating the mixture. If the heat is too high, the pudding can burn before it thickens. Medium heat is ideal for a slow, even cook that results in the smoothest pudding possible. - Whisk Constantly:
To ensure a smooth, lump-free pudding, whisk the mixture constantly as it heats. Once it comes to a boil, continue whisking until it thickens. This will help maintain the pudding’s creamy consistency. - Boil for One Minute:
The key to a perfectly thickened pudding is to boil the mixture for a full minute. This allows the cornstarch to fully activate, resulting in a pudding that’s rich and velvety. - Chill for the Best Texture:
Allow the pudding to chill for at least 2 to 3 hours to give it time to set properly. The longer it chills, the more firm it will become, allowing you to scoop it into perfect, individual servings. - Experiment with Variations:
While this recipe is delicious on its own, feel free to experiment with different flavors. Add a touch of cinnamon or espresso powder to enhance the chocolate flavor, or top with fresh berries for a burst of freshness. - Storage Tips:
Homemade chocolate pudding can be stored in the fridge for up to 7 days. Be sure to cover it tightly with plastic wrap or an airtight lid to keep it fresh. This pudding is not ideal for freezing, as the texture may change when thawed.
- Prep Time: 5 minutes
- Cook Time: 15 minutes
What makes homemade chocolate pudding so special is its ability to capture the essence of chocolate in a comforting, smooth form. With just a few basic ingredients, you can create a dessert that tastes far more sophisticated than it is to prepare. This pudding offers the perfect balance of deep chocolate flavor, richness, and sweetness without being overly decadent.
The beauty of chocolate pudding is in its versatility. While you can enjoy it simply as it is, it can also be dressed up in countless ways, making it the perfect base for various garnishes and add-ons. Topped with a dollop of whipped cream or chocolate shavings, it becomes a stunning treat for gatherings or weeknight indulgences.
Whether you’re new to cooking or a seasoned baker, this chocolate pudding recipe is easy to follow and results in a dessert that is sure to impress. Let’s dive into the ingredients and instructions that will guide you toward making this unforgettable dessert.
The Ingredients: Simplicity Meets Richness
Creating the perfect chocolate pudding requires only a handful of ingredients, and what’s wonderful about this dish is how easily it can be made with everyday pantry items. Here’s what you’ll need:
- ¾ cup White Granulated Sugar
The sugar is the base of the pudding’s sweetness. It blends seamlessly into the other ingredients, creating the perfect balance of sugary goodness. You could experiment with alternatives such as coconut sugar or maple syrup for a different flavor profile, but the white granulated sugar yields the best results for this particular recipe. - ⅓ cup Cocoa Powder (Unsweetened)
Cocoa powder is where the chocolate flavor really shines. Unsweetened cocoa powder gives the pudding a deep, pure chocolate taste that’s not overly sweet, allowing the richness of the chocolate to stand out. It dissolves into the mixture beautifully, giving the pudding its signature color and flavor. - 3 Tbsp Cornstarch
Cornstarch acts as the thickening agent in this pudding. When heated, it helps the mixture achieve that perfect, velvety texture that is neither too runny nor too firm. You can substitute cornstarch with arrowroot powder if you prefer a more natural option or have dietary restrictions. - ¼ tsp Salt
A pinch of salt elevates the flavors of chocolate, making it taste even richer. It balances out the sweetness of the sugar and the bitterness of the cocoa powder, creating a well-rounded dessert. - 2 and ¼ cups Whole Milk
Whole milk is the key to achieving that creamy, smooth texture in the pudding. The higher fat content in whole milk ensures the pudding is rich and indulgent. If you prefer, you can swap out whole milk for a plant-based alternative like almond milk or oat milk, but it may affect the consistency and flavor slightly. - 2 Tbsp Butter
Butter adds richness to the pudding, making it incredibly silky and smooth. It also enhances the flavor profile, giving the pudding a slight creaminess and an irresistible melt-in-your-mouth quality. If you’re looking for a dairy-free option, you can use margarine or a non-dairy butter substitute. - 1 tsp Vanilla Extract
Vanilla extract brings a warm, aromatic note to the pudding, enhancing the chocolate flavor. It provides a subtle contrast to the richness of the cocoa powder and creates depth in the dessert. You can experiment with other flavor extracts, like hazelnut or almond, for a unique twist, but vanilla is the classic choice.
For Serving (Optional)
- Whipped Cream
Whipped cream adds a light, airy contrast to the dense, creamy pudding. It provides a delightful balance in texture and sweetness. Homemade whipped cream is simple to make and can be flavored with vanilla or a hint of cocoa powder for a more chocolatey experience. - Chocolate Shavings
For an added touch of elegance, sprinkle some chocolate shavings on top of your pudding. The shaved chocolate melts slightly into the pudding, creating an extra layer of chocolate flavor. It also adds a beautiful visual element, making your homemade chocolate pudding feel like a high-end dessert.
The Step-by-Step Process: Crafting the Perfect Pudding
Making chocolate pudding from scratch is much easier than you might think. With just a little patience and a few simple steps, you’ll have a creamy, chocolatey delight ready to enjoy in no time.
Step 1: Prepare the Dry Ingredients
Begin by adding the sugar, cocoa powder, cornstarch, and salt to a medium-sized saucepan. Mix them together using a whisk or a spoon to ensure the dry ingredients are evenly distributed. This step is important because it helps prevent lumps from forming when you add the wet ingredients later.
Step 2: Add the Milk Slowly
Next, slowly add the milk to the dry ingredients. It’s important to add the milk gradually and whisk it in as you go to create a smooth, lump-free mixture. Take your time during this step; rushing can lead to clumps that will be difficult to break down later.
Step 3: Heat the Mixture
Place the saucepan over medium heat. It’s crucial to stir constantly as the mixture heats up. This prevents the pudding from sticking to the bottom of the pan and burning. As the milk heats, you’ll notice the cocoa powder and sugar dissolving, creating a rich, dark mixture. Keep whisking, ensuring there are no lumps.
Step 4: Bring the Mixture to a Boil
Once the mixture begins to heat up, keep whisking until it starts to simmer. This is the stage where the pudding begins to thicken. Allow it to come to a boil and let it boil for one full minute. This step is essential for activating the cornstarch and ensuring that the pudding reaches the right consistency. Be sure to keep whisking during this time to prevent the mixture from sticking or forming clumps.
Step 5: Add Butter and Vanilla Extract
After the pudding has thickened, remove the saucepan from the heat. Stir in the butter and vanilla extract. The butter will melt into the warm pudding, creating a smooth and velvety texture. The vanilla extract adds a lovely depth of flavor, bringing the chocolate pudding to life.
Step 6: Pour the Pudding into Serving Dishes
Once the butter has fully melted and incorporated, pour the pudding into small glasses, ramekins, or individual serving bowls. Gently smooth the tops with a spoon to create an even surface. This is the stage where you can get creative with presentation, adding garnishes like chocolate shavings or sprinkles of cocoa powder.
Step 7: Prevent a Skin from Forming
To prevent a skin from forming on top of the pudding as it cools, cover each dish with plastic wrap. Press the plastic wrap directly onto the surface of the pudding to ensure it stays in contact with the mixture. This step is optional, as some people don’t mind the skin, but if you prefer a smooth surface, it’s worth the extra effort.
Step 8: Chill and Set the Pudding
Place the pudding in the refrigerator and allow it to chill for at least 2 to 3 hours, or until it has fully set. During this time, the pudding will firm up to a silky smooth texture, and the flavors will continue to develop. Once the pudding has set, it’s ready to be served!
Tips for Success: Making Your Chocolate Pudding Perfect
- Don’t Rush the Heating Process:
Be patient while heating the mixture. If the heat is too high, the pudding can burn before it thickens. Medium heat is ideal for a slow, even cook that results in the smoothest pudding possible. - Whisk Constantly:
To ensure a smooth, lump-free pudding, whisk the mixture constantly as it heats. Once it comes to a boil, continue whisking until it thickens. This will help maintain the pudding’s creamy consistency. - Boil for One Minute:
The key to a perfectly thickened pudding is to boil the mixture for a full minute. This allows the cornstarch to fully activate, resulting in a pudding that’s rich and velvety. - Chill for the Best Texture:
Allow the pudding to chill for at least 2 to 3 hours to give it time to set properly. The longer it chills, the more firm it will become, allowing you to scoop it into perfect, individual servings. - Experiment with Variations:
While this recipe is delicious on its own, feel free to experiment with different flavors. Add a touch of cinnamon or espresso powder to enhance the chocolate flavor, or top with fresh berries for a burst of freshness. - Storage Tips:
Homemade chocolate pudding can be stored in the fridge for up to 7 days. Be sure to cover it tightly with plastic wrap or an airtight lid to keep it fresh. This pudding is not ideal for freezing, as the texture may change when thawed.
Serving Suggestions: Elevate Your Chocolate Pudding
While chocolate pudding is delicious on its own, you can easily elevate it with a few simple toppings or pairings.
- Whipped Cream:
The airy sweetness of whipped cream pairs perfectly with the rich, dense texture of chocolate pudding. Whether you make it yourself or use store-bought, a dollop on top makes the dessert feel even more indulgent. - Chocolate Shavings:
For an extra touch of chocolate decadence, top your pudding with finely grated chocolate. The shavings will melt slightly into the pudding, creating pockets of chocolatey goodness with every bite. - Fresh Fruit:
Top your pudding with fresh fruit like raspberries, strawberries, or bananas. The natural sweetness and acidity of the fruit create a perfect balance with the richness of the chocolate pudding. - Nuts or Crumbled Cookies:
For added texture, consider topping the pudding with chopped nuts, such as almonds, hazelnuts, or pecans. Crumbled cookies like graham crackers or biscotti also work wonderfully as a crunchy topping.
Conclusion: Why You’ll Love Homemade Chocolate Pudding
There’s no denying the allure of homemade chocolate pudding. From its smooth texture to its rich, satisfying chocolate flavor, this dessert never fails to impress. The best part? It’s incredibly easy to make, and the ingredients are simple and inexpensive. Whether you’re looking to treat yourself, impress guests, or create a comforting dessert for your family, this classic chocolate pudding is the perfect choice.
The beauty of this dessert is that it can be made ahead of time, which means you can prepare it in advance for a stress-free treat later on. It’s also highly customizable, allowing you to add your favorite toppings and mix-ins to create a version that’s uniquely yours.
Homemade chocolate pudding is not just a dessert—it’s an experience. From the first whisk of the cocoa powder to the last spoonful of creamy goodness, every step is a reminder of the joy that comes with making food from scratch. So grab your ingredients, follow these simple steps, and indulge in the blissful delight of homemade chocolate pudding. Enjoy!