There’s something special about a dessert that looks like it came straight out of a European pâtisserie but can actually be made at home, step by step, with simple ingredients and a little patience. The first time I made these Chocolate, Meringue, and Hazelnut Pastries, it was for a birthday celebration I was hosting. I wanted a dessert that felt elevated—something more exciting than cookies or a boxed cake mix—but I also didn’t want to spend days in the kitchen or wrestle with complicated pastry techniques.
Print
Chocolate, Meringue, and Hazelnut Pastries: A Beginner’s Guide to a Stunning Dessert
Buttery, flaky pastry filled with rich chocolate, crunchy hazelnuts, and airy meringue—this show-stopping dessert is easier than it looks and absolutely divine! 🍫🌰🥐
- Total Time: 3 hours
- Yield: 8 servings 1x
Ingredients
Meringue
- 4 egg whites, room temperature
- ¾ cup granulated sugar
Tip: Room temperature egg whites whip better and hold more volume.
Chocolate Cake
- 1 ½ cups granulated sugar
- 1 ¾ cups all-purpose flour
- ¾ cup unsweetened cocoa powder (regular)
- 2 teaspoons baking soda
- 1 teaspoon baking powder
- 1 teaspoon salt
- 2 large eggs
- 1 cup buttermilk
- 1 cup strong coffee, cooled
- ½ cup neutral oil (vegetable, canola, or sunflower)
- 2 teaspoons vanilla extract
Substitutions: If you don’t have buttermilk, mix 1 cup of milk with 1 tablespoon of vinegar or lemon juice and let it sit for 5 minutes.
Frosting
- 8 oz (1 package) cream cheese, softened
- 8 tablespoons (1 stick) butter, softened
- 14 oz can dulce de leche (or cooked sweetened condensed milk)
- 1 teaspoon vanilla extract
- ¼ teaspoon salt
Note: Dulce de leche can be store-bought or made by simmering a sealed can of sweetened condensed milk in water for 2–3 hours.
Garnishes
- 1 ½ cups toasted chopped hazelnuts
- 1 to 1 ½ cups Nutella
- Melted chocolate for drizzling (optional)
Alternatives: You can use almonds or pecans if hazelnuts aren’t available.
Instructions
1. Meringue
- Preheat your oven to 250°F (120°C). Line a large rimmed baking sheet (18×13 inches) with parchment paper or foil.
- In a stand mixer with the whisk attachment (or using a hand mixer), beat the egg whites on medium until frothy.
- Gradually add the sugar, then increase to medium-high and beat for about 15 minutes until stiff, glossy peaks form.
- Spread the meringue evenly over the baking sheet.
- Bake for 2 hours. Turn the oven off, crack the door, and let the meringue cool inside.
- Once completely cool, carefully peel away the parchment or foil and cut the meringue in half.
Make-ahead tip: Store in an airtight container at room temperature for up to 2 days.
2. Chocolate Cake
- Preheat the oven to 350°F (175°C). Line the same size baking sheet with parchment or foil and lightly grease it.
- In a large bowl, combine sugar, flour, cocoa, baking soda, baking powder, and salt. Sift the cocoa to remove clumps.
- In another bowl or measuring cup, whisk together eggs, buttermilk, coffee, oil, and vanilla.
- Pour wet ingredients into the dry and mix until combined—don’t overmix.
- Spread the batter evenly in the prepared pan.
- Bake for 20–25 minutes or until a toothpick inserted in the center comes out clean.
- Cool completely, then cut in half.
Tip: Let the cake cool fully before handling or layering to prevent tearing.
3. Frosting
- In a stand mixer or with a hand mixer, beat softened cream cheese and butter until smooth.
- Add dulce de leche, vanilla, and salt. Beat again until creamy and fully incorporated.
- Refrigerate if not using right away.
Note: This frosting is rich but not overly sweet, which balances the Nutella and meringue perfectly.
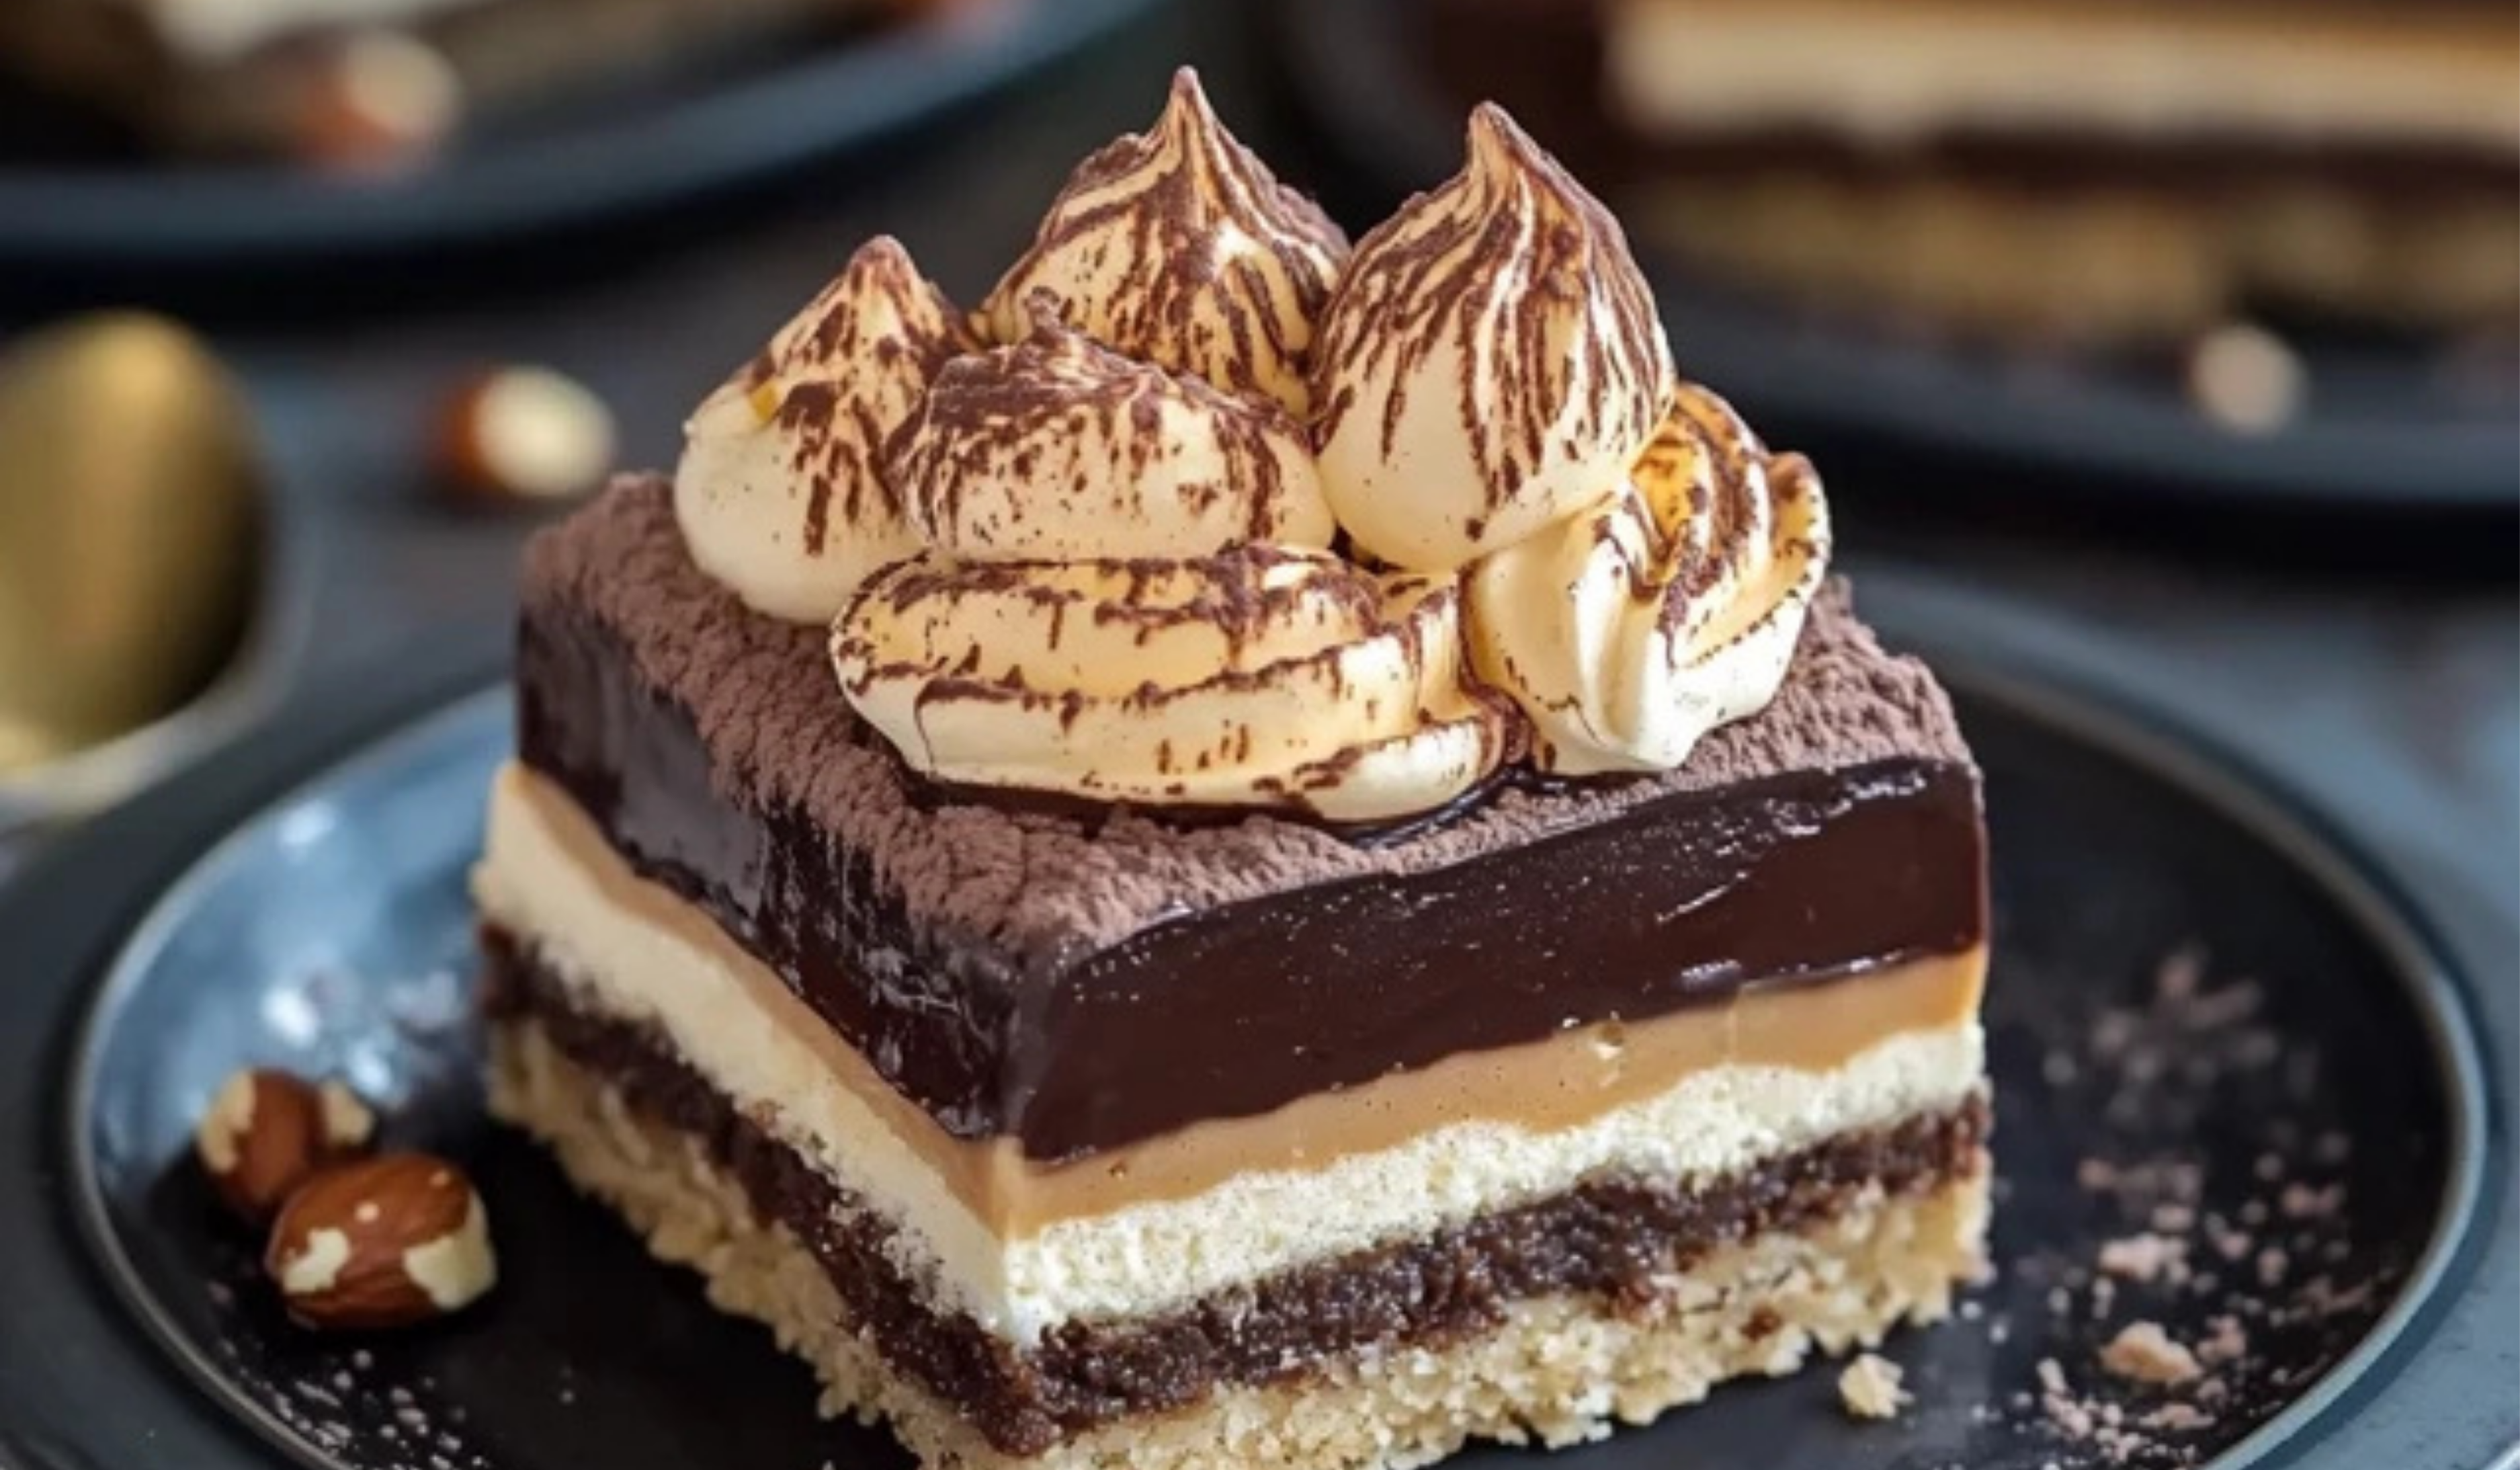
4. Assembling the Pastries
- Place one half of the chocolate cake on a tray or platter.
- Spread half the frosting evenly on top.
- Sprinkle a generous handful of chopped hazelnuts.
- Spread ¼ to ⅓ cup Nutella on the bottom of a meringue layer. Place it Nutella-side down on top of the frosted cake.
- Spread another ⅓ to ½ cup Nutella on top of the meringue layer.
- Sprinkle more hazelnuts.
- Top with the second meringue layer. Again, spread Nutella (¼ to ⅓ cup) and sprinkle nuts.
- Finish with the second half of the chocolate cake.
- Spread remaining frosting on top, sprinkle more hazelnuts, and drizzle with melted chocolate if desired.
Optional: You can also frost the sides and serve it as a full cake or cut into individual pastries.
Notes
Meringue Troubleshooting
- Not stiffening? Make sure your bowl and whisk are clean and free of grease. Any trace of yolk in the whites can prevent whipping.
- Cracking? That’s okay. Meringue is delicate. Cracks won’t affect flavor and are often hidden once layered.
- Sticky bottom? Let it cool longer, or use a thin spatula to help lift.
Cake Tips
- Dry cake? Don’t overbake. Set a timer and check at the 20-minute mark.
- Coffee taste too strong? Use decaf or substitute with water if preferred, though coffee enhances chocolate flavor beautifully.
- No mixer? A whisk works fine for the cake and frosting—just mix thoroughly.
Frosting Fixes
- Too soft? Chill for 15–30 minutes before using.
- Too thick? Let sit at room temperature for a few minutes or add a teaspoon of milk to loosen.
Assembly Tips
- Messy layers? Use a long serrated knife to trim edges and neaten layers after chilling.
- Nut allergies? Skip the hazelnuts or replace with crunchy granola for texture.
- Prep Time: 1 hour
- Cook Time: 2 hours
What I discovered was a surprisingly forgiving recipe layered with textures and flavors: airy meringue, moist chocolate cake, a rich dulce de leche cream cheese frosting, and the unmistakable crunch of toasted hazelnuts. Nutella brings everything together with its smooth, chocolate-hazelnut finish, and melted chocolate drizzled on top turns this into a visually stunning dessert that’s perfect for celebrations—or even just because.
For beginner cooks, this is the kind of recipe that builds both skill and confidence. It’s broken into manageable parts, and you can make some components ahead of time. It’s versatile, deeply satisfying, and more achievable than it appears. If you’ve never made a meringue before or frosted a layered cake, don’t worry—this guide walks you through everything in a way that’s clear, doable, and encouraging.
Ingredients and Preparation
This recipe is structured in three main parts: the meringue, the chocolate cake, and the frosting. Then comes assembly, where all the magic happens.
Meringue
- 4 egg whites, room temperature
- ¾ cup granulated sugar
Tip: Room temperature egg whites whip better and hold more volume.
Chocolate Cake
- 1 ½ cups granulated sugar
- 1 ¾ cups all-purpose flour
- ¾ cup unsweetened cocoa powder (regular)
- 2 teaspoons baking soda
- 1 teaspoon baking powder
- 1 teaspoon salt
- 2 large eggs
- 1 cup buttermilk
- 1 cup strong coffee, cooled
- ½ cup neutral oil (vegetable, canola, or sunflower)
- 2 teaspoons vanilla extract
Substitutions: If you don’t have buttermilk, mix 1 cup of milk with 1 tablespoon of vinegar or lemon juice and let it sit for 5 minutes.
Frosting
- 8 oz (1 package) cream cheese, softened
- 8 tablespoons (1 stick) butter, softened
- 14 oz can dulce de leche (or cooked sweetened condensed milk)
- 1 teaspoon vanilla extract
- ¼ teaspoon salt
Note: Dulce de leche can be store-bought or made by simmering a sealed can of sweetened condensed milk in water for 2–3 hours.
Garnishes
- 1 ½ cups toasted chopped hazelnuts
- 1 to 1 ½ cups Nutella
- Melted chocolate for drizzling (optional)
Alternatives: You can use almonds or pecans if hazelnuts aren’t available.
Step-by-Step Instructions
Each component is prepared separately and can be made ahead. Start with the meringue since it takes the longest to bake and cool.
1. Meringue
- Preheat your oven to 250°F (120°C). Line a large rimmed baking sheet (18×13 inches) with parchment paper or foil.
- In a stand mixer with the whisk attachment (or using a hand mixer), beat the egg whites on medium until frothy.
- Gradually add the sugar, then increase to medium-high and beat for about 15 minutes until stiff, glossy peaks form.
- Spread the meringue evenly over the baking sheet.
- Bake for 2 hours. Turn the oven off, crack the door, and let the meringue cool inside.
- Once completely cool, carefully peel away the parchment or foil and cut the meringue in half.
Make-ahead tip: Store in an airtight container at room temperature for up to 2 days.
2. Chocolate Cake
- Preheat the oven to 350°F (175°C). Line the same size baking sheet with parchment or foil and lightly grease it.
- In a large bowl, combine sugar, flour, cocoa, baking soda, baking powder, and salt. Sift the cocoa to remove clumps.
- In another bowl or measuring cup, whisk together eggs, buttermilk, coffee, oil, and vanilla.
- Pour wet ingredients into the dry and mix until combined—don’t overmix.
- Spread the batter evenly in the prepared pan.
- Bake for 20–25 minutes or until a toothpick inserted in the center comes out clean.
- Cool completely, then cut in half.
Tip: Let the cake cool fully before handling or layering to prevent tearing.
3. Frosting
- In a stand mixer or with a hand mixer, beat softened cream cheese and butter until smooth.
- Add dulce de leche, vanilla, and salt. Beat again until creamy and fully incorporated.
- Refrigerate if not using right away.
Note: This frosting is rich but not overly sweet, which balances the Nutella and meringue perfectly.
4. Assembling the Pastries
- Place one half of the chocolate cake on a tray or platter.
- Spread half the frosting evenly on top.
- Sprinkle a generous handful of chopped hazelnuts.
- Spread ¼ to ⅓ cup Nutella on the bottom of a meringue layer. Place it Nutella-side down on top of the frosted cake.
- Spread another ⅓ to ½ cup Nutella on top of the meringue layer.
- Sprinkle more hazelnuts.
- Top with the second meringue layer. Again, spread Nutella (¼ to ⅓ cup) and sprinkle nuts.
- Finish with the second half of the chocolate cake.
- Spread remaining frosting on top, sprinkle more hazelnuts, and drizzle with melted chocolate if desired.
Optional: You can also frost the sides and serve it as a full cake or cut into individual pastries.
Beginner Tips and Notes
Meringue Troubleshooting
- Not stiffening? Make sure your bowl and whisk are clean and free of grease. Any trace of yolk in the whites can prevent whipping.
- Cracking? That’s okay. Meringue is delicate. Cracks won’t affect flavor and are often hidden once layered.
- Sticky bottom? Let it cool longer, or use a thin spatula to help lift.
Cake Tips
- Dry cake? Don’t overbake. Set a timer and check at the 20-minute mark.
- Coffee taste too strong? Use decaf or substitute with water if preferred, though coffee enhances chocolate flavor beautifully.
- No mixer? A whisk works fine for the cake and frosting—just mix thoroughly.
Frosting Fixes
- Too soft? Chill for 15–30 minutes before using.
- Too thick? Let sit at room temperature for a few minutes or add a teaspoon of milk to loosen.
Assembly Tips
- Messy layers? Use a long serrated knife to trim edges and neaten layers after chilling.
- Nut allergies? Skip the hazelnuts or replace with crunchy granola for texture.

Serving Suggestions
These pastries are rich, so smaller portions go a long way. Here’s how to serve and elevate them:
- With fresh berries like raspberries or strawberries for tart contrast
- Alongside coffee or tea for an elegant afternoon treat
- With a scoop of vanilla or hazelnut ice cream for a dessert worthy of special occasions
- Cut into squares or rectangles for party trays or buffets
Storage Tips
- Store covered in the refrigerator for up to 3 days.
- The meringue may soften over time, but the flavor remains delicious.
- To freeze, wrap individual portions tightly in plastic wrap and foil. Thaw in the fridge overnight before serving.
Engagement Features
Cooking is about sharing—both food and experience. If you try this recipe, let us know how it went. Did you make any ingredient swaps? Was it your first time working with meringue? Were you surprised by how doable it was? Leave a comment below and share your version.
This recipe might look elaborate at first glance, but once broken down, it becomes a step-by-step journey that’s surprisingly beginner-friendly. It’s a perfect opportunity to learn new techniques in a rewarding, low-stress way. And the result? A dessert that looks impressive, tastes luxurious, and tells everyone at the table that you know your way around a kitchen—even if you’ve just started.