
There’s something undeniably comforting about a homemade pie. The rich, fruity aroma filling the kitchen, the sight of glossy berries bubbling in their own syrup, and the anticipation of that first bite make it a timeless dessert. But for beginners, making a pie filling from scratch might seem intimidating. Fortunately, blueberry pie filling is one of the easiest and most rewarding recipes to master.
Print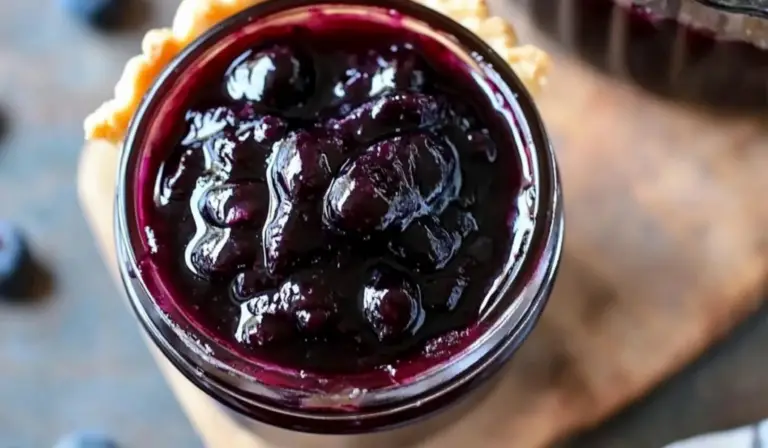
The Ultimate Beginner’s Guide to Making Homemade Blueberry Pie Filling
Sweet, juicy, and bursting with fresh blueberry flavor! 🫐✨ This Homemade Blueberry Pie Filling is thick, glossy, and perfect for pies, cheesecakes, pancakes, or even spooning over ice cream! Beginner-friendly and made with simple ingredients, it’s a must-have for any dessert lover! 🍰💙
- Total Time: 32 minutes
- Yield: 24 ounces 1x
Ingredients
- 4 cups blueberries – fresh or frozen
- ¾ cup granulated sugar
- 3 tablespoons cornstarch
- Pinch of salt
- 1 tablespoon lemon juice
- 2 teaspoons vanilla extract (optional)
Instructions
Step 1: Cook the Blueberries
Place the blueberries in a medium saucepan over medium heat. Stir occasionally and let them cook until they begin to release their juices and soften. This usually takes about 7 to 9 minutes. If using frozen blueberries, they may take a bit longer.
Step 2: Prepare the Thickening Mixture
While the blueberries are cooking, whisk together the sugar, cornstarch, and salt in a separate bowl. This ensures that the cornstarch distributes evenly and prevents clumping when added to the blueberries.
Step 3: Combine and Thicken
Once the blueberries have softened, gradually add the sugar and cornstarch mixture to the saucepan, stirring continuously. Keep stirring as the filling thickens, which should take about 2 to 3 minutes. The mixture should reach a glossy, syrup-like consistency.
Step 4: Add the Final Touches
Remove the saucepan from heat and carefully stir in the lemon juice and vanilla extract (if using). The lemon juice brightens the flavor, while the vanilla adds depth.
Step 5: Cool and Store
Let the filling cool to room temperature before transferring it to a glass jar or airtight container. Store it in the refrigerator until ready to use. The filling will continue to thicken as it cools.
Notes
How to Tell If the Filling is Thick Enough
The filling should coat the back of a spoon and have a glossy, smooth texture. If it appears too runny, let it simmer for another minute while stirring constantly.
What to Do If the Mixture is Too Thick
If the filling thickens too much, add a tablespoon of water or fruit juice and stir well. Keep adding small amounts until it reaches the desired consistency.
Preventing Overcooked Blueberries
If blueberries are overcooked, they may lose their shape and turn into a jam-like consistency. To prevent this, remove the saucepan from heat as soon as the mixture thickens.
How to Avoid Clumps in the Filling
Always whisk the cornstarch with sugar before adding it to the blueberries. Stirring continuously while cooking also helps prevent lumps.
Using Frozen Blueberries
There’s no need to thaw frozen blueberries before cooking. Simply add them directly to the saucepan, keeping in mind that they may release more liquid and take slightly longer to cook.
- Prep Time: 2 minutes
- Cook Time: 30 minutes
With just a handful of ingredients, you can create a luscious, flavorful filling that works for pies, tarts, cheesecakes, or even as a topping for pancakes and ice cream. Unlike store-bought options, this homemade version is free from preservatives and artificial flavors, giving you a pure, fresh taste with every spoonful.
This recipe is perfect for beginners because it requires minimal effort and basic kitchen tools. The cooking process is straightforward, and the ingredients are easily accessible. Whether you’re using fresh or frozen blueberries, the result is a vibrant, sweet, and slightly tangy filling that enhances any dessert.
Why This Recipe is Ideal for Beginners
Simplicity is key when learning how to cook, and this blueberry pie filling recipe delivers just that. There are no complicated techniques or special equipment needed—just a saucepan, a spoon, and a few measuring cups.
The recipe is also quick to prepare, taking just over 30 minutes from start to finish. It allows room for adjustments based on taste preferences, making it a flexible choice for those still learning their way around the kitchen.
Additionally, this filling is highly versatile. While its primary use is for pies, you can also use it as a topping for yogurt, oatmeal, waffles, or even spread it over toast. Learning this basic recipe opens up a world of dessert possibilities.
Ingredients and Substitutions
Main Ingredients
- 4 cups blueberries – fresh or frozen
- ¾ cup granulated sugar
- 3 tablespoons cornstarch
- Pinch of salt
- 1 tablespoon lemon juice
- 2 teaspoons vanilla extract (optional)
Ingredient Substitutions and Variations
- If you prefer a less sweet filling, reduce the sugar to ½ cup. For a richer flavor, try brown sugar instead of granulated sugar.
- If you don’t have cornstarch, use an equal amount of arrowroot powder or tapioca starch. These alternatives will provide the same thickening effect.
- Lemon juice adds a slight tanginess that balances the sweetness. If unavailable, lime juice or orange juice can be used as substitutes.
- Vanilla extract enhances the overall flavor, but it is optional. Almond extract or cinnamon can be added for a unique twist.
Step-by-Step Instructions
Step 1: Cook the Blueberries
Place the blueberries in a medium saucepan over medium heat. Stir occasionally and let them cook until they begin to release their juices and soften. This usually takes about 7 to 9 minutes. If using frozen blueberries, they may take a bit longer.
Step 2: Prepare the Thickening Mixture
While the blueberries are cooking, whisk together the sugar, cornstarch, and salt in a separate bowl. This ensures that the cornstarch distributes evenly and prevents clumping when added to the blueberries.
Step 3: Combine and Thicken
Once the blueberries have softened, gradually add the sugar and cornstarch mixture to the saucepan, stirring continuously. Keep stirring as the filling thickens, which should take about 2 to 3 minutes. The mixture should reach a glossy, syrup-like consistency.
Step 4: Add the Final Touches
Remove the saucepan from heat and carefully stir in the lemon juice and vanilla extract (if using). The lemon juice brightens the flavor, while the vanilla adds depth.
Step 5: Cool and Store
Let the filling cool to room temperature before transferring it to a glass jar or airtight container. Store it in the refrigerator until ready to use. The filling will continue to thicken as it cools.
Beginner Tips and Notes
How to Tell If the Filling is Thick Enough
The filling should coat the back of a spoon and have a glossy, smooth texture. If it appears too runny, let it simmer for another minute while stirring constantly.
What to Do If the Mixture is Too Thick
If the filling thickens too much, add a tablespoon of water or fruit juice and stir well. Keep adding small amounts until it reaches the desired consistency.
Preventing Overcooked Blueberries
If blueberries are overcooked, they may lose their shape and turn into a jam-like consistency. To prevent this, remove the saucepan from heat as soon as the mixture thickens.
How to Avoid Clumps in the Filling
Always whisk the cornstarch with sugar before adding it to the blueberries. Stirring continuously while cooking also helps prevent lumps.
Using Frozen Blueberries
There’s no need to thaw frozen blueberries before cooking. Simply add them directly to the saucepan, keeping in mind that they may release more liquid and take slightly longer to cook.

Serving Suggestions
This homemade blueberry pie filling is incredibly versatile. Here are some creative ways to use it:
- Classic Blueberry Pie – Pour the filling into a pre-baked pie crust and top it with another layer of pastry or a crumble topping.
- Cheesecake Topping – Spoon the filling over a creamy cheesecake for an elegant dessert.
- Pancakes and Waffles – Drizzle over pancakes or waffles for a breakfast upgrade.
- Yogurt and Oatmeal – Stir into Greek yogurt or oatmeal for added sweetness and texture.
- Ice Cream Topping – Serve warm over vanilla ice cream for a delicious contrast of flavors.
- Blueberry Shortcake – Layer it between biscuits or sponge cake with whipped cream.
Storage and Shelf Life
Refrigeration
Store the blueberry pie filling in an airtight container or glass jar in the refrigerator for up to a week. Ensure it is fully cooled before sealing to prevent condensation and excess moisture.
Freezing for Long-Term Storage
For longer storage, freeze the filling in a freezer-safe container for up to three months. Leave about an inch of space at the top to allow for expansion. When ready to use, thaw it in the refrigerator overnight and reheat it gently over low heat.
Engagement and Final Thoughts
Making homemade blueberry pie filling is a rewarding and straightforward process, perfect for beginner cooks looking to build their confidence in the kitchen. This recipe teaches essential cooking techniques such as thickening with cornstarch, balancing flavors, and properly storing homemade ingredients.
One of the best parts of this recipe is its adaptability. Whether you prefer your filling extra sweet, slightly tart, or infused with warm spices, it can be adjusted to suit your taste. Additionally, it offers a healthier, fresher alternative to store-bought fillings, allowing you to control the quality of ingredients.
If you’ve never made pie filling from scratch before, this is a great place to start. It requires minimal effort, uses simple ingredients, and yields a deliciously rich filling that enhances a variety of desserts.
Give this recipe a try, and share your experience. Have you experimented with different flavor additions? Did you use the filling in a unique way? Let us know in the comments, and enjoy your homemade blueberry creation.