
The Strawberry Shortcake Cheesecake Dessert Roll is a delightful twist on two beloved desserts—classic strawberry shortcake and creamy cheesecake. By combining the lightness of sponge cake with the indulgence of cheesecake filling, this dessert offers the best of both worlds in a fun, roll-up presentation. Inspired by the concept of sushi rolls, this cake is not only visually appealing but also incredibly tasty, making it a perfect treat for any occasion. Whether you’re hosting a party, celebrating a special event, or just craving something sweet, this dessert roll will impress with its vibrant flavors and smooth texture.
Print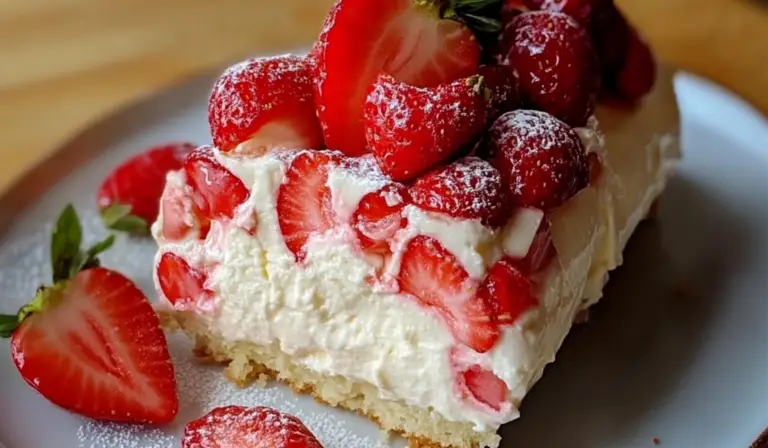
Strawberry Shortcake Cheesecake Dessert Roll
🍓✨ A swirl of sweetness and decadence! This Strawberry Shortcake Cheesecake Dessert Roll is the perfect balance of light sponge cake, creamy cheesecake filling, and fresh strawberries. 😍💫 Every bite is a soft, flavorful dream that combines your favorite desserts in one indulgent roll. Perfect for a summer treat or a special occasion! 🍴🍓
#StrawberryShortcake #CheesecakeRoll #DessertRoll #StrawberryDelight #SweetSwirls #SummerDesserts #DessertGoals #CreamyAndDelicious #IndulgentTreats #FoodieFavorites 🍓🍰✨
- Total Time: 35 minutes
Ingredients
- Fluffy, Soft Cake: The sponge cake is light and airy, providing a perfect contrast to the creamy cheesecake filling and juicy strawberries.
- Cheesecake Filling: A rich, velvety cream cheese filling that’s perfectly sweet and smooth, offering the ideal creamy texture against the sponge cake.
- Fresh Strawberries: The strawberries add a refreshing, fruity burst, making the dessert feel light and balanced even with its indulgent filling.
- Fun Presentation: The sushi roll style adds an element of surprise and excitement, making it an attractive addition to any dessert table.
Instructions
Step 1: Preheat the Oven and Prepare the Pan
Preheat your oven to 350°F (175°C). This ensures the oven is at the right temperature when the cake is ready to go in. Grease a 15×10-inch jelly roll pan and line it with parchment paper. The parchment paper helps the cake release easily from the pan after baking. If you prefer, you can also lightly flour the pan to ensure the cake doesn’t stick.
Step 2: Make the Cake Batter
In a medium-sized bowl, whisk together the flour, baking powder, and salt. These dry ingredients will provide the structure for the cake.
In another large bowl, beat the eggs and sugar together until the mixture becomes thick and pale. This process, called creaming, incorporates air into the batter, which is what gives the cake its light texture. Add in the vanilla extract and milk, mixing until the ingredients are fully incorporated.
Gradually fold the dry ingredients into the wet mixture. Be gentle when folding to prevent the batter from deflating. You want to maintain as much air as possible to achieve a fluffy, light cake.
Step 3: Bake the Cake
Pour the batter into the prepared pan, spreading it out evenly. Bake for about 12-15 minutes, or until the cake is lightly golden and a toothpick inserted into the center comes out clean. The cake should be soft to the touch, but not wet.
While the cake is baking, prepare a clean kitchen towel by dusting it generously with powdered sugar. Once the cake is done, immediately invert the pan onto the towel. Carefully peel off the parchment paper, and gently roll the cake, starting from one end, using the towel to help shape it. This technique helps the cake retain its roll shape and prevents it from cracking later. Let the rolled-up cake cool completely.
Step 4: Prepare the Cheesecake Filling
While the cake cools, make the cheesecake filling. In a medium-sized bowl, beat the softened cream cheese, powdered sugar, and vanilla extract together until the mixture is smooth and creamy. The cream cheese should be soft to ensure a lump-free filling.
Next, gently fold in the whipped cream. Be careful not to deflate the whipped cream too much—its light, airy texture is key to the filling’s fluffiness. Once combined, the cheesecake filling should be smooth, creamy, and easy to spread.
Step 5: Assemble the Roll
Once the cake has cooled, unroll it gently from the towel. Spread an even layer of the cheesecake filling over the cake, leaving a small border around the edges.
Place the sliced strawberries over the cheesecake filling, arranging them evenly. The fresh strawberries will add a burst of color and flavor to the dessert, making each slice look as appealing as it tastes.
Step 6: Roll Up the Cake
Carefully roll the cake back up, this time without the towel. Be gentle so the cake doesn’t crack, and ensure that the filling stays intact inside. Once rolled, wrap the dessert roll tightly in plastic wrap and refrigerate it for at least one hour. Chilling the roll allows the filling to set and makes it easier to slice.
Step 7: Slice and Serve
After the dessert roll has chilled, remove it from the refrigerator and unwrap the plastic wrap. Slice the roll into pieces, cutting it sushi-style to reveal the layers of cake, cheesecake filling, and strawberries.
Optionally, garnish the top with extra strawberries, a dollop of whipped cream, or a dusting of powdered sugar for added flair. Serve the slices immediately, and watch as your guests are impressed by this beautiful and delicious dessert.
Notes
- Freshness Matters: Use fresh strawberries for the best flavor and texture. Frozen strawberries can become too watery, affecting the roll’s structure.
- Chill the Cake: Don’t skip the step of chilling the cake roll in the refrigerator. It helps the filling set and ensures clean, neat slices.
- Customization: Feel free to experiment with different fruits. Blueberries, raspberries, or even peaches could be excellent substitutes for the strawberries, depending on the season.
- Serving Suggestions: Serve this dessert roll on its own, or pair it with a scoop of vanilla ice cream or a drizzle of strawberry syrup for an extra indulgent treat.
- Prep Time: 20 minutes
- Cook Time: 15 minutes
The Appeal of Strawberry Shortcake Cheesecake Roll
Strawberry shortcake has long been a favorite dessert for many, especially during the spring and summer months when fresh strawberries are in abundance. Combining that with a rich cheesecake filling creates a luscious treat that’s both indulgent and refreshing. The addition of a soft, airy sponge cake base makes this dessert easy to serve and enjoy, and its roll-up form adds an element of fun and creativity to the traditional dessert.
Why You’ll Love This Recipe
This dessert roll brings together several factors that elevate it from an ordinary treat to something extraordinary:
- Fluffy, Soft Cake: The sponge cake is light and airy, providing a perfect contrast to the creamy cheesecake filling and juicy strawberries.
- Cheesecake Filling: A rich, velvety cream cheese filling that’s perfectly sweet and smooth, offering the ideal creamy texture against the sponge cake.
- Fresh Strawberries: The strawberries add a refreshing, fruity burst, making the dessert feel light and balanced even with its indulgent filling.
- Fun Presentation: The sushi roll style adds an element of surprise and excitement, making it an attractive addition to any dessert table.
Ingredients BreakdownCreating the perfect Strawberry Shortcake Cheesecake Dessert Roll requires just a handful of ingredients, many of which are pantry staples. Let’s break them down:For the Cake Base
- All-Purpose Flour: This is the main dry ingredient that forms the foundation of the sponge cake. The flour gives the cake its structure while allowing it to remain light and tender.
- Baking Powder: This leavening agent helps the cake rise, ensuring it’s fluffy and soft.
- Salt: A pinch of salt balances out the sweetness of the cake and enhances the overall flavor.
- Eggs: Eggs act as a binder and provide structure to the cake. They also help with the texture, giving it that delicate, airy quality.
- Sugar: Granulated sugar sweetens the cake and helps with its structure and moisture.
- Vanilla Extract: This ingredient infuses the cake with a warm, aromatic flavor, complementing the sweetness of the cake and filling.
- Milk: Milk adds moisture to the cake, helping it stay soft and tender.
For the Cheesecake Filling
- Cream Cheese: The base of the cheesecake filling. It gives the filling its smooth and creamy texture. Ensure the cream cheese is softened to make mixing easier.
- Powdered Sugar: This ingredient sweetens the filling without adding any graininess, ensuring a silky-smooth texture.
- Vanilla Extract: Just a touch of vanilla enhances the flavor of the cream cheese filling.
- Whipped Cream: Whipped cream adds lightness and volume to the cheesecake filling, giving it a fluffy, airy texture that contrasts perfectly with the cake.
For the Filling
- Fresh Strawberries: The star of the dish. Fresh strawberries provide a burst of sweetness and a slightly tart contrast to the creamy filling. Their bright red color adds a vibrant, inviting touch to the roll.
Step-by-Step Instructions
Now that we’ve covered the ingredients, it’s time to dive into the step-by-step process to create this show-stopping dessert roll.
Step 1: Preheat the Oven and Prepare the Pan
Preheat your oven to 350°F (175°C). This ensures the oven is at the right temperature when the cake is ready to go in. Grease a 15×10-inch jelly roll pan and line it with parchment paper. The parchment paper helps the cake release easily from the pan after baking. If you prefer, you can also lightly flour the pan to ensure the cake doesn’t stick.
Step 2: Make the Cake Batter
In a medium-sized bowl, whisk together the flour, baking powder, and salt. These dry ingredients will provide the structure for the cake.
In another large bowl, beat the eggs and sugar together until the mixture becomes thick and pale. This process, called creaming, incorporates air into the batter, which is what gives the cake its light texture. Add in the vanilla extract and milk, mixing until the ingredients are fully incorporated.
Gradually fold the dry ingredients into the wet mixture. Be gentle when folding to prevent the batter from deflating. You want to maintain as much air as possible to achieve a fluffy, light cake.
Step 3: Bake the Cake
Pour the batter into the prepared pan, spreading it out evenly. Bake for about 12-15 minutes, or until the cake is lightly golden and a toothpick inserted into the center comes out clean. The cake should be soft to the touch, but not wet.
While the cake is baking, prepare a clean kitchen towel by dusting it generously with powdered sugar. Once the cake is done, immediately invert the pan onto the towel. Carefully peel off the parchment paper, and gently roll the cake, starting from one end, using the towel to help shape it. This technique helps the cake retain its roll shape and prevents it from cracking later. Let the rolled-up cake cool completely.
Step 4: Prepare the Cheesecake Filling
While the cake cools, make the cheesecake filling. In a medium-sized bowl, beat the softened cream cheese, powdered sugar, and vanilla extract together until the mixture is smooth and creamy. The cream cheese should be soft to ensure a lump-free filling.
Next, gently fold in the whipped cream. Be careful not to deflate the whipped cream too much—its light, airy texture is key to the filling’s fluffiness. Once combined, the cheesecake filling should be smooth, creamy, and easy to spread.
Step 5: Assemble the Roll
Once the cake has cooled, unroll it gently from the towel. Spread an even layer of the cheesecake filling over the cake, leaving a small border around the edges.
Place the sliced strawberries over the cheesecake filling, arranging them evenly. The fresh strawberries will add a burst of color and flavor to the dessert, making each slice look as appealing as it tastes.
Step 6: Roll Up the Cake
Carefully roll the cake back up, this time without the towel. Be gentle so the cake doesn’t crack, and ensure that the filling stays intact inside. Once rolled, wrap the dessert roll tightly in plastic wrap and refrigerate it for at least one hour. Chilling the roll allows the filling to set and makes it easier to slice.
Step 7: Slice and Serve
After the dessert roll has chilled, remove it from the refrigerator and unwrap the plastic wrap. Slice the roll into pieces, cutting it sushi-style to reveal the layers of cake, cheesecake filling, and strawberries.
- Freshness Matters: Use fresh strawberries for the best flavor and texture. Frozen strawberries can become too watery, affecting the roll’s structure.
- Chill the Cake: Don’t skip the step of chilling the cake roll in the refrigerator. It helps the filling set and ensures clean, neat slices.
- Customization: Feel free to experiment with different fruits. Blueberries, raspberries, or even peaches could be excellent substitutes for the strawberries, depending on the season.
- Serving Suggestions: Serve this dessert roll on its own, or pair it with a scoop of vanilla ice cream or a drizzle of strawberry syrup for an extra indulgent treat.
Variations and Substitutes
- Gluten-Free Option: If you’re gluten intolerant, you can substitute the all-purpose flour with a gluten-free flour blend. Just make sure the blend you choose is suitable for baking cakes.
- Dairy-Free Option: To make this recipe dairy-free, substitute the cream cheese with a dairy-free cream cheese alternative, and use non-dairy whipped cream. You can also find dairy-free versions of whipped cream at many grocery stores.
- Vegan Option: For a vegan version, use flax eggs instead of regular eggs, and opt for a plant-based whipped cream and dairy-free cream cheese.

Conclusion
The Strawberry Shortcake Cheesecake Dessert Roll is a showstopper that blends two timeless desserts into one irresistible treat. With its soft cake, creamy cheesecake filling, and fresh strawberries, it’s perfect for any occasion—from casual get-togethers to special celebrations. The unique presentation makes it even more fun to serve and enjoy. Plus, it’s adaptable to various dietary preferences, making it an accessible dessert for everyone. Try this recipe the next time you want to impress your friends and family with a delicious, visually stunning dessert!