
Red Velvet Cheesecake Bites are everything you love about the iconic red velvet cake combined with the creamy richness of cheesecake, all packed into perfectly portioned bite-sized treats. This dessert captures the charm of red velvet cake with its subtle cocoa flavor, a hint of tang from the cream cheese, and a pop of vibrant red color that adds a festive touch to any gathering. Whether you’re hosting a party, attending a potluck, or simply craving an indulgent snack, these cheesecake bites are the ultimate solution. They’re not only visually stunning but also irresistibly delicious, making them a guaranteed hit among dessert lovers.
Print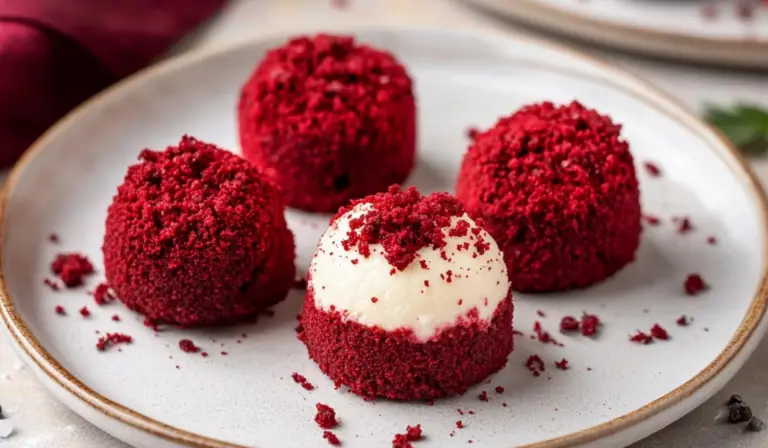
Red Velvet Cheesecake Bites
Mini bites, maximum delight! 🎂❤️ These Red Velvet Cheesecake Bites are the perfect mix of creamy cheesecake and velvety red goodness. A must-try for any dessert lover! 🍰✨”
#RedVelvetLove #CheesecakeGoals #MiniDesserts #BiteSizedBliss #DessertPerfection #SweetTreats #FoodieFavorites #HolidayDesserts #EasyRecipes #DessertInspo
- Total Time: 3 hours
Ingredients
- 1 box red velvet cake mix (plus ingredients called for on the box)
- 16 ounces cream cheese (softened to room temperature)
- 1/2 cup powdered sugar
- 3 tablespoons milk
- 1 teaspoon vanilla extract
Instructions
- Preheat your oven to 350°F (175°C).
- Prepare the red velvet cake batter according to the package instructions. Pour the batter into a baking pan and bake as directed.
- While the cake bakes, prepare the cheesecake filling:
• In a large mixing bowl, beat the softened cream cheese and powdered sugar with a hand mixer until the mixture becomes light and fluffy.
• Add milk and vanilla extract, then continue to beat until stiff peaks form. - Line a large baking sheet with parchment paper. Using a small cookie scoop, scoop the cream cheese mixture into small balls and place them on the prepared baking sheet.
- Transfer the cream cheese balls to the freezer and chill for 1 hour or until they are firm and easy to handle.
- Once the cake is fully baked, remove it from the oven and allow it to cool completely.
- Cut the cooled cake in half. Crumble one half into fine crumbs in a large bowl. You can enjoy the remaining half as a snack or save it for another use.
- Remove the chilled cream cheese balls from the freezer. Roll each ball in the red velvet cake crumbs until fully coated.
- Place the coated cheesecake bites back onto the prepared baking sheet. Refrigerate for about 1 hour to allow them to set.
Notes
• Serve the Red Velvet Cheesecake Bites chilled on a decorative platter for an elegant presentation.
• Garnish with a light dusting of powdered sugar or drizzle with melted white chocolate for an extra touch of indulgence.
• Pair with a warm cup of coffee or a glass of chilled milk to complement their creamy texture and rich flavor.
- Prep Time: 30 minutes
- Cook Time: 30 minutes
Ingredients
1 box red velvet cake mix (plus ingredients called for on the box)
16 ounces cream cheese (softened to room temperature)
1/2 cup powdered sugar
3 tablespoons milk
1 teaspoon vanilla extract
Instructions
Preheat the oven to 350°F. Prepare and bake the red velvet cake according to the instructions on the box. While the cake is baking, use a hand mixer to beat the softened cream cheese and powdered sugar in a large mixing bowl until the mixture is light and fluffy. Add the milk and vanilla extract, then continue beating until stiff peaks form. Line a large baking sheet with parchment paper. Using a small cookie scoop, portion the cream cheese mixture into small balls and place them onto the prepared baking sheet. Transfer the tray to the freezer and chill for about 1 hour or until the balls are firm enough to handle. Once the cake has baked, remove it from the oven and allow it to cool completely. Cut the cooled cake in half. Place one half in a large mixing bowl and set the other half aside for snacking or another recipe. Break the cake half in the bowl into fine crumbs using your hands or a fork. Take the chilled cream cheese balls from the freezer. Roll each ball in the red velvet cake crumbs until it is fully coated. Return the coated bites to the baking sheet. Refrigerate the bites for another hour to allow them to set fully. Serve and enjoy.
Flavors, Textures, and Aromas
Imagine biting into one of these cheesecake bites. The velvety cake crumbs create a tender outer layer that gently gives way to the luscious and creamy cheesecake center. The delicate cocoa flavor of the red velvet harmonizes with the tangy sweetness of the cream cheese, creating a balance that is both indulgent and light. With every bite, the richness of the cheesecake filling and the softness of the cake crumbs come together for a truly memorable dessert experience. The vibrant red hue is as much a treat for the eyes as the dessert is for the taste buds, while the faint vanilla aroma adds an inviting warmth.
Tips for Success
- For a more festive presentation, drizzle melted white or dark chocolate over the bites before serving.
- Use a food processor to create finer cake crumbs for a smoother coating.
- To make these bites ahead, prepare the cream cheese balls and freeze them. Roll in cake crumbs just before serving for the freshest look.
Ingredient Substitutions
- Substitute mascarpone or ricotta for cream cheese for a slightly different creamy texture and flavor.
- Use homemade red velvet cake if you prefer a scratch-made touch.
- Swap vanilla extract for almond extract for a subtle nutty twist.
Variations
- Add mini chocolate chips to the cream cheese mixture for an extra chocolatey surprise.
- Roll the bites in colorful sprinkles or edible glitter for a party-ready look.
- Use chocolate cake mix for a unique spin on this recipe, creating Chocolate Cheesecake Bites.

Serving Suggestions
- Serve on a dessert platter alongside fresh berries and whipped cream for a vibrant presentation.
- Pair with a glass of champagne or coffee for a delightful treat.
- Package in decorative boxes to give as thoughtful homemade gifts.
Red Velvet Cheesecake Bites are a testament to the magic of combining two classic desserts into one perfect bite. With their striking appearance, rich flavors, and delightful textures, these treats are sure to become a staple at your dessert table. Try them today and experience the joy of a dessert that is as fun to make as it is to eat.