
If you’ve ever thought making ice cream at home was too complicated or required fancy equipment, this recipe is here to change your mind. With just three simple ingredients, no ice cream maker, and minimal effort, you can whip up a creamy, dreamy dessert that rivals store-bought ice cream. Whether you’re a first-time cook or simply short on time, this no-churn ice cream recipe is a game-changer.
Print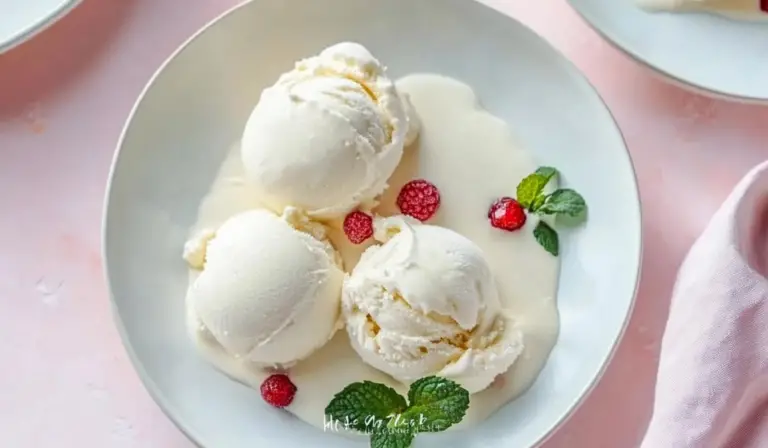
No-Churn 3-Ingredient Ice Cream Recipe for Beginners
❄️🍨 Homemade Ice Cream, No Machine Needed! This No-Churn 3-Ingredient Ice Cream recipe is beginner-friendly and oh-so-creamy. 🥛 Just whip, mix, and freeze for a delightful dessert that’s ready to customize with your favorite toppings. Sweet treats have never been this easy! 🍦💖
#NoChurnDessert #IceCreamAtHome #3IngredientRecipe #EasyDesserts #BeginnerCooks #CreamyDreamy #SummerInAFreezer #SimpleAndSweet #DIYIceCream #FoodieGoals ❄️🍦🍨
- Total Time: 4 hours 15 minutes (includes freezing time)
- Yield: 6 servings 1x
Ingredients
- Sweetened Condensed Milk (14 ounces)
Sweetened condensed milk serves as the base for this recipe, providing sweetness and a creamy texture. You can use regular or low-fat versions, depending on your preference.- Alternative: If you prefer less sugar, you can use condensed milk substitutes like sweetened coconut milk or a homemade version using milk and sugar reduced over heat.
- Vanilla Extract (2 teaspoons)
Vanilla adds a warm, classic flavor to the ice cream. Choose pure vanilla extract for the best results, but imitation vanilla can work in a pinch.- Alternative: You can swap vanilla for other flavorings, like almond extract, peppermint extract, or even a splash of rum for a more adult version.
- Heavy Whipping Cream (2 cups)
Whipping cream is essential for achieving the creamy, airy texture of the ice cream. It’s important to use heavy cream with at least 35% fat content.- Alternative: For a dairy-free version, you can use coconut cream (the thick part from a can of full-fat coconut milk).
Instructions
- Prepare Your Pan
- Line a 9×5 loaf pan with parchment paper and place it in the freezer to chill. This step helps the ice cream freeze faster and more evenly.
- Mix the Sweetened Condensed Milk and Vanilla
- In a large chilled bowl, combine the sweetened condensed milk and vanilla extract. Stir until well blended. This mixture will serve as the flavorful base of your ice cream.
- Whip the Heavy Cream
- In a separate chilled bowl, pour the heavy whipping cream. Using a hand mixer or stand mixer on medium-high speed, whip the cream until stiff peaks form. This means the cream will hold its shape when you lift the beaters out of the bowl.
- Tip: Be careful not to over-whip, as this can cause the cream to separate into butter and buttermilk. Stop as soon as the peaks are firm and glossy.
- Fold the Whipped Cream into the Base
- Gently fold the whipped cream into the sweetened condensed milk mixture. Use a spatula to combine them with a light, sweeping motion to keep the mixture airy. Overmixing can deflate the whipped cream, so take your time and be gentle.
- Optional Mix-Ins: At this stage, stir in any desired mix-ins, such as chocolate chips, crushed cookies, fruit puree, or chopped nuts.
- Transfer to the Pan and Freeze
- Pour the mixture into the prepared loaf pan. Smooth the top with a spatula, then cover the pan with plastic wrap to prevent ice crystals from forming.
- Freeze for at least 4 hours or overnight until the ice cream is firm and scoopable.
Notes
- What if the ice cream is too hard to scoop?
If your ice cream is too firm after freezing, let it sit at room temperature for 5–10 minutes before scooping. - How to tell if the cream is whipped enough?
Look for stiff peaks that stand up without drooping. If you’re unsure, stop and check frequently to avoid overwhipping. - Preventing Ice Crystals
Cover the surface of the ice cream with plastic wrap before sealing it in the freezer to minimize ice crystal formation. - Efficient Prep
Measure all your ingredients beforehand to make the process smoother. Chilling your tools and ingredients will also save time. - Substitute Tools
If you don’t have an electric mixer, you can whip the cream by hand using a whisk, though it will take more effort.
- Prep Time: 15 minutes
In this article, we’ll guide you step-by-step through the process of making no-churn ice cream while sharing practical tips, ingredient alternatives, and serving ideas to help you feel confident in the kitchen. Let’s dive into the world of homemade frozen treats!
Introduction: A Simple Treat with Maximum Flavor
Making ice cream at home used to intimidate me. The thought of ice cream makers, churning, and long ingredient lists was overwhelming. But everything changed when I discovered this no-churn method. It’s incredibly simple, requires no fancy tools, and uses just three basic ingredients you likely already have at home.
What makes this recipe even better is how beginner-friendly it is. You don’t need any prior cooking experience to make it successfully. Plus, the ingredients are affordable, and the process is quick—most of the time is just spent waiting for it to freeze!
This ice cream is a blank canvas for all your favorite mix-ins, making it a customizable dessert you’ll want to make again and again. It’s perfect for summer days, impromptu dessert cravings, or even as a fun activity with kids.
Why This Recipe is Perfect for Beginners
- Simplicity: Just three ingredients and straightforward steps make this an easy recipe to follow.
- No Special Equipment Needed: You won’t need an ice cream maker or any complicated tools—just a whisk and some bowls.
- Quick Prep: The hands-on time is only about 15 minutes, leaving you plenty of time for other activities while it freezes.
- Customizable: This basic recipe is incredibly versatile, so you can add your favorite mix-ins or flavors to make it your own.
Ingredients and Preparation
To make this ice cream, you’ll need the following:
- Sweetened Condensed Milk (14 ounces)Sweetened condensed milk serves as the base for this recipe, providing sweetness and a creamy texture. You can use regular or low-fat versions, depending on your preference.
- Alternative: If you prefer less sugar, you can use condensed milk substitutes like sweetened coconut milk or a homemade version using milk and sugar reduced over heat.
- Vanilla Extract (2 teaspoons)Vanilla adds a warm, classic flavor to the ice cream. Choose pure vanilla extract for the best results, but imitation vanilla can work in a pinch.
- Alternative: You can swap vanilla for other flavorings, like almond extract, peppermint extract, or even a splash of rum for a more adult version.
- Heavy Whipping Cream (2 cups)Whipping cream is essential for achieving the creamy, airy texture of the ice cream. It’s important to use heavy cream with at least 35% fat content.
- Alternative: For a dairy-free version, you can use coconut cream (the thick part from a can of full-fat coconut milk).
Preparation Tips
- Chill Your Tools: Place your mixing bowls and whisk or beaters in the refrigerator or freezer for about 15 minutes before starting. This helps the cream whip up faster and stay cold during the process.
- Choose the Right Pan: A 9×5 loaf pan works perfectly for freezing this ice cream, but any freezer-safe container will do. Line it with parchment paper for easy removal and cleanup.
- Set Up Your Freezer Space: Make sure there’s enough room in your freezer for the pan to lie flat while the ice cream freezes.
Step-by-Step Instructions
Follow these easy steps to create your no-churn ice cream:
- Prepare Your Pan
- Line a 9×5 loaf pan with parchment paper and place it in the freezer to chill. This step helps the ice cream freeze faster and more evenly.
- Mix the Sweetened Condensed Milk and Vanilla
- In a large chilled bowl, combine the sweetened condensed milk and vanilla extract. Stir until well blended. This mixture will serve as the flavorful base of your ice cream.
- Whip the Heavy Cream
- In a separate chilled bowl, pour the heavy whipping cream. Using a hand mixer or stand mixer on medium-high speed, whip the cream until stiff peaks form. This means the cream will hold its shape when you lift the beaters out of the bowl.
- Tip: Be careful not to over-whip, as this can cause the cream to separate into butter and buttermilk. Stop as soon as the peaks are firm and glossy.
- Fold the Whipped Cream into the Base
- Gently fold the whipped cream into the sweetened condensed milk mixture. Use a spatula to combine them with a light, sweeping motion to keep the mixture airy. Overmixing can deflate the whipped cream, so take your time and be gentle.
- Optional Mix-Ins: At this stage, stir in any desired mix-ins, such as chocolate chips, crushed cookies, fruit puree, or chopped nuts.
- Transfer to the Pan and Freeze
- Pour the mixture into the prepared loaf pan. Smooth the top with a spatula, then cover the pan with plastic wrap to prevent ice crystals from forming.
- Freeze for at least 4 hours or overnight until the ice cream is firm and scoopable.
Beginner Tips and Notes
- What if the ice cream is too hard to scoop?If your ice cream is too firm after freezing, let it sit at room temperature for 5–10 minutes before scooping.
- How to tell if the cream is whipped enough?Look for stiff peaks that stand up without drooping. If you’re unsure, stop and check frequently to avoid overwhipping.
- Preventing Ice CrystalsCover the surface of the ice cream with plastic wrap before sealing it in the freezer to minimize ice crystal formation.
- Efficient PrepMeasure all your ingredients beforehand to make the process smoother. Chilling your tools and ingredients will also save time.
- Substitute ToolsIf you don’t have an electric mixer, you can whip the cream by hand using a whisk, though it will take more effort.

Serving Suggestions
This no-churn ice cream is delicious on its own, but you can elevate it with these serving ideas:
- Toppings
- Drizzle with chocolate or caramel sauce.
- Add sprinkles, chopped nuts, or fresh fruit.
- Sprinkle with a pinch of sea salt for a sweet-salty twist.
- Pairings
- Serve alongside warm brownies, cookies, or apple pie.
- Use it to top a fruit crumble or cobbler.
- Creative Presentations
- Scoop the ice cream into waffle cones or edible bowls.
- Layer it in a glass with fruit and whipped cream to create a parfait.
- Storage Tips
- Store the ice cream in an airtight container to keep it fresh. It’s best enjoyed within 1–2 weeks for optimal texture and flavor.
Conclusion: Your Turn to Shine in the Kitchen
Now that you’ve learned how simple it is to make this 3-ingredient no-churn ice cream, it’s time to grab your ingredients and give it a try! This recipe is perfect for beginners and is sure to become a go-to dessert in your household. Don’t be afraid to experiment with different flavors and mix-ins to make it your own.
We’d love to hear how your ice cream turned out! Did you try any fun flavor combinations? Share your creations and tips in the comments below. Let’s inspire each other to create more delicious treats at home!
By following this guide, you’re not just making ice cream—you’re building confidence in the kitchen, one scoop at a time. Enjoy every creamy, sweet bite!