
There’s something special about homemade pastries—especially when they are as simple and rewarding as a Cherry Cheese Danish. I remember the first time I made one. I was intimidated by the idea of baking something that looked so elegant, assuming it required advanced skills. But once I discovered the magic of store-bought puff pastry, everything changed. With just a few ingredients and some basic steps, I realized I could create a bakery-quality treat at home.
Print
Mastering the Cherry Cheese Danish: A Beginner’s Guide to a Perfect Pastry
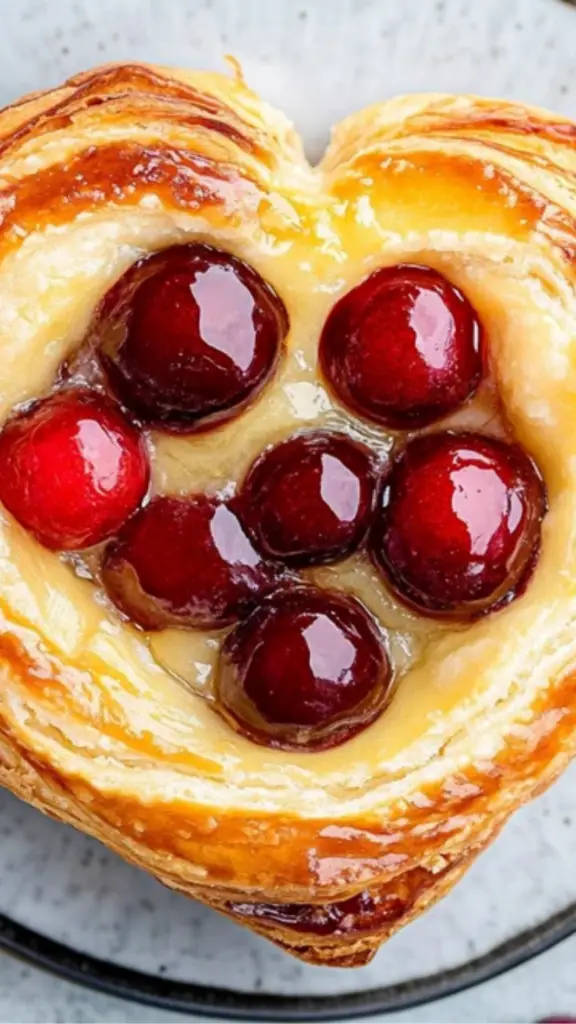
Flaky, creamy, and bursting with sweet cherry goodness—this Cherry Cheese Danish is the perfect pastry for any occasion! With a buttery golden crust, rich cream cheese filling, and a luscious cherry topping, it’s a bakery-style treat made easy for beginners. No need for complicated techniques—just simple steps to a delicious homemade delight. Enjoy it fresh out of the oven with your morning coffee or as an indulgent dessert. One bite, and you’ll be hooked!
#CherryCheeseDanish #FlakyAndDelicious #EasyBaking #HomemadePastry #SweetAndCreamy #BeginnerFriendlyRecipe #GoldenPerfection #BakeryStyle #DessertLover #CoffeeTimeTreat
- Total Time: 45 mins
- Yield: 8 Danishes 1x
Ingredients
For the Cream Cheese Filling
- 4 oz cream cheese, softened
- ¼ cup sugar
- 1 egg yolk
- 1 tablespoon ricotta cheese
- ½ teaspoon almond extract or vanilla extract
- 1 pinch salt
- ½ tablespoon lemon zest
For the Danish
- 2 sheets puff pastry (1 box)
- 1 can cherry pie filling
- 1 large egg plus 1 tablespoon water (for egg wash)
- Flour for dusting
Instructions
1. Prepare the Puff Pastry
- Thaw the puff pastry according to the package instructions. This usually takes about 30–40 minutes at room temperature.
- Line two baking sheets with parchment paper to prevent sticking.
2. Make the Cream Cheese Filling
- In a medium-sized bowl, use an electric mixer to beat the softened cream cheese and sugar until smooth.
- Add the egg yolk, ricotta cheese, almond (or vanilla) extract, salt, and lemon zest.
- Mix until well combined and creamy.
- Place the mixture in the refrigerator while you prepare the pastry.
3. Roll and Cut the Puff Pastry
- Lightly dust a clean surface with flour and roll out the thawed but still cold puff pastry into a 10×10-inch square.
- Use a heart-shaped cookie cutter to cut out pastry hearts.
- Transfer the hearts onto the prepared baking sheets.
- Using a fork, gently prick the inside of each heart, leaving about a ½-inch border around the edges. This step helps prevent the center from puffing up too much while allowing the edges to rise beautifully.
4. Assemble the Danishes
- Take the cream cheese filling out of the refrigerator.
- Spoon about one heaping tablespoon of the filling onto each heart, spreading it slightly but keeping it inside the forked border.
- Add about a tablespoon of cherry pie filling on top, ensuring each Danish has 4–5 cherries.
- In a small bowl, whisk together one egg and a tablespoon of water to create an egg wash.
- Brush the edges of each pastry heart with the egg wash to give them a golden, glossy finish when baked.
5. Chill the Pastries Before Baking
- Place the assembled Danishes in the refrigerator for about 15 minutes.
- This step is important as it helps keep the pastry cold, which prevents the filling from spreading too much in the oven.
6. Bake to Perfection
- Preheat your oven to 350°F (175°C).
- Bake the Danishes for 15–20 minutes, or until the puff pastry is golden brown and flaky.
- Remove them from the oven and allow them to cool for about 5 minutes before serving.
Notes
1. How to Tell If Your Pastry is Ready
- The edges should be golden brown and crisp, while the center should be slightly set but not runny.
- If the bottom of the pastry looks undercooked, place it back in the oven for 2–3 more minutes.
2. Troubleshooting Common Issues
- Pastry is too soft to work with: If the puff pastry becomes too soft or sticky while handling, place it in the refrigerator for 10 minutes before continuing.
- Filling is leaking out: This may happen if the edges of the pastry are not pricked properly or if too much filling is added. Reduce the amount slightly and ensure the pastry is cold before baking.
- Danishes are browning too quickly: Cover them loosely with aluminum foil and continue baking until done.
3. Kitchen Tips for Efficiency
- Prepping Ahead: The cream cheese filling can be made a day in advance and stored in the refrigerator.
- Batch Baking: If making a large quantity, prepare multiple trays and bake them in batches to ensure even baking.
- Using Different Shapes: While hearts are perfect for special occasions, you can also cut the pastry into squares, circles, or rectangles.
- Prep Time: 30 mins
- Cook Time: 15 mins
This Cherry Cheese Danish recipe is perfect for beginners. It requires minimal preparation, uses simple ingredients, and bakes quickly. The buttery, flaky puff pastry combined with a rich and creamy filling, topped with sweet and tart cherries, creates a balanced flavor that feels indulgent but is easy to make. Whether you are making these for breakfast, brunch, or an afternoon treat, this recipe will quickly become a favorite.
Why This Recipe is Ideal for Beginners
- Uses Store-Bought Puff Pastry: No need to make dough from scratch—puff pastry is pre-made and easy to work with.
- Simple Ingredients: Most items in this recipe are pantry staples or easily available at any grocery store.
- Quick and Efficient: With just 30 minutes of prep and 15 minutes of baking, these pastries come together quickly.
- Customizable: You can swap out the cherry filling for other fruit or add different flavors to the cream cheese mixture.
Ingredients and Preparation
For the Cream Cheese Filling
- 4 oz cream cheese, softened
- ¼ cup sugar
- 1 egg yolk
- 1 tablespoon ricotta cheese
- ½ teaspoon almond extract or vanilla extract
- 1 pinch salt
- ½ tablespoon lemon zest
For the Danish
- 2 sheets puff pastry (1 box)
- 1 can cherry pie filling
- 1 large egg plus 1 tablespoon water (for egg wash)
- Flour for dusting
Alternative Ingredients for Flexibility
- Cream Cheese Alternatives: If you do not have cream cheese, mascarpone or Greek yogurt can be used instead for a slightly different texture.
- Ricotta Cheese Substitute: Cottage cheese blended until smooth works as a replacement.
- Almond Extract Variation: If you are allergic to nuts or prefer a different flavor, vanilla or lemon extract can be used.
- Fruit Filling Options: Instead of cherry pie filling, try blueberry, raspberry, or apple pie filling.
Step-by-Step Instructions
1. Prepare the Puff Pastry
- Thaw the puff pastry according to the package instructions. This usually takes about 30–40 minutes at room temperature.
- Line two baking sheets with parchment paper to prevent sticking.
2. Make the Cream Cheese Filling
- In a medium-sized bowl, use an electric mixer to beat the softened cream cheese and sugar until smooth.
- Add the egg yolk, ricotta cheese, almond (or vanilla) extract, salt, and lemon zest.
- Mix until well combined and creamy.
- Place the mixture in the refrigerator while you prepare the pastry.
3. Roll and Cut the Puff Pastry
- Lightly dust a clean surface with flour and roll out the thawed but still cold puff pastry into a 10×10-inch square.
- Use a heart-shaped cookie cutter to cut out pastry hearts.
- Transfer the hearts onto the prepared baking sheets.
- Using a fork, gently prick the inside of each heart, leaving about a ½-inch border around the edges. This step helps prevent the center from puffing up too much while allowing the edges to rise beautifully.
4. Assemble the Danishes
- Take the cream cheese filling out of the refrigerator.
- Spoon about one heaping tablespoon of the filling onto each heart, spreading it slightly but keeping it inside the forked border.
- Add about a tablespoon of cherry pie filling on top, ensuring each Danish has 4–5 cherries.
- In a small bowl, whisk together one egg and a tablespoon of water to create an egg wash.
- Brush the edges of each pastry heart with the egg wash to give them a golden, glossy finish when baked.
5. Chill the Pastries Before Baking
- Place the assembled Danishes in the refrigerator for about 15 minutes.
- This step is important as it helps keep the pastry cold, which prevents the filling from spreading too much in the oven.
6. Bake to Perfection
- Preheat your oven to 350°F (175°C).
- Bake the Danishes for 15–20 minutes, or until the puff pastry is golden brown and flaky.
- Remove them from the oven and allow them to cool for about 5 minutes before serving.
Beginner Tips and Notes
1. How to Tell If Your Pastry is Ready
- The edges should be golden brown and crisp, while the center should be slightly set but not runny.
- If the bottom of the pastry looks undercooked, place it back in the oven for 2–3 more minutes.
2. Troubleshooting Common Issues
- Pastry is too soft to work with: If the puff pastry becomes too soft or sticky while handling, place it in the refrigerator for 10 minutes before continuing.
- Filling is leaking out: This may happen if the edges of the pastry are not pricked properly or if too much filling is added. Reduce the amount slightly and ensure the pastry is cold before baking.
- Danishes are browning too quickly: Cover them loosely with aluminum foil and continue baking until done.
3. Kitchen Tips for Efficiency
- Prepping Ahead: The cream cheese filling can be made a day in advance and stored in the refrigerator.
- Batch Baking: If making a large quantity, prepare multiple trays and bake them in batches to ensure even baking.
- Using Different Shapes: While hearts are perfect for special occasions, you can also cut the pastry into squares, circles, or rectangles.
Serving Suggestions
1. Pairing with Breakfast and Brunch Favorites
- Serve these Danishes with a side of Greek yogurt and fresh berries for a balanced breakfast.
- Pair them with a hot cup of coffee or tea to complement the buttery pastry.
- For a more filling brunch, serve alongside scrambled eggs and seasoned chicken sausage for added protein.
2. Enhancing the Presentation
- Dust the Danishes with powdered sugar before serving for an elegant touch.
- Drizzle with a light vanilla glaze made from powdered sugar and milk.
- Garnish with fresh mint leaves for a pop of color and freshness.
3. Storing Leftovers Properly
- Store leftover Danishes in an airtight container at room temperature for up to 2 days.
- For longer storage, place them in the refrigerator for up to 5 days and reheat in the oven at 300°F for 5 minutes before serving.
- If freezing, wrap each Danish in plastic wrap and store in a freezer-safe bag. Reheat in the oven straight from the freezer at 325°F for 10–12 minutes.
Conclusion: Enjoy the Process and Share Your Experience
Baking these Cherry Cheese Danishes is more than just following a recipe—it’s about the joy of creating something special with your own hands. The combination of flaky pastry, creamy filling, and sweet cherries is a simple yet indulgent treat that anyone can master.
If you’re new to baking, let this be the recipe that boosts your confidence. Follow the steps, trust the process, and don’t be afraid to make adjustments based on your taste preferences. Once you try this recipe, you’ll see how easy it is to bring bakery-style pastries into your own kitchen.
Have you tried making this Cherry Cheese Danish? Share your experience in the comments! What fruit fillings or variations did you use? Your feedback and creativity inspire others to try new things in the kitchen.