
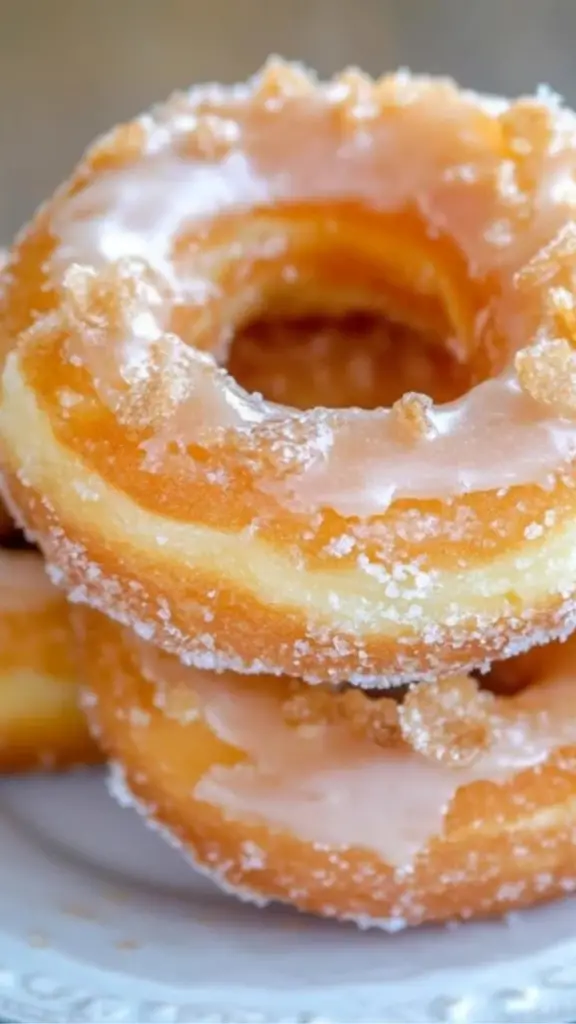
There’s something truly magical about biting into a freshly made honey cruller—light, airy, and delicately crisp, with a sweet glaze that melts in your mouth. I remember the first time I attempted homemade French crullers. I was intimidated by the idea of frying and working with choux pastry, but once I got the hang of it, I realized that these donuts are far simpler than they seem. In fact, they are the perfect recipe for beginners who want to try their hand at something that looks impressive but is entirely approachable.
Print
Mastering Homemade Honey Cruller Donuts: A Beginner’s Guide to Light and Fluffy Perfection
Dreaming of bakery-style donuts at home? These Homemade Honey Cruller Donuts are light, airy, and dipped in a luscious honey glaze! 🍩✨ The delicate choux pastry creates a crispy shell with a fluffy, cloud-like center—perfect for beginners looking to master the art of donut-making. Whether you enjoy them with coffee or as a sweet treat, these crullers are simple, delicious, and totally irresistible. No need for fancy equipment—just mix, fry, glaze, and enjoy! Who’s ready to make a batch?
#FluffyCrullers #GoldenAndSweet #HomemadeDonuts #HoneyGlaze #CrispyOutsideFluffyInside #EasyBaking #BeginnerFriendly #DonutPerfection #BiteSizedHappiness #SimpleAndDelicious
- Total Time: 35 minutes
- Yield: 18 crullers 1x
Ingredients
For the Crullers:
- 1 cup water
- 6 tablespoons butter
- 2 tablespoons sugar
- 1 cup all-purpose flour
- 3 eggs
- Vegetable oil for frying
For the Honey Glaze:
- 1 ½ cups powdered sugar
- 1 tablespoon honey
- 4 tablespoons milk
Instructions
Step 1: Making the Choux Dough
Begin by preparing the choux pastry dough. In a small saucepan, bring the water, butter, and sugar to a boil over medium heat. Once the mixture is bubbling, reduce the heat to low and add the flour all at once. Using a whisk, quickly mix the flour into the liquid until it forms a thick paste. Switch to a wooden spoon and continue stirring while cooking the dough for about 2-3 minutes. You’ll notice a thin film forming on the bottom of the pan—this is a sign that the dough is drying out properly.
Step 2: Incorporating the Eggs
Transfer the hot dough to the bowl of a stand mixer fitted with a paddle attachment. Beat on medium speed for about a minute to release steam and cool it slightly. Then, add the eggs one at a time, mixing well after each addition. The dough will initially look lumpy and separated, but keep mixing—it will come together into a smooth, glossy batter. The final consistency should be thick enough to hold its shape when piped but still soft enough to form a delicate ring.
Step 3: Piping the Crullers
Prepare small 3×3-inch parchment paper squares. Transfer the dough into a piping bag fitted with a large star tip. Pipe circular rings onto the parchment squares, making sure the ends meet but do not overlap too much. This ensures an even shape when frying. The dough should be thick enough to hold its shape but not too stiff, or it will not puff up properly.
Step 4: Frying to Perfection
Heat vegetable oil in a deep fryer or heavy-bottomed pot to 375°F (190°C). Carefully place one or two donuts, parchment side up, into the hot oil. After a few seconds, the parchment will naturally release—remove it with tongs. Fry until the donut turns a deep golden brown, about 2-3 minutes per side. The donut should puff up significantly and feel light. If it browns too quickly, lower the heat slightly to ensure the inside cooks through. Remove the donuts with a slotted spoon and place them on a paper towel-lined cooling rack to drain excess oil.
Step 5: Making the Honey Glaze
While the crullers are cooling, prepare the glaze by whisking together powdered sugar, honey, and milk in a small bowl. The glaze should be smooth and slightly thick, just runny enough to coat the donuts without dripping excessively. Adjust the consistency by adding more milk if needed.
Step 6: Glazing and Serving
Dip the top of each cooled cruller into the honey glaze, allowing any excess to drip off. Place them back on the cooling rack and let the glaze set for a few minutes before serving. The glaze adds a beautiful shine and enhances the delicate crispiness of the crullers.
Notes
- How to Tell If the Dough Is Ready: The choux dough should be smooth and pipeable but not runny. If it’s too thick, add an extra egg. If it’s too thin, let it sit for a minute to firm up slightly before piping.
- Troubleshooting Frying Issues: If the crullers are browning too fast but are still doughy inside, reduce the oil temperature slightly. If they aren’t puffing up, ensure your oil is hot enough before frying.
- Efficient Prep Tips: To save time, cut the parchment squares before starting. You can also mix the glaze while the donuts are frying to streamline the process.
- Storage Advice: Crullers are best enjoyed fresh, but if you have leftovers, store them in an airtight container at room temperature for up to a day. Avoid refrigerating, as this can make them soggy.
- Prep Time: 15 minutes
- Cook Time: 20 minutes
What makes this recipe so beginner-friendly is its short ingredient list and straightforward method. Unlike traditional yeast-raised donuts that require proofing and kneading, crullers rely on choux pastry—a dough that comes together quickly and puffs beautifully when fried. Plus, the frying process is fast, and the honey glaze adds a perfect finishing touch. This recipe is a great introduction to choux pastry, a versatile dough that’s also used for éclairs and cream puffs. If you’ve ever wanted to impress family and friends with homemade donuts but felt intimidated, this is the ideal place to start.
Ingredients and Preparation
For the Crullers:
- 1 cup water
- 6 tablespoons butter
- 2 tablespoons sugar
- 1 cup all-purpose flour
- 3 eggs
- Vegetable oil for frying
For the Honey Glaze:
- 1 ½ cups powdered sugar
- 1 tablespoon honey
- 4 tablespoons milk
Ingredient Substitutions and Variations:
- Butter Alternative: If you’re looking for a dairy-free option, substitute butter with margarine or plant-based butter.
- Sugar Adjustments: For a less sweet donut, reduce the sugar in the dough to 1 tablespoon. If you prefer a more caramelized flavor, use brown sugar instead.
- Flour Variations: While all-purpose flour works best, you can experiment with a mix of cake flour for an even lighter texture.
- Glaze Flavors: Try adding vanilla extract or a pinch of cinnamon to the glaze for extra flavor depth.
Step-by-Step Instructions
Step 1: Making the Choux Dough
Begin by preparing the choux pastry dough. In a small saucepan, bring the water, butter, and sugar to a boil over medium heat. Once the mixture is bubbling, reduce the heat to low and add the flour all at once. Using a whisk, quickly mix the flour into the liquid until it forms a thick paste. Switch to a wooden spoon and continue stirring while cooking the dough for about 2-3 minutes. You’ll notice a thin film forming on the bottom of the pan—this is a sign that the dough is drying out properly.
Step 2: Incorporating the Eggs
Transfer the hot dough to the bowl of a stand mixer fitted with a paddle attachment. Beat on medium speed for about a minute to release steam and cool it slightly. Then, add the eggs one at a time, mixing well after each addition. The dough will initially look lumpy and separated, but keep mixing—it will come together into a smooth, glossy batter. The final consistency should be thick enough to hold its shape when piped but still soft enough to form a delicate ring.
Step 3: Piping the Crullers
Prepare small 3×3-inch parchment paper squares. Transfer the dough into a piping bag fitted with a large star tip. Pipe circular rings onto the parchment squares, making sure the ends meet but do not overlap too much. This ensures an even shape when frying. The dough should be thick enough to hold its shape but not too stiff, or it will not puff up properly.
Step 4: Frying to Perfection
Heat vegetable oil in a deep fryer or heavy-bottomed pot to 375°F (190°C). Carefully place one or two donuts, parchment side up, into the hot oil. After a few seconds, the parchment will naturally release—remove it with tongs. Fry until the donut turns a deep golden brown, about 2-3 minutes per side. The donut should puff up significantly and feel light. If it browns too quickly, lower the heat slightly to ensure the inside cooks through. Remove the donuts with a slotted spoon and place them on a paper towel-lined cooling rack to drain excess oil.
Step 5: Making the Honey Glaze
While the crullers are cooling, prepare the glaze by whisking together powdered sugar, honey, and milk in a small bowl. The glaze should be smooth and slightly thick, just runny enough to coat the donuts without dripping excessively. Adjust the consistency by adding more milk if needed.
Step 6: Glazing and Serving
Dip the top of each cooled cruller into the honey glaze, allowing any excess to drip off. Place them back on the cooling rack and let the glaze set for a few minutes before serving. The glaze adds a beautiful shine and enhances the delicate crispiness of the crullers.
Beginner Tips and Notes
- How to Tell If the Dough Is Ready: The choux dough should be smooth and pipeable but not runny. If it’s too thick, add an extra egg. If it’s too thin, let it sit for a minute to firm up slightly before piping.
- Troubleshooting Frying Issues: If the crullers are browning too fast but are still doughy inside, reduce the oil temperature slightly. If they aren’t puffing up, ensure your oil is hot enough before frying.
- Efficient Prep Tips: To save time, cut the parchment squares before starting. You can also mix the glaze while the donuts are frying to streamline the process.
- Storage Advice: Crullers are best enjoyed fresh, but if you have leftovers, store them in an airtight container at room temperature for up to a day. Avoid refrigerating, as this can make them soggy.
Serving Suggestions
While these honey cruller donuts are delicious on their own, you can elevate them with a few serving ideas. Pair them with a cup of freshly brewed coffee or tea for a classic café-style experience. If you’re serving them as a dessert, consider drizzling them with additional honey or a dusting of cinnamon sugar for extra flavor. For a decadent twist, serve them alongside a small bowl of melted chocolate or fruit preserves for dipping.
If you’re making crullers for a special occasion, try stacking them on a dessert platter with fresh berries and whipped cream for an elegant presentation. You can also experiment with different glazes, such as maple or lemon, to match seasonal flavors.
Final Thoughts: Give It a Try!
Homemade honey cruller donuts may seem like a bakery-exclusive treat, but with the right techniques, they’re completely achievable for beginners. The combination of light, airy dough and sweet honey glaze is truly irresistible. The process of making choux pastry, piping the rings, and frying to golden perfection is not only rewarding but also a great way to build confidence in the kitchen.
If this is your first time making homemade donuts, don’t be afraid to experiment and make adjustments along the way. Cooking is all about learning, and even if your first batch isn’t perfect, the experience will be worth it. Plus, nothing beats the joy of biting into a freshly made cruller, knowing you made it from scratch.
I’d love to hear how your honey crullers turn out! Did you try any flavor variations? Have any tips to share? Drop a comment below and let’s chat about your experience. Happy baking!