
Tiramisu is a timeless Italian dessert that combines rich layers of espresso-soaked ladyfingers, smooth mascarpone cream, and a dusting of cocoa powder. While this dessert may seem fancy or difficult, it’s actually incredibly simple to make, even for beginners! Whether you’re preparing a special treat for a family gathering or a casual get-together with friends, tiramisu is the perfect dessert to impress your guests.
Print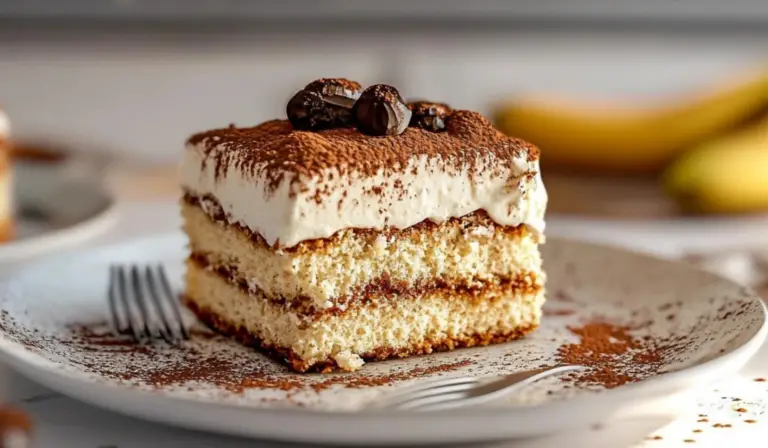
How to Make Tiramisu: A Beginner’s Guide to Crafting this Classic Dessert
☕🍫 Tiramisu – the ultimate beginner-friendly dessert with layers of flavor! Coffee-soaked ladyfingers, velvety mascarpone cream, and a sprinkle of cocoa make for a perfect treat that’s rich, indulgent, and sure to impress. It’s time to bring Italy to your kitchen! 🇮🇹✨
#TiramisuTime 🍰 #DeliciousLayers 😋 #EasyDesserts 🍽️ #MascarponeMagic 🧀 #CoffeeAndCocoa ☕🍫 #ItalianIndulgence 🇮🇹 #BeginnerFriendly 🏠 #SweetPerfection 🍮 #HomemadeTiramisu 🍰 #ComfortDessert 💕
- Total Time: 2 hours 45 minutes (includes chilling time)
- Yield: Serves 12 1x
Ingredients
- 1 cup (240ml) very strongly prepared espresso, warm or at room temperature*
- 5 Tablespoons (75ml) Grand Marnier (optional)
- 40–45 ladyfingers
- 16 ounces (about 2 cups; 450g) mascarpone, cold
- 2 Tablespoons (30ml) dark rum
- 4 large pasteurized eggs, separated
- 1/2 cup (100g) granulated sugar, divided
- 2 cups (480ml) heavy cream or heavy whipping cream
- 1/2 teaspoon pure vanilla extract
- 1/8 teaspoon salt
- Unsweetened natural or Dutch-process cocoa powder
Instructions
Step 1: Prepare the Pan and Ladyfingers
First, grab a large 9×13-inch baking dish that holds at least 12-14 cups. This will be your base for layering the tiramisu. Now, get started with the ladyfingers.
- In a shallow bowl, whisk together your espresso and Grand Marnier (if using).
- One by one, quickly dip the ladyfingers into the espresso mixture. Be careful not to over-saturate them. A quick dip will ensure that the ladyfingers remain crisp and don’t turn soggy.
- Arrange the dipped ladyfingers in the pan to form the first layer.
Step 2: Make the Mascarpone Cream
In a large bowl, beat together the mascarpone and dark rum until smooth. If you don’t have a hand mixer or stand mixer, you can also do this by hand with a whisk. The key here is to blend it gently without overworking the mixture.
Step 3: Prepare the Egg Yolk Mixture
For this step, you’ll need a double boiler or a makeshift one. Fill a small pot with water and place a heatproof bowl over it, making sure the water doesn’t touch the bowl.
- Whisk the egg yolks and 1/4 cup of granulated sugar together until the mixture becomes light and foamy (about 5 minutes).
- Once done, remove it from the heat and add it to the mascarpone mixture. Beat this until smooth and well-combined.
Step 4: Whip the Cream
In a separate bowl, beat the heavy cream and vanilla extract until medium peaks form. Medium peaks are perfect for tiramisu—fluffy and firm but not too stiff.
- Gently fold the whipped cream into the mascarpone mixture. Be careful not to deflate the whipped cream to maintain that light, airy texture.
Step 5: Whip the Egg Whites
Next, beat the egg whites with a pinch of salt. When they become foamy, slowly add the remaining 1/4 cup of sugar and continue to beat until stiff peaks form.
- Gently fold the egg whites into the mascarpone-cream mixture. This is what will give your tiramisu its light, mousse-like texture.
Step 6: Assemble the Tiramisu
- Start by spreading half of the mascarpone mixture over the first layer of dipped ladyfingers.
- Add the second layer of dipped ladyfingers on top and gently press them down to create a compact, even layer.
- Spread the remaining mascarpone cream on top.
Step 7: Chill and Dust with Cocoa
Now, the tiramisu needs time to set. Refrigerate it for at least 2-3 hours, uncovered, to allow the flavors to meld together.
- After it has chilled, sift a layer of cocoa powder over the top. Wipe the rim of the dish clean and cover it with plastic wrap or aluminum foil.
- Refrigerate for at least 8-9 more hours (or up to one day) for the best results.
Step 8: Serve
Once the tiramisu has fully chilled, slice it with a sharp knife and serve. Wipe the knife clean between cuts to maintain clean lines. For best results, use a small metal serving spatula to remove the slices from the pan.
Notes
- Saturating the Ladyfingers: Don’t soak the ladyfingers for too long! A quick dip in the espresso mixture will give them the perfect texture. Too much liquid will make them soggy, and too little will make them dry.
- Whipping Egg Whites: If you’re new to whipping egg whites, keep an eye on them! When they form stiff peaks, they’ll hold their shape and stand up on their own.
- Double Boiler: If you don’t have a double boiler, you can easily create one by placing a heatproof bowl over a small pot of simmering water. Just be sure the water doesn’t touch the bottom of the bowl.
- Using a Hand Mixer: If you’re using a hand mixer, be mindful of overmixing. You want to gently fold the mixtures together to keep the tiramisu light and airy.
- Prep Time: 45 minutes
This dessert is known for its luxurious flavors, with the bitter-sweetness of espresso complementing the creamy richness of mascarpone. Even though it may take some time to set in the fridge, the preparation is relatively easy and straightforward, making it a fantastic recipe for those who are new to the kitchen.
Ingredients and Preparation
Here’s everything you’ll need to prepare your own tiramisu:
Ingredients:
- 1 cup (240ml) very strongly prepared espresso, warm or at room temperature*
- 5 Tablespoons (75ml) Grand Marnier (optional)
- 40–45 ladyfingers
- 16 ounces (about 2 cups; 450g) mascarpone, cold
- 2 Tablespoons (30ml) dark rum
- 4 large pasteurized eggs, separated
- 1/2 cup (100g) granulated sugar, divided
- 2 cups (480ml) heavy cream or heavy whipping cream
- 1/2 teaspoon pure vanilla extract
- 1/8 teaspoon salt
- Unsweetened natural or Dutch-process cocoa powder
Ingredient Substitutes:
- Ladyfingers: If you can’t find ladyfingers, you can substitute with sponge cake or angel food cake, though the texture will differ slightly.
- Grand Marnier: If you prefer a non-alcoholic version, feel free to skip the Grand Marnier. You could also use a small amount of orange juice for a similar flavor.
- Dark Rum: For a non-alcoholic version, use more vanilla extract or a dash of coffee flavoring.
- Heavy Cream: For a lighter version, you can substitute with whipped topping, though the texture may not be as rich.
Step-by-Step Instructions
Step 1: Prepare the Pan and Ladyfingers
First, grab a large 9×13-inch baking dish that holds at least 12-14 cups. This will be your base for layering the tiramisu. Now, get started with the ladyfingers.
- In a shallow bowl, whisk together your espresso and Grand Marnier (if using).
- One by one, quickly dip the ladyfingers into the espresso mixture. Be careful not to over-saturate them. A quick dip will ensure that the ladyfingers remain crisp and don’t turn soggy.
- Arrange the dipped ladyfingers in the pan to form the first layer.
Step 2: Make the Mascarpone Cream
In a large bowl, beat together the mascarpone and dark rum until smooth. If you don’t have a hand mixer or stand mixer, you can also do this by hand with a whisk. The key here is to blend it gently without overworking the mixture.
Step 3: Prepare the Egg Yolk Mixture
For this step, you’ll need a double boiler or a makeshift one. Fill a small pot with water and place a heatproof bowl over it, making sure the water doesn’t touch the bowl.
- Whisk the egg yolks and 1/4 cup of granulated sugar together until the mixture becomes light and foamy (about 5 minutes).
- Once done, remove it from the heat and add it to the mascarpone mixture. Beat this until smooth and well-combined.
Step 4: Whip the Cream
In a separate bowl, beat the heavy cream and vanilla extract until medium peaks form. Medium peaks are perfect for tiramisu—fluffy and firm but not too stiff.
- Gently fold the whipped cream into the mascarpone mixture. Be careful not to deflate the whipped cream to maintain that light, airy texture.
Step 5: Whip the Egg Whites
Next, beat the egg whites with a pinch of salt. When they become foamy, slowly add the remaining 1/4 cup of sugar and continue to beat until stiff peaks form.
- Gently fold the egg whites into the mascarpone-cream mixture. This is what will give your tiramisu its light, mousse-like texture.
Step 6: Assemble the Tiramisu
- Start by spreading half of the mascarpone mixture over the first layer of dipped ladyfingers.
- Add the second layer of dipped ladyfingers on top and gently press them down to create a compact, even layer.
- Spread the remaining mascarpone cream on top.
Step 7: Chill and Dust with Cocoa
Now, the tiramisu needs time to set. Refrigerate it for at least 2-3 hours, uncovered, to allow the flavors to meld together.
- After it has chilled, sift a layer of cocoa powder over the top. Wipe the rim of the dish clean and cover it with plastic wrap or aluminum foil.
- Refrigerate for at least 8-9 more hours (or up to one day) for the best results.
Step 8: Serve
Once the tiramisu has fully chilled, slice it with a sharp knife and serve. Wipe the knife clean between cuts to maintain clean lines. For best results, use a small metal serving spatula to remove the slices from the pan.
Beginner Tips and Notes
- Saturating the Ladyfingers: Don’t soak the ladyfingers for too long! A quick dip in the espresso mixture will give them the perfect texture. Too much liquid will make them soggy, and too little will make them dry.
- Whipping Egg Whites: If you’re new to whipping egg whites, keep an eye on them! When they form stiff peaks, they’ll hold their shape and stand up on their own.
- Double Boiler: If you don’t have a double boiler, you can easily create one by placing a heatproof bowl over a small pot of simmering water. Just be sure the water doesn’t touch the bottom of the bowl.
- Using a Hand Mixer: If you’re using a hand mixer, be mindful of overmixing. You want to gently fold the mixtures together to keep the tiramisu light and airy.
Serving Suggestions
Tiramisu is a rich dessert on its own, but it pairs beautifully with other flavors and textures:
- Complementary Sides: Serve alongside fresh fruit like berries or citrus slices for a burst of freshness that contrasts the richness of the tiramisu.
- Coffee or Dessert Wine: Pair it with a cup of coffee or a light dessert wine like a Moscato for a refined finishing touch.
Storage Tips:
- Tiramisu can be stored in the refrigerator for up to 3 days. Be sure to cover it tightly to maintain freshness.
- Leftovers are perfect for a quick snack or to impress guests with a second round the next day!
Conclusion
Tiramisu is a timeless Italian classic that has earned its place as one of the most beloved desserts worldwide. With its creamy layers, rich espresso-soaked ladyfingers, and dusting of cocoa powder, every bite offers a perfect balance of sweetness, bitterness, and velvety texture. What makes this dessert even more special is how adaptable it is, allowing for variations in flavor, presentation, and even the types of spirits used. Whether you’re preparing it for a family gathering, a special occasion, or simply to indulge in a well-loved treat, this tiramisu recipe is bound to impress.
For beginners, this recipe is a fantastic starting point to explore the world of Italian desserts. It requires minimal cooking skills and can be made ahead of time, making it an ideal choice for a hassle-free yet elegant dessert. The step-by-step instructions break down the process, so even if you’ve never attempted a no-bake dessert before, you’ll find it manageable and rewarding. The layering of ladyfingers, mascarpone cream, and cocoa powder may seem like a delicate process, but with a bit of patience and care, you’ll be rewarded with a beautifully presented dish.
One of the best aspects of tiramisu is how it can be customized to suit your preferences. Experiment with different liqueurs, like Amaretto or Kahlúa, if Grand Marnier isn’t to your taste, or add a touch of cinnamon or vanilla to the cream for an extra layer of flavor. The creamy texture of mascarpone, paired with the punch of espresso and the lightness of whipped cream, is undeniably delicious, making this dessert an unforgettable experience for both novice and seasoned bakers alike.
Don’t forget to share your creation with friends and family, and enjoy the moment when they take their first bite. Tiramisu has a magical way of bringing people together, and the joy it brings is always worth the effort. If you’re looking for a dessert that’s both delicious and easy to make, this tiramisu recipe is a surefire winner. So, gather your ingredients, follow the simple steps, and soon you’ll be serving up an authentic and indulgent Italian treat that will leave everyone asking for seconds.