
Pie-making often seems like a daunting task, especially for beginners, but I’m here to assure you that Homemade Blackberry Pie is both approachable and incredibly rewarding. Imagine the aroma of freshly baked pie filling your home, the golden crust crisping up in the oven, and the sweet, tangy blackberry filling bubbling to perfection. There’s something truly magical about homemade pies – the perfect balance of flavors, textures, and the satisfaction of knowing you created it from scratch.
Print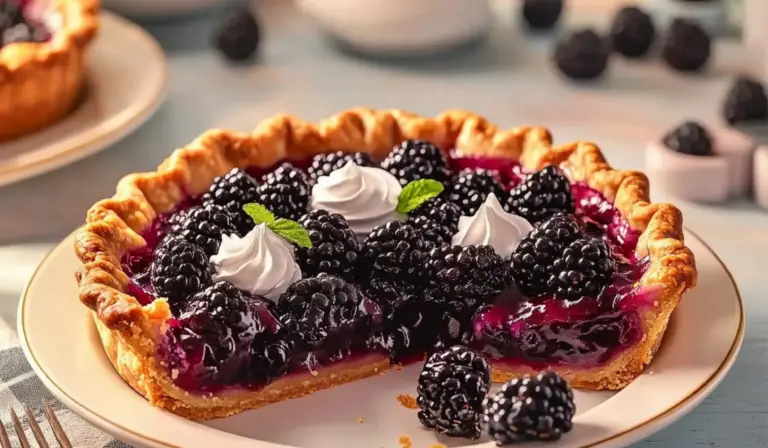
Homemade Blackberry Pie: A Beginner-Friendly Recipe for Deliciousness
🥧💜 Homemade Blackberry Pie—the perfect beginner-friendly dessert that’s bursting with sweet, juicy blackberries! 🍇 This easy-to-follow recipe gives you a flaky, buttery crust filled with a luscious berry filling, making it a must-try for anyone who loves fresh, homemade pie. A slice of deliciousness in every bite! 😋
#BlackberryPie #HomemadeDesserts #BeginnerFriendlyBaking #PieLovers #BerryDelicious #FlakyCrust #EasyPieRecipes #FreshBerryGoodness #ComfortInABite #DessertGoals 🥧💜🍇
- Total Time: 5 hours (including cooling time)
- Yield: 8 slices 1x
Ingredients
- 5 to 6 cups of blackberries – Fresh or frozen berries will work perfectly. If you’re using frozen berries, make sure to thaw them and drain excess moisture before use.
- ½ cup granulated sugar – The sugar will balance out the tartness of the blackberries. However, if your berries are extra sweet, feel free to reduce the sugar slightly.
- 3 to 4 tablespoons of cornstarch – This acts as a thickening agent to help the blackberry filling set. You might need more cornstarch if the berries are extra juicy.
- ¼ teaspoon cinnamon – A pinch of cinnamon adds depth to the flavor and complements the natural sweetness of the blackberries.
- 2 tablespoons of butter – Dotting the filling with butter adds richness to the pie and enhances the overall flavor.
- 1 double pie crust – You can use a homemade or store-bought crust. If you’re new to pie-making, store-bought is a great option to make the process simpler.
- 1 egg yolk – This will be used for an egg wash to give the pie a beautiful golden finish.
Instructions
Step 1: Prepare the Pie Crust
If you’re making your own pie crust, start by preparing the dough according to the recipe instructions. Otherwise, take your store-bought pie crust out of the fridge and let it come to room temperature.
- Tip: If you’re using a store-bought crust, make sure to unroll it gently to avoid tearing. If it’s frozen, let it thaw slightly before rolling it out.
Roll one half of your dough into a 12-inch circle. This will be the bottom layer of your pie. Gently transfer the dough to a 9-inch pie plate. If the crust is too big, trim the edges and leave about an inch of extra dough around the pie plate.
Step 2: Prepare the Filling
In a large bowl, gently toss the blackberries, sugar, cornstarch, and cinnamon together. Make sure the blackberries are evenly coated, but don’t crush them—this will preserve their shape and texture during baking.
- Tip: If you’re worried about your blackberries being too tart, taste them before adding the sugar. You can adjust the sugar based on the berries’ sweetness.
Once the berries are coated, pour them into the prepared pie crust. Cut the butter into small cubes and scatter it over the top of the filling. This will melt as the pie bakes, adding richness to the berry mixture.
Step 3: Add the Top Crust
Roll out the remaining pie crust to form the top layer of your pie. Place it over the berry filling and trim the edges so they’re about 1 inch beyond the edge of the pie plate. Fold the edges over the top crust and gently pinch the crusts together to seal.
- Tip: For a beautiful presentation, crimp the edges of the crust with your fingers or use a fork to press the edges together.
Step 4: Egg Wash
Whisk the egg yolk with 1 tablespoon of water and brush it over the top crust. This egg wash will give the pie a glossy, golden finish as it bakes.
- Tip: Be sure to brush the egg wash evenly over the crust, but don’t overdo it. A light coating is all that’s needed.
Step 5: Bake the Pie
Place the pie on a large baking pan (optional, but it’s helpful in case the filling bubbles over). Bake the pie at 375°F (190°C) for 45-55 minutes or until the crust is golden brown and the filling is bubbly.
- Tip: If the edges of the crust start to brown too quickly, cover them with aluminum foil to prevent burning.
Step 6: Cool and Serve
Once the pie is done baking, remove it from the oven and place it on a cooling rack. Let the pie cool for at least 4 hours before slicing. This will give the filling time to set, so it doesn’t run when you cut into it.
- Tip: If you can’t wait, refrigerating the pie for a bit will speed up the cooling process.
Notes
Troubleshooting Common Issues
- Overcooked Veggies: If you’re adding vegetables to your pie (like in a savory version), make sure they’re not overcooked when added to the crust. This could make them mushy when baked. To avoid this, partially cook them before filling the pie.
- Undercooked Chicken: If you substitute chicken for other meats, ensure the chicken is fully cooked before adding it to the pie. Check by cutting into the thickest part to make sure there’s no pink inside.
- Filling Too Runny: If your blackberry filling turns out too runny, simply add a bit more cornstarch next time, and be sure to let the pie cool completely before cutting.
Efficient Pie Prep
- Pie Crust Tips: If you’re making your own pie crust, make sure it’s cold before rolling it out. This will help it hold its shape better during baking.
- Prepare in Stages: You can prep the filling and crust ahead of time. This allows you to bake the pie the day you plan to serve it, making it easier to manage your time.
- Prep Time: 15 minutes
- Cook Time: 45 minutes
This blackberry pie is the ideal dessert for beginner bakers. It uses simple ingredients, like fresh or frozen berries and a pre-made pie crust, to ensure that you can focus on perfecting the pie rather than worrying about complex techniques. Plus, the recipe is quick to prepare, making it perfect for anyone looking to impress their friends and family with minimal effort.
Whether you’re celebrating a special occasion or just craving a sweet treat, this Homemade Blackberry Pie is the perfect solution. Let’s dive into the recipe and see how easy it can be to make this showstopper dessert!
Ingredients and Preparation
Before we get started with the steps, let’s take a moment to gather all the ingredients. Here’s what you’ll need:
- 5 to 6 cups of blackberries – Fresh or frozen berries will work perfectly. If you’re using frozen berries, make sure to thaw them and drain excess moisture before use.
- ½ cup granulated sugar – The sugar will balance out the tartness of the blackberries. However, if your berries are extra sweet, feel free to reduce the sugar slightly.
- 3 to 4 tablespoons of cornstarch – This acts as a thickening agent to help the blackberry filling set. You might need more cornstarch if the berries are extra juicy.
- ¼ teaspoon cinnamon – A pinch of cinnamon adds depth to the flavor and complements the natural sweetness of the blackberries.
- 2 tablespoons of butter – Dotting the filling with butter adds richness to the pie and enhances the overall flavor.
- 1 double pie crust – You can use a homemade or store-bought crust. If you’re new to pie-making, store-bought is a great option to make the process simpler.
- 1 egg yolk – This will be used for an egg wash to give the pie a beautiful golden finish.
Alternative Ingredient Suggestions:
- Blackberries: While this recipe calls for blackberries, you can easily swap them with other berries like raspberries, blueberries, or even a mixed berry combination.
- Sugar: If you’re looking for a healthier alternative, you can use honey or maple syrup. Just keep in mind that this might slightly alter the flavor of the pie.
- Cornstarch: If you don’t have cornstarch on hand, you can substitute it with flour. However, you might need to use slightly more flour for the same thickening effect.
Step-by-Step Instructions
Now, let’s break the recipe down into manageable steps. Don’t worry; it’s simpler than it seems. By the end of this, you’ll be a pie-baking pro!
Step 1: Prepare the Pie Crust
If you’re making your own pie crust, start by preparing the dough according to the recipe instructions. Otherwise, take your store-bought pie crust out of the fridge and let it come to room temperature.
- Tip: If you’re using a store-bought crust, make sure to unroll it gently to avoid tearing. If it’s frozen, let it thaw slightly before rolling it out.
Roll one half of your dough into a 12-inch circle. This will be the bottom layer of your pie. Gently transfer the dough to a 9-inch pie plate. If the crust is too big, trim the edges and leave about an inch of extra dough around the pie plate.
Step 2: Prepare the Filling
In a large bowl, gently toss the blackberries, sugar, cornstarch, and cinnamon together. Make sure the blackberries are evenly coated, but don’t crush them—this will preserve their shape and texture during baking.
- Tip: If you’re worried about your blackberries being too tart, taste them before adding the sugar. You can adjust the sugar based on the berries’ sweetness.
Once the berries are coated, pour them into the prepared pie crust. Cut the butter into small cubes and scatter it over the top of the filling. This will melt as the pie bakes, adding richness to the berry mixture.
Step 3: Add the Top Crust
Roll out the remaining pie crust to form the top layer of your pie. Place it over the berry filling and trim the edges so they’re about 1 inch beyond the edge of the pie plate. Fold the edges over the top crust and gently pinch the crusts together to seal.
- Tip: For a beautiful presentation, crimp the edges of the crust with your fingers or use a fork to press the edges together.
Step 4: Egg Wash
Whisk the egg yolk with 1 tablespoon of water and brush it over the top crust. This egg wash will give the pie a glossy, golden finish as it bakes.
- Tip: Be sure to brush the egg wash evenly over the crust, but don’t overdo it. A light coating is all that’s needed.
Step 5: Bake the Pie
Place the pie on a large baking pan (optional, but it’s helpful in case the filling bubbles over). Bake the pie at 375°F (190°C) for 45-55 minutes or until the crust is golden brown and the filling is bubbly.
- Tip: If the edges of the crust start to brown too quickly, cover them with aluminum foil to prevent burning.
Step 6: Cool and Serve
Once the pie is done baking, remove it from the oven and place it on a cooling rack. Let the pie cool for at least 4 hours before slicing. This will give the filling time to set, so it doesn’t run when you cut into it.
- Tip: If you can’t wait, refrigerating the pie for a bit will speed up the cooling process.
Beginner Tips and Notes
Baking doesn’t have to be intimidating, and there are always ways to troubleshoot and improve. Here are some helpful tips for beginner bakers:
Troubleshooting Common Issues
- Overcooked Veggies: If you’re adding vegetables to your pie (like in a savory version), make sure they’re not overcooked when added to the crust. This could make them mushy when baked. To avoid this, partially cook them before filling the pie.
- Undercooked Chicken: If you substitute chicken for other meats, ensure the chicken is fully cooked before adding it to the pie. Check by cutting into the thickest part to make sure there’s no pink inside.
- Filling Too Runny: If your blackberry filling turns out too runny, simply add a bit more cornstarch next time, and be sure to let the pie cool completely before cutting.
Efficient Pie Prep
- Pie Crust Tips: If you’re making your own pie crust, make sure it’s cold before rolling it out. This will help it hold its shape better during baking.
- Prepare in Stages: You can prep the filling and crust ahead of time. This allows you to bake the pie the day you plan to serve it, making it easier to manage your time.
Serving Suggestions
This Homemade Blackberry Pie is delicious on its own, but why not take it up a notch? Here are a few ways to serve it:
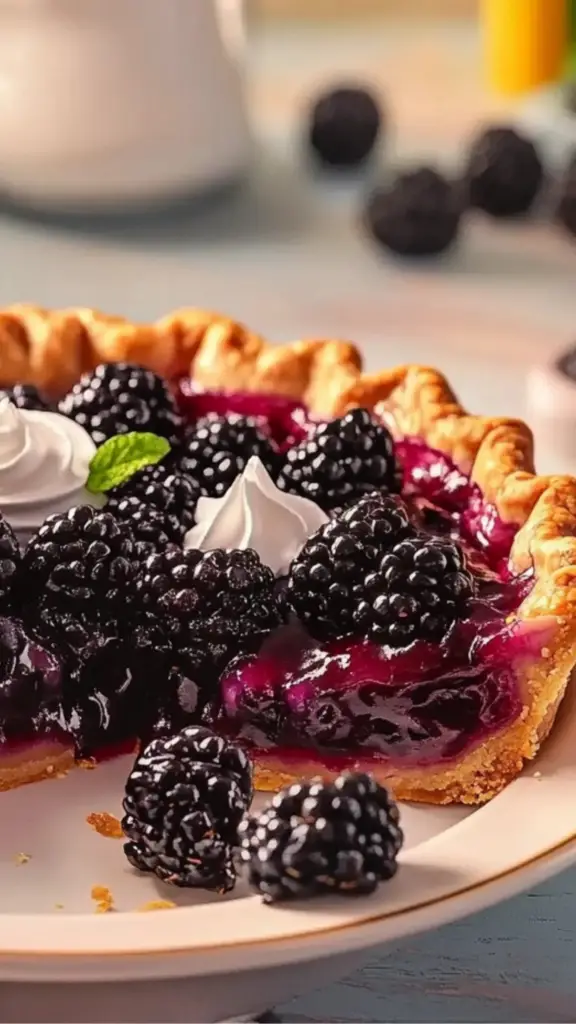
- Whipped Cream: A dollop of freshly whipped cream adds a light, creamy contrast to the sweet and tart berry filling.
- Vanilla Ice Cream: If you’re a fan of hot and cold dessert combinations, serve a slice of warm pie with a scoop of vanilla ice cream.
- Fresh Berries: Garnish with fresh blackberries or a few sprigs of mint to make the pie even more visually appealing.
Storage Tips:
- Leftovers: You can store leftover pie (covered) in the fridge for up to 3 days. Serve it cold or gently reheat it in the microwave.
- Freezing: To freeze, wrap the pie tightly in plastic wrap and foil. It will last in the freezer for up to 3 months. When ready to serve, thaw it at room temperature.
Engagement Features
I hope this Homemade Blackberry Pie recipe has inspired you to get in the kitchen and bake something delicious! The combination of juicy blackberries, buttery crust, and a hint of cinnamon is sure to leave everyone at the table wanting more.
Have you tried making this pie? Share your experiences in the comments below! We’d love to hear how it turned out for you and any personal twists you added to make it your own. Whether you’re baking for a family dinner or a special occasion, this pie is sure to impress and become a staple in your recipe collection.