
You’re craving something rich, creamy, and indulgent, but you don’t want to spend hours in the kitchen. Maybe you have guests coming over, or perhaps you just want to treat yourself to a luxurious dessert without the hassle of complicated techniques. That’s where this dulce de leche mousse comes in—a silky, caramel-flavored delight that requires only four ingredients and comes together in just five minutes.
Print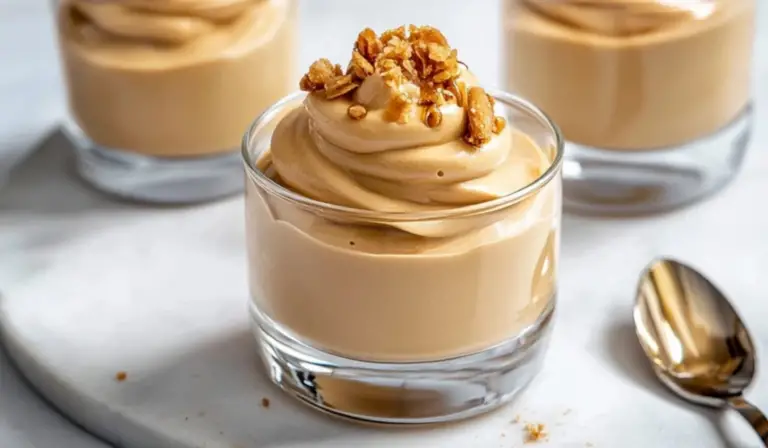
Decadent Dulce de Leche Mousse: A Foolproof Recipe for Beginners
This Dulce de Leche Mousse is what dessert dreams are made of! Light yet incredibly rich, it’s packed with deep caramel flavor and an ultra-smooth texture that’s simply irresistible. And guess what? You don’t need fancy skills to make it! This beginner-friendly recipe comes together effortlessly, making it perfect for impressing guests or treating yourself to something sweet. Who’s ready for a spoonful of heaven?
#CaramelMousse #EasyDessertRecipe #NoBakeGoodness #FoolproofDesserts #HomemadeSweets #RichAndVelvety #BeginnerBakers #SweetAndCreamy #DessertLover #MeltInYourMouth
- Total Time: 5 minutes
- Yield: 6 servings 1x
Ingredients
- 390 grams (13.4 oz) dulce de leche or tinned caramel – Use a thick, scoopable version, not a caramel sauce. This provides the rich caramel flavor and creamy texture.
- 250 grams (9 oz) full-fat cream cheese – A key ingredient that balances the sweetness of the dulce de leche with a subtle tang. Philadelphia cream cheese works well.
- A pinch of salt – Enhances the caramel flavor and prevents the mousse from tasting overly sweet.
- 240 milliliters (1 US cup) double cream or heavy cream – Essential for creating the mousse’s light, airy texture.
Instructions
Step 1: Prepare the Ingredients
Before starting, ensure that your cream is well-chilled. Cold cream whips up faster and creates a fluffier texture. If using a stand mixer, set up the whisk attachment for easy whipping.
Step 2: Mix the Dulce de Leche and Cream Cheese
In a large mixing bowl, combine the dulce de leche, cream cheese, and a pinch of salt. Using an electric mixer or a sturdy whisk, beat the mixture until it is completely smooth, with no lumps remaining. This step is crucial because any lumps will affect the final texture of the mousse.
Step 3: Whip the Cream
In a separate bowl, pour the cold double cream and whisk until soft peaks form. Soft peaks mean the cream holds its shape but still has a slight droop when you lift the whisk. Be cautious not to overwhip, as the cream can turn grainy or even become butter if beaten too much.
Step 4: Fold the Whipped Cream into the Mixture
Using a spatula, gently fold the whipped cream into the dulce de leche mixture. Be careful not to deflate the cream—use slow, deliberate folding motions to maintain the airy texture.
Step 5: Check the Consistency
Continue mixing until the mousse thickens and forms visible trails from the whisk. At this stage, it should be light and creamy, with a fluffy texture. If it seems too dense, you can add a bit more whipped cream to lighten it up.
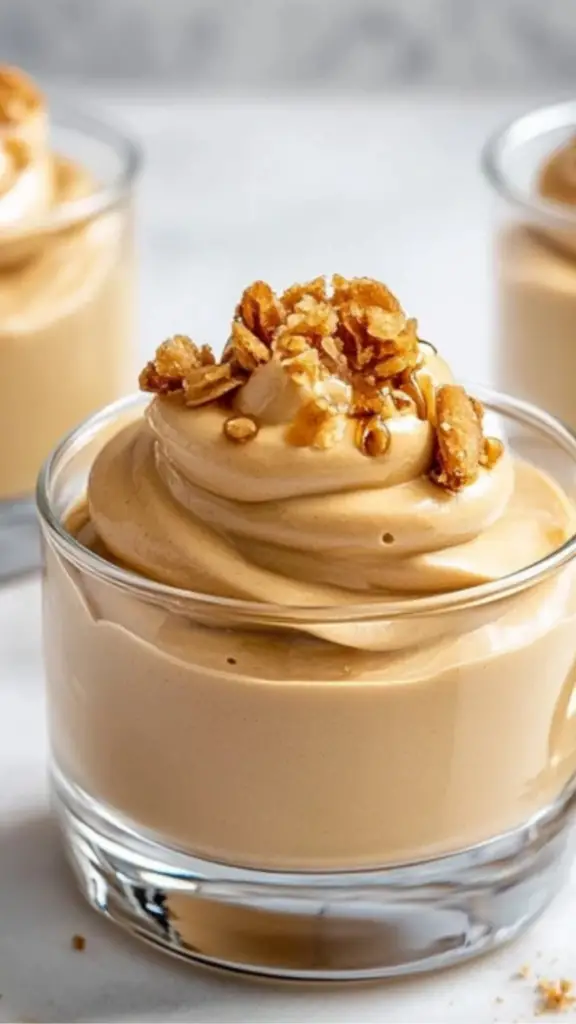
Step 6: Serve and Garnish
Spoon the mousse into serving bowls or dessert glasses. You can serve it immediately for the best texture or let it chill for a few minutes for a firmer consistency.
Notes
1. Use Chilled Cream for Best Results
Cold cream whips up more efficiently and holds its shape better. If your cream is warm, it may not achieve the right texture, resulting in a denser mousse.
2. Whip the Dulce de Leche and Cream Cheese First
Mixing these two ingredients first ensures that the base is smooth and lump-free. If you add whipped cream too early, it may not incorporate evenly.
3. Be Gentle When Folding
Overmixing at this stage can knock out the air, making the mousse too dense. Use slow, folding motions rather than stirring.
4. Don’t Overwhip the Cream
Soft peaks are key. If the cream becomes too stiff, it won’t blend well with the dulce de leche mixture. If you accidentally overwhip, try adding a little extra unwhipped cream and mix on low speed to bring it back to a softer consistency.
5. Serve Fresh for Best Texture
Unlike mousses made with gelatin, this version is best enjoyed fresh. While you can store leftovers in the fridge for a short time, the mousse will lose some of its lightness if left too long.
- Prep Time: 5 minutes
This recipe is perfect for beginner cooks because it eliminates the need for baking, tempering eggs, or dealing with finicky ingredients. The process is straightforward, and the result is a luscious, airy mousse with deep caramel notes, balanced by the tanginess of cream cheese and the lightness of whipped cream. Whether you’re hosting a dinner party or simply indulging in a homemade treat, this dulce de leche mousse is sure to impress.
Why This Recipe Works for Beginners
- Minimal Ingredients: With only four simple ingredients, there’s no need to juggle multiple components.
- No Cooking Required: Unlike traditional mousse recipes that may involve egg yolks and cooking on the stove, this version skips those steps entirely.
- Quick and Easy: In just five minutes, you can prepare a dessert that looks and tastes like something from a high-end restaurant.
- Beginner-Friendly Techniques: This recipe focuses on easy mixing and whipping, making it perfect for those new to dessert-making.
Now, let’s dive into the details.
Ingredients and Substitutions
Main Ingredients:
- 390 grams (13.4 oz) dulce de leche or tinned caramel – Use a thick, scoopable version, not a caramel sauce. This provides the rich caramel flavor and creamy texture.
- 250 grams (9 oz) full-fat cream cheese – A key ingredient that balances the sweetness of the dulce de leche with a subtle tang. Philadelphia cream cheese works well.
- A pinch of salt – Enhances the caramel flavor and prevents the mousse from tasting overly sweet.
- 240 milliliters (1 US cup) double cream or heavy cream – Essential for creating the mousse’s light, airy texture.
Ingredient Substitutions and Variations:
- Dulce de Leche Alternatives: If you can’t find dulce de leche, you can make your own by simmering a can of sweetened condensed milk for a few hours. Alternatively, thick caramel spreads can work.
- Dairy-Free Version: Substitute dairy-free cream cheese and coconut cream for a lactose-free option.
- Sweetness Adjustment: If you prefer a less sweet mousse, use unsweetened whipped cream and add a squeeze of lemon juice for extra balance.
Step-by-Step Instructions
Step 1: Prepare the Ingredients
Before starting, ensure that your cream is well-chilled. Cold cream whips up faster and creates a fluffier texture. If using a stand mixer, set up the whisk attachment for easy whipping.
Step 2: Mix the Dulce de Leche and Cream Cheese
In a large mixing bowl, combine the dulce de leche, cream cheese, and a pinch of salt. Using an electric mixer or a sturdy whisk, beat the mixture until it is completely smooth, with no lumps remaining. This step is crucial because any lumps will affect the final texture of the mousse.
Step 3: Whip the Cream
In a separate bowl, pour the cold double cream and whisk until soft peaks form. Soft peaks mean the cream holds its shape but still has a slight droop when you lift the whisk. Be cautious not to overwhip, as the cream can turn grainy or even become butter if beaten too much.
Step 4: Fold the Whipped Cream into the Mixture
Using a spatula, gently fold the whipped cream into the dulce de leche mixture. Be careful not to deflate the cream—use slow, deliberate folding motions to maintain the airy texture.
Step 5: Check the Consistency
Continue mixing until the mousse thickens and forms visible trails from the whisk. At this stage, it should be light and creamy, with a fluffy texture. If it seems too dense, you can add a bit more whipped cream to lighten it up.
Step 6: Serve and Garnish
Spoon the mousse into serving bowls or dessert glasses. You can serve it immediately for the best texture or let it chill for a few minutes for a firmer consistency.
Beginner Tips and Common Mistakes to Avoid
1. Use Chilled Cream for Best Results
Cold cream whips up more efficiently and holds its shape better. If your cream is warm, it may not achieve the right texture, resulting in a denser mousse.
2. Whip the Dulce de Leche and Cream Cheese First
Mixing these two ingredients first ensures that the base is smooth and lump-free. If you add whipped cream too early, it may not incorporate evenly.
3. Be Gentle When Folding
Overmixing at this stage can knock out the air, making the mousse too dense. Use slow, folding motions rather than stirring.
4. Don’t Overwhip the Cream
Soft peaks are key. If the cream becomes too stiff, it won’t blend well with the dulce de leche mixture. If you accidentally overwhip, try adding a little extra unwhipped cream and mix on low speed to bring it back to a softer consistency.
5. Serve Fresh for Best Texture
Unlike mousses made with gelatin, this version is best enjoyed fresh. While you can store leftovers in the fridge for a short time, the mousse will lose some of its lightness if left too long.
Serving Suggestions
Classic Garnishes:
- Shaved dark chocolate – Adds a slightly bitter contrast to the sweetness.
- Crushed nuts – Almonds or hazelnuts give a nice crunch.
- Fresh berries – Strawberries or raspberries add freshness and balance the caramel flavor.
Pairing Ideas:
- With Coffee: A rich espresso or cappuccino pairs beautifully with the caramel notes.
- With a Crunchy Element: Serve alongside a piece of biscotti or shortbread for added texture.
- As a Layered Dessert: Layer the mousse with crumbled cookies or sponge cake for a trifle-style dessert.
Storage and Make-Ahead Tips
Short-Term Storage:
If you need to store leftovers, cover the mousse tightly with plastic wrap and refrigerate for up to 24 hours. Beyond that, the texture may become too dense.
Freezing Option:
You can freeze the mousse for a different experience—it turns into a creamy frozen treat similar to ice cream. Just scoop it into an airtight container and freeze for up to one month. Let it sit at room temperature for a few minutes before serving.
Conclusion: Give It a Try!
This dulce de leche mousse is one of the easiest, most impressive desserts you can make with minimal effort. It’s perfect for beginner cooks because it requires no cooking skills, just simple mixing and whipping. The result is a velvety, caramel-infused mousse that’s light yet indulgent, making it an ideal treat for any occasion.
Now it’s your turn to try it. Gather your ingredients, whip up a batch, and enjoy the satisfaction of creating a restaurant-quality dessert in minutes. If you make it, be sure to share your experience and any creative variations you try. Happy cooking!