There’s something undeniably satisfying about salt and pepper shrimp—crispy, flavorful, and packed with aromatic spices. This dish, a staple of Chinese takeout menus, is traditionally deep-fried. But what if you could achieve that same golden crunch with significantly less oil? That’s where the air fryer comes in.
Print
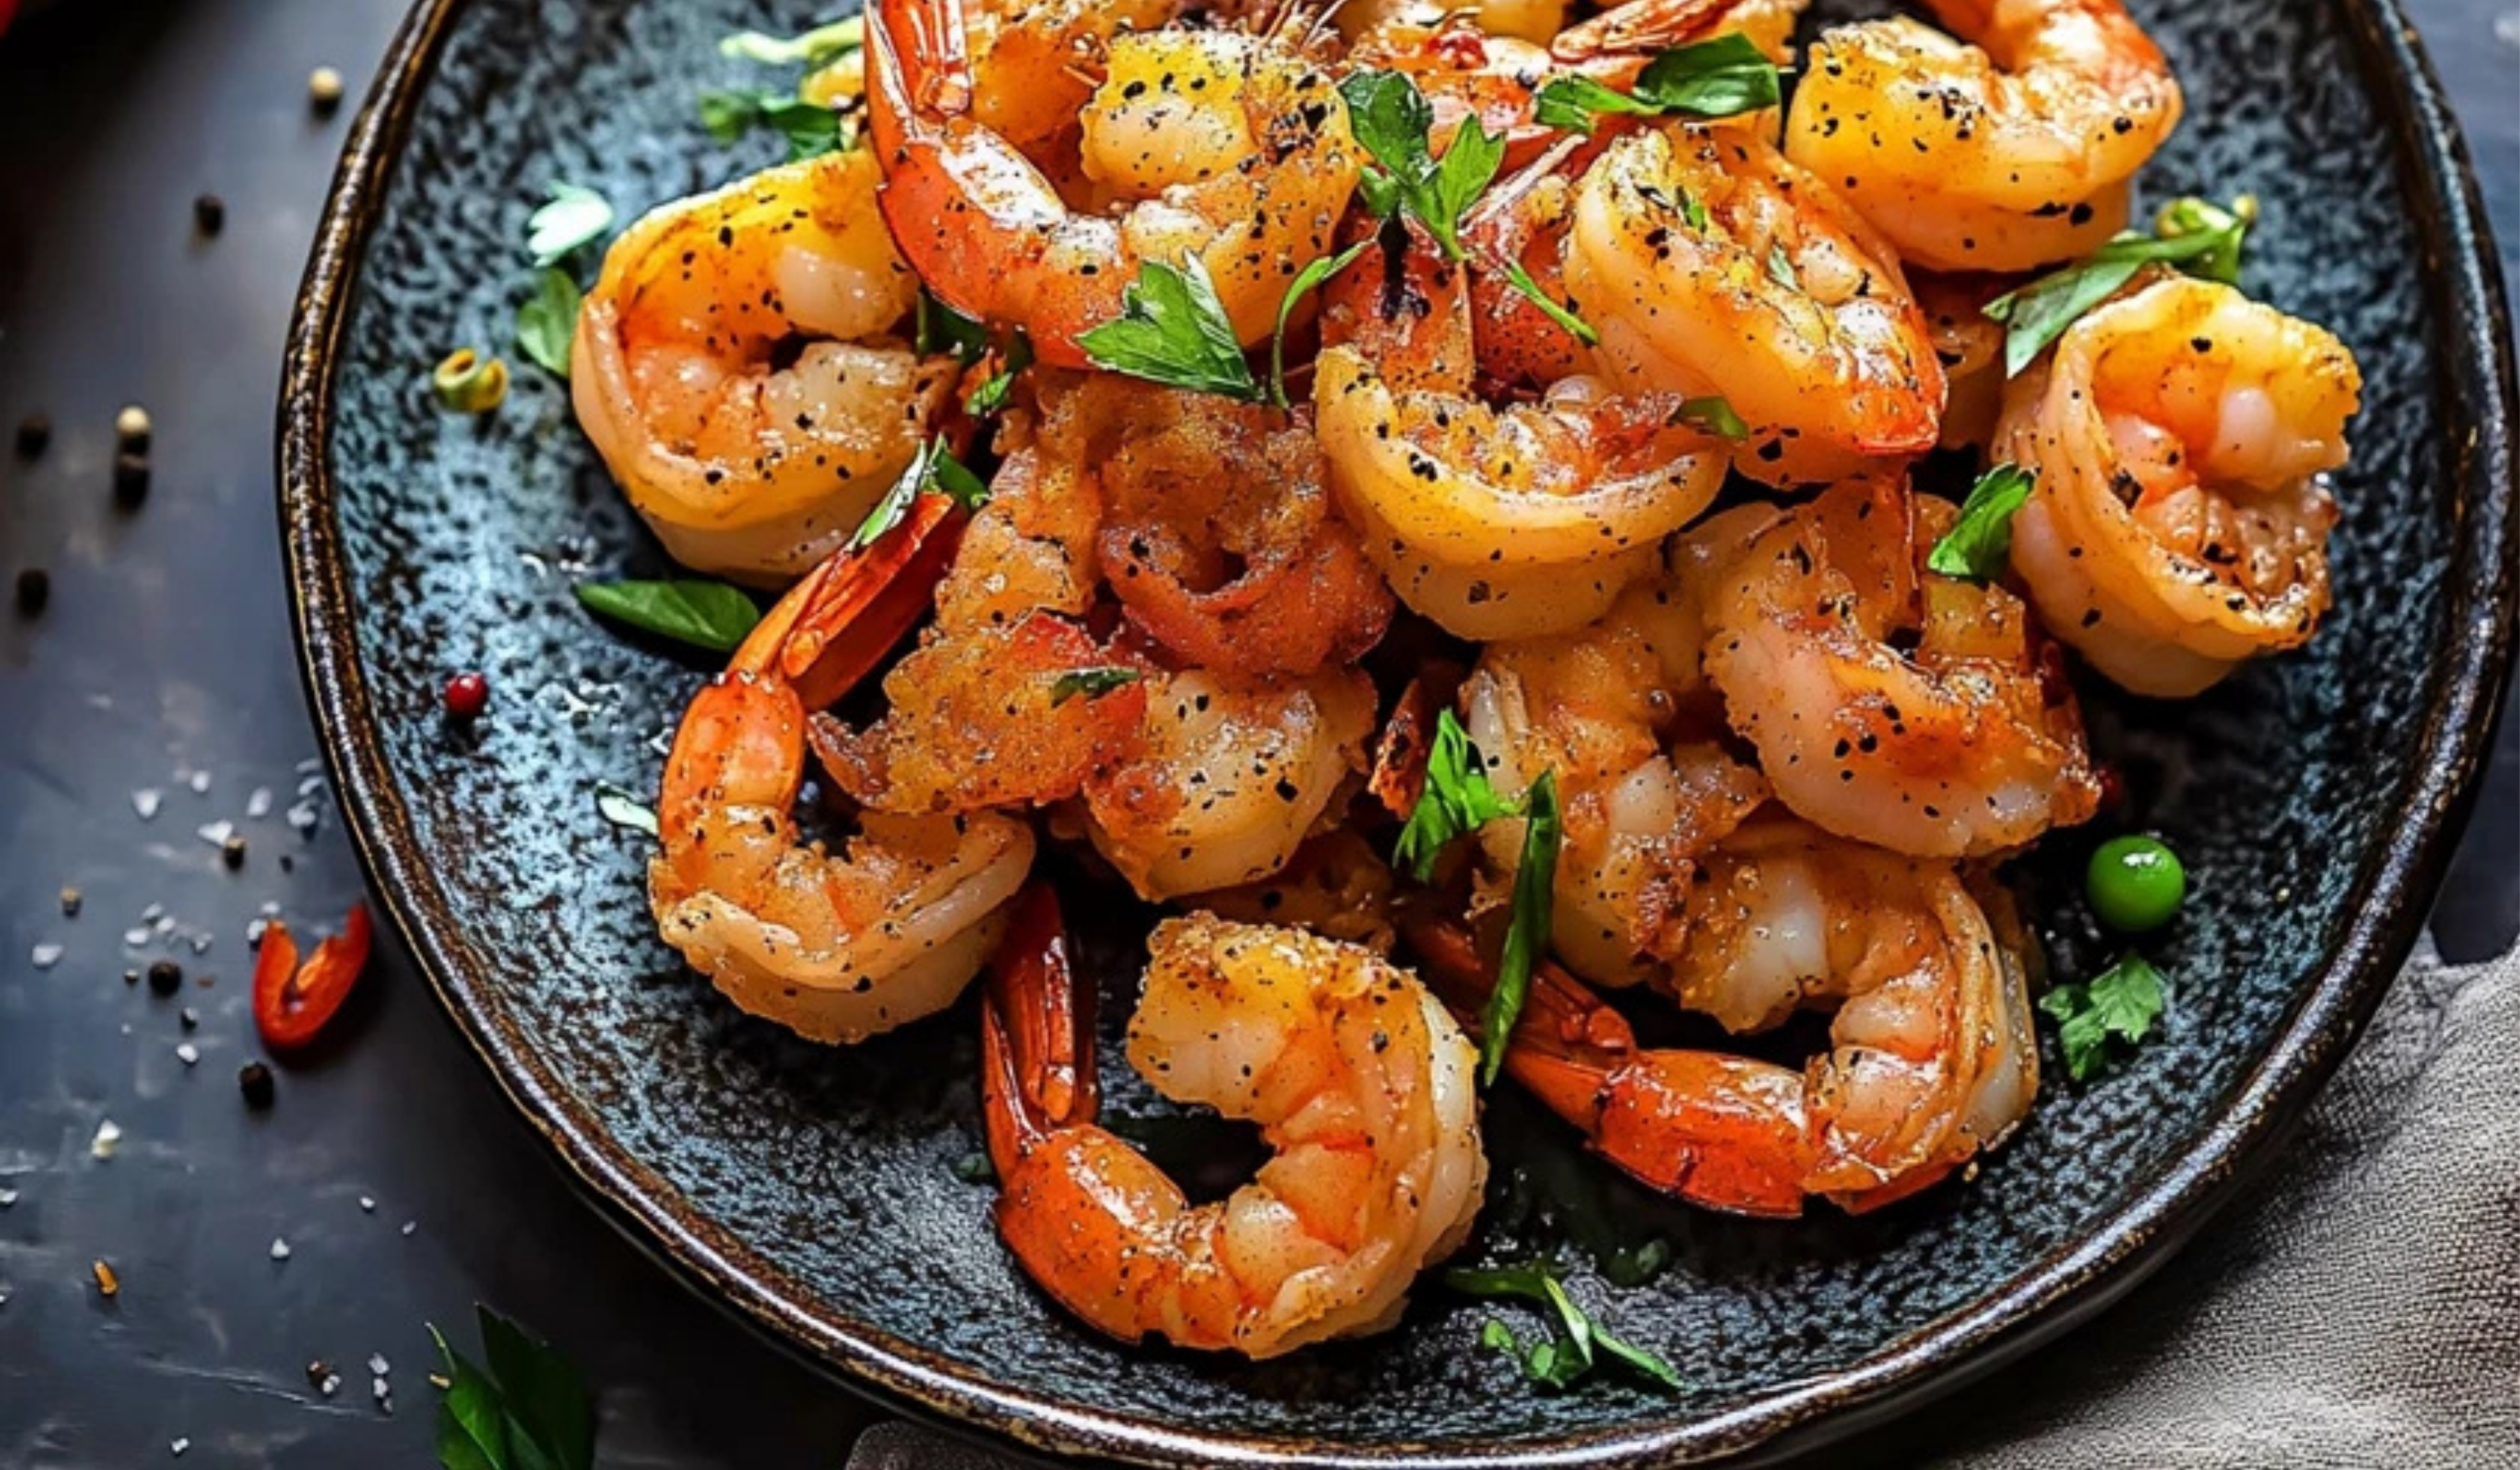
Crispy Salt and Pepper Shrimp: A Chinese Takeout Classic Made Easy in the Air Fryer
Skip the takeout and make Crispy Salt and Pepper Shrimp right in your air fryer! 🍤🔥 Light, crunchy, and perfectly seasoned with garlic, pepper, and a touch of heat, this Chinese classic is easy to make and packed with bold flavors. No deep frying, just pure crispy goodness! #AirFryerMagic #CrispyShrimp #BetterThanTakeout
- Total Time: 25 minutes
- Yield: 6 servings 1x
Ingredients
For the Shrimp
- 450g (1 lb) large shrimp or prawns, cleaned and deveined
- 3 tablespoons cornstarch or corn flour
- 1 teaspoon salt
- 1 teaspoon white pepper
- Cooking spray
For the Garnish
- 3 cloves garlic, thinly sliced
- ½ red chili, thinly sliced
- 1 tablespoon ginger, cut into thin matchsticks
- 2 tablespoons vegetable oil
- 2 green onions, sliced
Instructions
Step 1: Prepare the Shrimp
Begin by cleaning and deveining the shrimp. If purchased fresh, peel and remove the veins using a small knife or a deveining tool. Leaving the tails on is optional, but they provide a nice presentation and are easy to remove while eating.
Step 2: Prepare the Coating
In a shallow bowl, mix the cornstarch, salt, and white pepper. This simple coating gives the shrimp a crisp texture while allowing the natural sweetness of the shrimp to shine.
Step 3: Coat the Shrimp
Toss the shrimp in the cornstarch mixture, ensuring each piece is evenly coated. Shake off any excess to prevent clumping.
Step 4: Arrange in the Air Fryer
Place the shrimp in a single layer inside the air fryer basket. Avoid overcrowding, as this will prevent even crisping. If necessary, cook in batches.
Spray the shrimp lightly but evenly with cooking spray, ensuring the cornstarch coating is fully covered. Flip the shrimp and spray the other side as well.
Step 5: Air Fry the Shrimp
Set the air fryer to 180°C (350°F). Cook for four minutes, then flip the shrimp and spray again. Continue cooking for an additional three to four minutes. The shrimp should turn golden and crisp.
Step 6: Prepare the Aromatics
While the shrimp is cooking, heat two tablespoons of vegetable oil in a small pan over medium heat. Add the garlic, red chili, and ginger. Stir-fry quickly, watching carefully to prevent burning. Once the red chili starts to curl, remove the aromatics from the oil using a slotted spoon and place them on a paper towel-lined plate.
Step 7: Assemble and Serve
Once the shrimp are finished cooking, transfer them to a serving plate. Top with the fried garlic, chili, and ginger. Sprinkle with sliced green onions for added freshness. Serve immediately while hot and crispy.
Notes
How to Tell if the Shrimp is Cooked
Shrimp cook very quickly, and overcooking can result in a rubbery texture. Perfectly cooked shrimp will be firm to the touch and opaque with a pinkish hue. If the shrimp still appears translucent in the thickest part, it needs a little more time.
Preventing Overcrowding in the Air Fryer
For even crisping, ensure that the shrimp are placed in a single layer with space between them. If necessary, cook in multiple batches. Overcrowding the air fryer can lead to uneven cooking and soggy shrimp.
Getting the Crispiest Texture
The key to achieving a crispy exterior is ensuring the shrimp are thoroughly coated and evenly sprayed with oil. If some areas remain dry, they may not crisp up properly. A light, even misting of oil helps mimic deep frying.
Handling the Aromatics
Garlic, chili, and ginger cook quickly. Stir-fry them over medium heat, and remove them as soon as they become fragrant and slightly curled. If left in hot oil too long, they may burn, resulting in a bitter taste.
Adapting the Recipe for Dietary Preferences
For those avoiding fried foods entirely, the shrimp can also be grilled or pan-seared. While the texture will be slightly different, the flavor remains excellent.
- Prep Time: 10 minutes
- Cook Time: 15 minutes
I remember the first time I tried making salt and pepper shrimp at home. I had always assumed it was a complicated dish, best left to skilled chefs. But after some experimenting, I realized that with a few simple ingredients and the right technique, anyone could create restaurant-quality results in their own kitchen. This version is perfect for beginner cooks because it is quick, uses minimal oil, and requires just a handful of readily available ingredients. The air fryer ensures an irresistibly crispy texture without the mess of deep frying, making it a healthier and more convenient option.
Salt and pepper shrimp is a great introduction to Chinese cooking. It highlights the importance of balance—savory, spicy, and aromatic flavors come together in a dish that is simple to prepare but impressive to serve. Whether you are cooking for yourself, your family, or guests, this recipe is guaranteed to be a hit.
Ingredients and Preparation
Before beginning, it is important to prepare all ingredients so the cooking process runs smoothly. Organizing everything in advance, a technique known as mise en place, helps avoid last-minute scrambling.
Ingredients
For the Shrimp
- 450g (1 lb) large shrimp or prawns, cleaned and deveined
- 3 tablespoons cornstarch or corn flour
- 1 teaspoon salt
- 1 teaspoon white pepper
- Cooking spray
For the Garnish
- 3 cloves garlic, thinly sliced
- ½ red chili, thinly sliced
- 1 tablespoon ginger, cut into thin matchsticks
- 2 tablespoons vegetable oil
- 2 green onions, sliced
Ingredient Notes and Substitutions
- If white pepper is unavailable, black pepper can be used as a substitute, though the flavor will be slightly different. White pepper provides a milder heat with an earthy taste.
- Cornstarch is essential for achieving a light, crispy coating. If cornstarch is unavailable, potato starch can be used.
- Green onions add a fresh, slightly sharp contrast to the fried shrimp. If unavailable, chives or shallots can be used instead.
- Red chili provides a subtle heat. Those who prefer a milder dish can omit it, while those who enjoy spice can add extra or use a stronger variety such as Thai bird’s eye chili.
Step-by-Step Instructions
Step 1: Prepare the Shrimp
Begin by cleaning and deveining the shrimp. If purchased fresh, peel and remove the veins using a small knife or a deveining tool. Leaving the tails on is optional, but they provide a nice presentation and are easy to remove while eating.
Step 2: Prepare the Coating
In a shallow bowl, mix the cornstarch, salt, and white pepper. This simple coating gives the shrimp a crisp texture while allowing the natural sweetness of the shrimp to shine.
Step 3: Coat the Shrimp
Toss the shrimp in the cornstarch mixture, ensuring each piece is evenly coated. Shake off any excess to prevent clumping.
Step 4: Arrange in the Air Fryer
Place the shrimp in a single layer inside the air fryer basket. Avoid overcrowding, as this will prevent even crisping. If necessary, cook in batches.
Spray the shrimp lightly but evenly with cooking spray, ensuring the cornstarch coating is fully covered. Flip the shrimp and spray the other side as well.
Step 5: Air Fry the Shrimp
Set the air fryer to 180°C (350°F). Cook for four minutes, then flip the shrimp and spray again. Continue cooking for an additional three to four minutes. The shrimp should turn golden and crisp.
Step 6: Prepare the Aromatics
While the shrimp is cooking, heat two tablespoons of vegetable oil in a small pan over medium heat. Add the garlic, red chili, and ginger. Stir-fry quickly, watching carefully to prevent burning. Once the red chili starts to curl, remove the aromatics from the oil using a slotted spoon and place them on a paper towel-lined plate.
Step 7: Assemble and Serve
Once the shrimp are finished cooking, transfer them to a serving plate. Top with the fried garlic, chili, and ginger. Sprinkle with sliced green onions for added freshness. Serve immediately while hot and crispy.
Beginner Tips and Notes
How to Tell if the Shrimp is Cooked
Shrimp cook very quickly, and overcooking can result in a rubbery texture. Perfectly cooked shrimp will be firm to the touch and opaque with a pinkish hue. If the shrimp still appears translucent in the thickest part, it needs a little more time.
Preventing Overcrowding in the Air Fryer
For even crisping, ensure that the shrimp are placed in a single layer with space between them. If necessary, cook in multiple batches. Overcrowding the air fryer can lead to uneven cooking and soggy shrimp.
Getting the Crispiest Texture
The key to achieving a crispy exterior is ensuring the shrimp are thoroughly coated and evenly sprayed with oil. If some areas remain dry, they may not crisp up properly. A light, even misting of oil helps mimic deep frying.
Handling the Aromatics
Garlic, chili, and ginger cook quickly. Stir-fry them over medium heat, and remove them as soon as they become fragrant and slightly curled. If left in hot oil too long, they may burn, resulting in a bitter taste.
Adapting the Recipe for Dietary Preferences
For those avoiding fried foods entirely, the shrimp can also be grilled or pan-seared. While the texture will be slightly different, the flavor remains excellent.

Serving Suggestions
Salt and pepper shrimp is delicious on its own but can be elevated with a few simple accompaniments.
Side Dishes
- Steamed Jasmine Rice: A classic pairing that balances the bold flavors of the shrimp.
- Stir-Fried Vegetables: Lightly stir-fried bok choy, snap peas, or bell peppers add color and freshness.
- Garlic Noodles: Savory, umami-packed noodles complement the crisp shrimp perfectly.
Dipping Sauces
- Soy Sauce with Chili Oil: A simple and spicy addition for those who enjoy heat.
- Sweet Chili Sauce: A touch of sweetness balances the salty, crispy shrimp.
- Garlic-Lime Dipping Sauce: Fresh lime juice mixed with minced garlic and a pinch of sugar enhances the dish’s flavor.
Storage and Reheating
Salt and pepper shrimp is best enjoyed fresh, but leftovers can be stored in an airtight container in the refrigerator for up to two days. To reheat, place them in the air fryer at 180°C (350°F) for a few minutes to restore crispness. Avoid microwaving, as it will make the shrimp rubbery.
Engagement Features
Cooking should be a fun and rewarding experience, and this recipe is designed to be accessible to all skill levels. If you try this dish, consider sharing your experience. Were the instructions easy to follow? Did you make any modifications? Do you have any favorite dipping sauces to pair with it?
For those new to air frying, this recipe is a great starting point. The technique can be applied to other proteins such as chicken or beef, making it a versatile method to explore.
Salt and pepper shrimp is proof that restaurant-quality dishes can be recreated at home with minimal effort. The air fryer makes the process easier, healthier, and just as satisfying as traditional deep frying. If you are looking for an easy yet impressive dish, this recipe is the perfect choice. Try it today, and let us know how it turns out.