
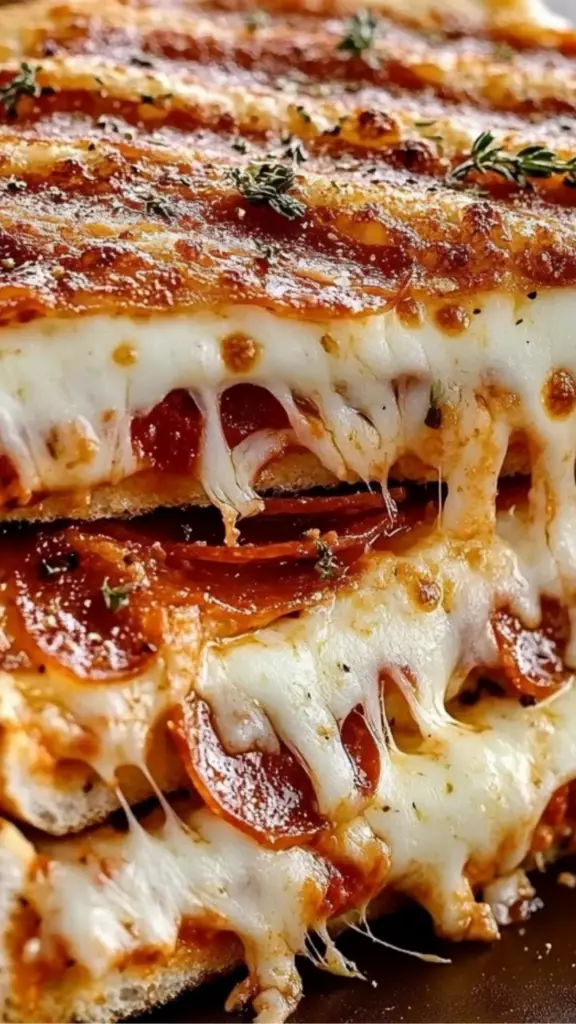
It’s a lazy afternoon, and you’re craving pizza, but you don’t want to deal with making dough or waiting for delivery. You want something quick, delicious, and satisfying. That’s where the Crispy Pepperoni Pizza Panini with Gooey Mozzarella comes in. This dish takes the best elements of a classic pizza—melty cheese, bold tomato sauce, and flavorful toppings—and transforms them into a crispy, golden sandwich that’s easy to prepare.
Print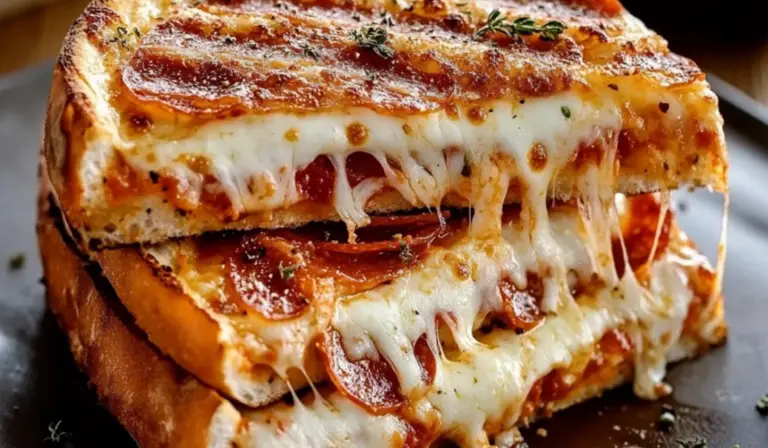
Crispy Pepperoni Pizza Panini with Gooey Mozzarella: A Beginner-Friendly Comfort Dish
Crispy, cheesy, and packed with pizza flavor! 🍕🔥 This Pepperoni Pizza Panini combines golden, toasty bread, gooey mozzarella, and zesty pepperoni for the ultimate handheld comfort dish. A beginner-friendly recipe that’s quick, easy, and totally satisfying! 🧀✨
- Total Time: 13 minutes
- Yield: 2 servings 1x
Ingredients
- 4 thick slices of hearty bread (such as sourdough, whole wheat, or ciabatta)
- ½ cup pizza sauce (or marinara sauce)
- 4 ounces fresh mozzarella cheese, thinly sliced
- 3–4 ounces cooked, seasoned chicken slices or thinly sliced beef (substituting for traditional pepperoni)
- Olive oil spray
Instructions
1. Preheat the Grill or Panini Press
Before assembling the panini, preheat your panini press, George Foreman grill, or stovetop grill pan over medium heat. If using a stovetop grill pan, have a heavy skillet or another weighted object ready to press the sandwich down while cooking. This step ensures an even, golden crisp on the bread.
2. Prepare the Bread
Cut your bread into thick slices, about ¾ inch thick. If using ciabatta, slice it in half and scoop out some of the inside to create more space for the fillings. This prevents the sandwich from becoming too thick to grill properly. Spread an even layer of pizza sauce on the inside of each slice, ensuring full coverage without making the bread soggy.
3. Layer the Fillings
Start by placing a layer of thinly sliced mozzarella on one side of the bread. The cheese acts as a binder that holds the sandwich together once melted. Next, evenly distribute the cooked chicken or beef slices over the cheese. If using chicken, you can season it with a pinch of salt, pepper, and Italian herbs for extra flavor. Place the second slice of bread on top, pressing down gently to secure the fillings.
4. Apply Olive Oil Spray
Lightly spray the outer surface of the bread with olive oil. This helps create the golden, crispy crust that makes panini so appealing. If you don’t have a spray, you can use a brush to evenly coat the bread with a small amount of olive oil. Avoid using too much oil, as it can make the sandwich greasy instead of crisp.
5. Grill the Panini
Place the sandwich on the preheated panini press or grill pan. If using a press, close the lid and cook for about 3-4 minutes, or until the bread is golden brown and crispy. If using a stovetop grill pan, place a heavy skillet on top of the sandwich to press it down. Cook for 3-4 minutes on one side, then carefully flip the sandwich and cook for another 3-4 minutes until the cheese is fully melted and the bread is evenly toasted.
6. Cool and Serve
Once the panini is done, remove it from the heat and let it cool for 1-2 minutes. This allows the cheese to set slightly, preventing it from spilling out when sliced. Cut the panini into halves or quarters and serve warm.
Notes
Troubleshooting Common Issues
- Bread Burning Too Quickly: If the bread is browning too fast while the cheese remains unmelted, lower the heat and cook it for a longer time. This ensures even melting without burning the exterior.
- Cheese Not Melting Enough: Fresh mozzarella takes a little longer to melt than shredded varieties. To speed up the process, cover the panini with a lid or foil for a minute to trap heat inside.
- Filling Overflows While Grilling: If the sandwich is too thick, some cheese or sauce might leak out. To prevent this, avoid overstuffing the sandwich and press it gently before grilling.
Efficient Preparation Tips
- Pre-Cook the Protein: If using chicken or beef, cook it ahead of time and store it in the fridge for easy assembly when needed.
- Assemble in Advance: You can prepare the sandwiches ahead of time and keep them wrapped in foil in the refrigerator. When ready to eat, simply grill them fresh.
- Use a Cast-Iron Skillet for Extra Crispiness: If you don’t have a panini press, a cast-iron skillet with a weighted press (such as another pan) can create the same crispy effect.
- Prep Time: 5 minutes
- Cook Time: 8 minutes
Perfect for beginner cooks, this recipe requires minimal ingredients, simple techniques, and just a few minutes to assemble. The panini press or stovetop grill does most of the work, ensuring a crispy texture and melted cheese without the need for complicated baking. It’s also highly adaptable. Whether you prefer chicken or beef in place of traditional pepperoni, or want to add vegetables for extra flavor, this panini can be customized to suit your taste.
If you are new to cooking, this recipe will introduce you to essential skills like layering flavors, grilling bread to perfection, and melting cheese just right. Let’s get started on this easy yet impressive dish that brings the flavors of pizza into a handheld delight.
Ingredients and Preparation
Ingredients
- 4 thick slices of hearty bread (such as sourdough, whole wheat, or ciabatta)
- ½ cup pizza sauce (or marinara sauce)
- 4 ounces fresh mozzarella cheese, thinly sliced
- 3–4 ounces cooked, seasoned chicken slices or thinly sliced beef (substituting for traditional pepperoni)
- Olive oil spray
Ingredient Substitutions and Variations
- Bread Options: If you prefer a lighter texture, you can use whole wheat bread for added fiber. Ciabatta is ideal for a crunchy bite, but sandwich bread works if you want a softer texture.
- Cheese Choices: Fresh mozzarella provides a creamy, mild flavor, but you can use shredded mozzarella, provolone, or even a dairy-free cheese alternative.
- Protein Alternatives: Instead of chicken or beef, you can use turkey slices or even grilled vegetables for a vegetarian option.
- Sauce Variations: If you don’t have pizza sauce, marinara or homemade tomato sauce with Italian herbs will work just as well. For a spicier kick, add a pinch of red pepper flakes to the sauce.
Step-by-Step Instructions
1. Preheat the Grill or Panini Press
Before assembling the panini, preheat your panini press, George Foreman grill, or stovetop grill pan over medium heat. If using a stovetop grill pan, have a heavy skillet or another weighted object ready to press the sandwich down while cooking. This step ensures an even, golden crisp on the bread.
2. Prepare the Bread
Cut your bread into thick slices, about ¾ inch thick. If using ciabatta, slice it in half and scoop out some of the inside to create more space for the fillings. This prevents the sandwich from becoming too thick to grill properly. Spread an even layer of pizza sauce on the inside of each slice, ensuring full coverage without making the bread soggy.
3. Layer the Fillings
Start by placing a layer of thinly sliced mozzarella on one side of the bread. The cheese acts as a binder that holds the sandwich together once melted. Next, evenly distribute the cooked chicken or beef slices over the cheese. If using chicken, you can season it with a pinch of salt, pepper, and Italian herbs for extra flavor. Place the second slice of bread on top, pressing down gently to secure the fillings.
4. Apply Olive Oil Spray
Lightly spray the outer surface of the bread with olive oil. This helps create the golden, crispy crust that makes panini so appealing. If you don’t have a spray, you can use a brush to evenly coat the bread with a small amount of olive oil. Avoid using too much oil, as it can make the sandwich greasy instead of crisp.
5. Grill the Panini
Place the sandwich on the preheated panini press or grill pan. If using a press, close the lid and cook for about 3-4 minutes, or until the bread is golden brown and crispy. If using a stovetop grill pan, place a heavy skillet on top of the sandwich to press it down. Cook for 3-4 minutes on one side, then carefully flip the sandwich and cook for another 3-4 minutes until the cheese is fully melted and the bread is evenly toasted.
6. Cool and Serve
Once the panini is done, remove it from the heat and let it cool for 1-2 minutes. This allows the cheese to set slightly, preventing it from spilling out when sliced. Cut the panini into halves or quarters and serve warm.
Beginner Tips and Notes
Troubleshooting Common Issues
- Bread Burning Too Quickly: If the bread is browning too fast while the cheese remains unmelted, lower the heat and cook it for a longer time. This ensures even melting without burning the exterior.
- Cheese Not Melting Enough: Fresh mozzarella takes a little longer to melt than shredded varieties. To speed up the process, cover the panini with a lid or foil for a minute to trap heat inside.
- Filling Overflows While Grilling: If the sandwich is too thick, some cheese or sauce might leak out. To prevent this, avoid overstuffing the sandwich and press it gently before grilling.
Efficient Preparation Tips
- Pre-Cook the Protein: If using chicken or beef, cook it ahead of time and store it in the fridge for easy assembly when needed.
- Assemble in Advance: You can prepare the sandwiches ahead of time and keep them wrapped in foil in the refrigerator. When ready to eat, simply grill them fresh.
- Use a Cast-Iron Skillet for Extra Crispiness: If you don’t have a panini press, a cast-iron skillet with a weighted press (such as another pan) can create the same crispy effect.
Serving Suggestions
Side Dishes to Complement the Panini
- Fresh Salad: A side of mixed greens with balsamic vinaigrette balances the richness of the panini.
- Roasted Vegetables: A side of roasted bell peppers, zucchini, or cherry tomatoes enhances the flavors.
- Soup Pairing: A warm bowl of tomato soup or minestrone makes this a cozy meal.
- Garlic Parmesan Fries: A crispy side of homemade fries with garlic and parmesan pairs well with the panini’s bold flavors.
Storage and Reheating Tips
- Refrigeration: Store leftover panini in an airtight container in the fridge for up to two days.
- Reheating: To keep the bread crispy, reheat in a pan over medium heat for 3-4 minutes on each side. Avoid microwaving, as it can make the bread soggy.
- Freezing: If you want to freeze assembled but ungrilled panini, wrap them tightly in foil and freeze for up to one month. Grill directly from frozen, adding 1-2 extra minutes to the cooking time.
Conclusion: Try This Crispy, Cheesy Delight
Cooking doesn’t have to be intimidating, and this Crispy Pepperoni Pizza Panini with Gooey Mozzarella is proof of that. With just a few basic ingredients and simple steps, you can create a restaurant-quality meal at home in under 15 minutes. Whether you’re a beginner or just looking for an easy meal, this recipe is an excellent choice.
The best part is that you can make it your own. Swap in different cheeses, add vegetables, or experiment with sauces to create new flavors. Try it out, and let us know how it turned out. What variations did you try? Share your experience in the comments—we’d love to hear from you.