
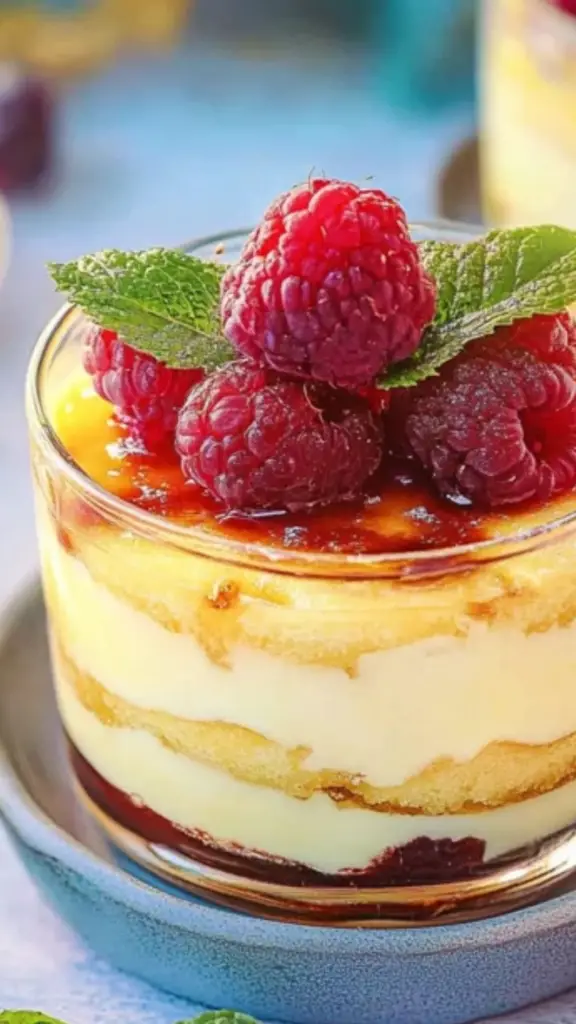
a creamy, velvety custard layered with buttery shortbread cookies and sweet raspberry jam, all topped with a crisp caramelized sugar crust. Creme Brûlée Trifles are the perfect dessert to impress guests while remaining approachable for beginner cooks. Unlike traditional crème brûlée, which can be intimidating due to its delicate custard and torching technique, this trifle version simplifies the process without sacrificing flavor.
Print
Creme Brûlée Trifles: A Beginner-Friendly Showstopper Dessert
Who says gourmet desserts have to be complicated? These Crème Brûlée Trifles bring the best of crème brûlée—velvety custard, caramelized sugar, and a cookie crunch—all in a stunning, no-fuss dessert. Perfect for special occasions or a self-care treat, this elegant yet easy recipe guarantees a restaurant-worthy bite at home. The best part? You can prep them ahead and impress effortlessly. A little torch (or broiler) magic and voilà—dessert perfection!
#GourmetMadeEasy #CrèmeBrûléeTrifles #FancyButEasy #BeginnerFriendlyDesserts #NoFussTreats #HomemadeLuxury #DessertGoals #SweetPerfection #CustardLover #DIYDesserts
- Total Time: 7 hours 45 minutes (including chilling time)
- Yield: 8 servings 1x
Ingredients
For the Custard:
- 1 vanilla bean
- 8 large egg yolks
- 1 quart heavy cream (no substitutions)
- ½ cup granulated sugar (plus extra for topping)
For Assembly:
- 60 shortbread cookies (such as Lorna Doone), crushed
- 1 cup seedless raspberry jam
Instructions
1. Prepare the Oven and Water Bath
Preheat your oven to 300°F and position the rack in the center. Fill a large pot with water and bring it to a boil while you prepare the custard. This boiling water will be used for the water bath, which helps the custard cook evenly.
2. Infuse the Cream with Vanilla
- Slice the vanilla bean pod in half lengthwise. Using the back of a knife, scrape out the tiny seeds inside.
- In a large saucepan over medium heat, combine the heavy cream, sugar, vanilla bean seeds, and the scraped vanilla pod.
- Heat the mixture, stirring frequently, until it reaches 205°F. You’ll know it’s ready when it’s just below a simmer. Remove from heat.
3. Whisk the Egg Yolks and Temper the Mixture
- In a separate large bowl, whisk the egg yolks until smooth (about 1 minute).
- Slowly, pour a small amount of the hot cream into the egg yolks while whisking continuously. This process, called tempering, prevents the eggs from scrambling.
- Gradually add the remaining hot cream, whisking constantly, until fully combined.
4. Strain and Bake the Custard
- Set a fine mesh strainer over a large bowl and pour the custard mixture through it. This removes any solids and the vanilla pod.
- Pour the strained custard into a 9×9-inch baking dish.
- Place the baking dish inside a larger roasting pan and carefully pour the boiling water into the roasting pan, filling it halfway up the sides of the baking dish.
- Bake uncovered for 40 minutes. Cover with foil and bake for an additional 20 minutes, until the custard is set but slightly jiggly in the center.
5. Chill and Prepare for Assembly
- Let the custard cool at room temperature for 2 hours.
- Cover with plastic wrap and refrigerate for at least 4 hours (or overnight for best results).
Notes
Troubleshooting Common Issues
- Custard is too runny: If your custard doesn’t set properly, it may not have cooked long enough. Make sure it jiggles slightly in the center when removed from the oven, and always chill it for at least 4 hours.
- Eggs scrambled when adding hot cream: This happens when the hot cream is added too quickly. Pour it in very slowly while whisking constantly to prevent overheating the yolks.
- Sugar won’t caramelize properly: If the sugar isn’t browning evenly, move the torch in small circles over the surface instead of keeping it in one spot.
Kitchen Efficiency Tips
- Pre-measure Ingredients: Have everything ready before you start to make the process smoother.
- Use Heat-Safe Glasses: If you plan to caramelize the sugar topping, choose sturdy glasses or ramekins that can withstand high heat.
- Make Ahead: The custard can be prepared a day in advance, and the trifles can be assembled a few hours before serving.
- Prep Time: 30 minutes
- Cook Time: 1 hour 15 minutes
If you’re new to baking, this recipe is a fantastic starting point. It eliminates the stress of making individual custards while still delivering the classic rich and smooth texture. Plus, the layering process is easy, and the ingredients are simple to find. This guide will walk you through each step, providing tips along the way to ensure success.
Ingredients and Preparation
For the Custard:
- 1 vanilla bean
- 8 large egg yolks
- 1 quart heavy cream (no substitutions)
- ½ cup granulated sugar (plus extra for topping)
For Assembly:
- 60 shortbread cookies (such as Lorna Doone), crushed
- 1 cup seedless raspberry jam
Ingredient Alternatives
- Vanilla Bean Substitute: If you don’t have a vanilla bean, you can use 2 teaspoons of pure vanilla extract. Add it after heating the cream to preserve its flavor.
- Cookie Options: Shortbread cookies provide a rich, buttery texture, but graham crackers or vanilla wafers can also work.
- Jam Variations: Raspberry jam offers a tart contrast to the sweet custard, but you can substitute it with strawberry, blueberry, or even apricot jam.
Step-by-Step Instructions
1. Prepare the Oven and Water Bath
Preheat your oven to 300°F and position the rack in the center. Fill a large pot with water and bring it to a boil while you prepare the custard. This boiling water will be used for the water bath, which helps the custard cook evenly.
2. Infuse the Cream with Vanilla
- Slice the vanilla bean pod in half lengthwise. Using the back of a knife, scrape out the tiny seeds inside.
- In a large saucepan over medium heat, combine the heavy cream, sugar, vanilla bean seeds, and the scraped vanilla pod.
- Heat the mixture, stirring frequently, until it reaches 205°F. You’ll know it’s ready when it’s just below a simmer. Remove from heat.
3. Whisk the Egg Yolks and Temper the Mixture
- In a separate large bowl, whisk the egg yolks until smooth (about 1 minute).
- Slowly, pour a small amount of the hot cream into the egg yolks while whisking continuously. This process, called tempering, prevents the eggs from scrambling.
- Gradually add the remaining hot cream, whisking constantly, until fully combined.
4. Strain and Bake the Custard
- Set a fine mesh strainer over a large bowl and pour the custard mixture through it. This removes any solids and the vanilla pod.
- Pour the strained custard into a 9×9-inch baking dish.
- Place the baking dish inside a larger roasting pan and carefully pour the boiling water into the roasting pan, filling it halfway up the sides of the baking dish.
- Bake uncovered for 40 minutes. Cover with foil and bake for an additional 20 minutes, until the custard is set but slightly jiggly in the center.
5. Chill and Prepare for Assembly
- Let the custard cool at room temperature for 2 hours.
- Cover with plastic wrap and refrigerate for at least 4 hours (or overnight for best results).
Assembling the Trifles
1. Prepare the Custard
- Once chilled, remove the custard from the fridge and whisk it until smooth. Make sure to incorporate any vanilla bean specks that may have settled.
2. Layer the Ingredients
- In sturdy serving glasses or ramekins, start with a layer of crushed shortbread cookies.
- Add a spoonful of custard, followed by about 2 tablespoons of raspberry jam.
- Repeat the layers, finishing with a final layer of custard on top.
3. Caramelize the Sugar Topping
- Sprinkle a generous amount of granulated sugar evenly over the top layer of custard. Make sure the sugar covers the entire surface.
- Using a small kitchen torch, carefully caramelize the sugar until it turns a deep golden brown. This creates the signature crisp topping.
- Let the sugar set for a couple of minutes before serving.
Note: If you don’t have a kitchen torch, you can skip this step. The trifles will still taste incredible without the caramelized topping.
Beginner Tips and Notes
Troubleshooting Common Issues
- Custard is too runny: If your custard doesn’t set properly, it may not have cooked long enough. Make sure it jiggles slightly in the center when removed from the oven, and always chill it for at least 4 hours.
- Eggs scrambled when adding hot cream: This happens when the hot cream is added too quickly. Pour it in very slowly while whisking constantly to prevent overheating the yolks.
- Sugar won’t caramelize properly: If the sugar isn’t browning evenly, move the torch in small circles over the surface instead of keeping it in one spot.
Kitchen Efficiency Tips
- Pre-measure Ingredients: Have everything ready before you start to make the process smoother.
- Use Heat-Safe Glasses: If you plan to caramelize the sugar topping, choose sturdy glasses or ramekins that can withstand high heat.
- Make Ahead: The custard can be prepared a day in advance, and the trifles can be assembled a few hours before serving.
Serving Suggestions
Pairings and Complementary Flavors
These trifles pair beautifully with a variety of accompaniments:
- Fresh Berries: Serve with fresh raspberries, strawberries, or blueberries for added texture and flavor.
- Whipped Cream: A light dollop of homemade whipped cream balances the richness of the custard.
- Dark Chocolate Shavings: Sprinkle finely grated dark chocolate over the top for a decadent touch.
Storage Tips
- Refrigeration: Store assembled trifles in the refrigerator for up to 2 days. However, wait to caramelize the sugar until just before serving.
- Custard Storage: If storing the custard separately, keep it covered in the refrigerator for up to 3 days. Stir well before assembling the trifles.
- Avoid Freezing: Custard doesn’t freeze well as it can become grainy when thawed.
Conclusion
Creme Brûlée Trifles offer all the elegance of a classic crème brûlée with a simplified process that makes them perfect for beginners. With easy-to-find ingredients and a forgiving method, this recipe allows you to build confidence in the kitchen while creating a show-stopping dessert. The rich vanilla custard, buttery cookies, and tart raspberry jam create a perfectly balanced flavor that will impress family and friends.
If you try this recipe, let us know how it turns out in the comments. Did you experiment with different flavors or add your own twist? We’d love to hear about your experience. Happy cooking!