
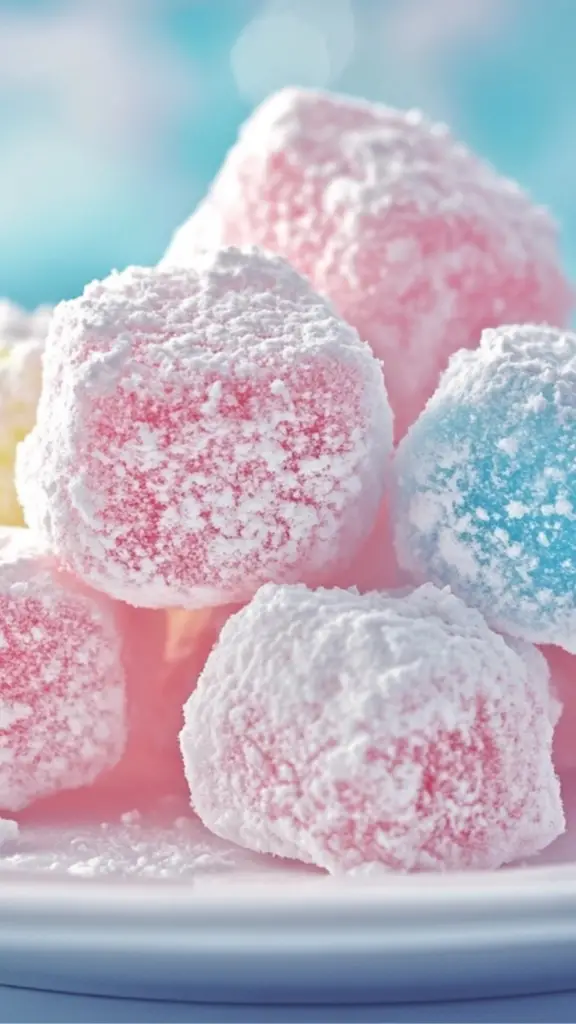
There’s something truly magical about cotton candy—the way it melts in your mouth, the nostalgic sweetness, and the vibrant colors that bring back childhood memories of fairs and carnivals. Now, imagine capturing that same airy, melt-in-your-mouth experience in soft, fluffy marshmallows! These homemade cotton candy marshmallows are not just delicious; they’re a fun, eye-catching treat that adds a whimsical touch to any dessert table.
Print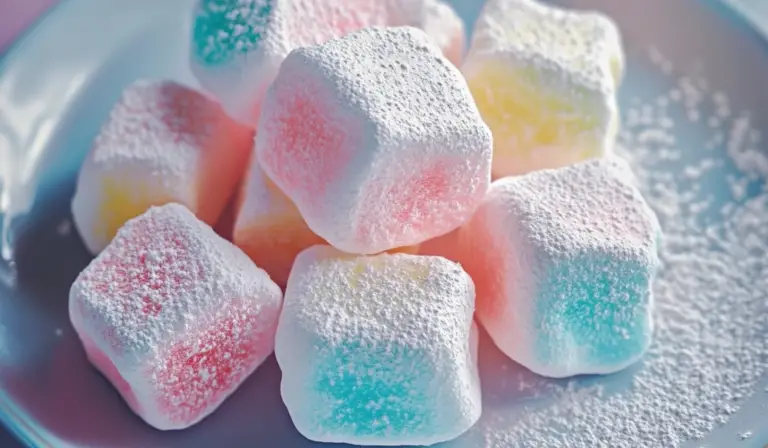
Cotton Candy Marshmallows: A Whimsical, Homemade Treat
Bringing sweet, fluffy magic to life! ☁️💖 These Cotton Candy Marshmallows are the perfect mix of softness, sweetness, and fun! 🍭💙 Light as a cloud with the irresistible flavor of classic cotton candy, they make the ultimate treat for parties, gifts, or a cozy night in. ✨ Drop them into hot chocolate, add them to desserts, or enjoy them straight from the jar—because why not? 😉 Who’s excited to make their own batch? 🎉 #FluffyGoodness #CottonCandyLover #HomemadeSweets #SugarClouds #WhimsicalTreats #FunDesserts #SoftAndSweet #DIYMarshmallows #PastelDreams #SweetEscape 💫
- Total Time: 6 hours 20 minutes
- Yield: 36 marshmallows 1x
Ingredients
- 3/4 cup (180 ml) cold water, divided – Used to bloom the gelatin and create the sugar syrup.
- 3 envelopes (7 g each) unflavored gelatin – The key to giving the marshmallows their signature fluffy texture.
- 2 cups (400 g) granulated sugar – Provides the sweetness and structure for the marshmallow base.
- 1/2 cup (120 ml) light corn syrup – Helps prevent crystallization and keeps the marshmallows smooth.
- 1/4 teaspoon salt – Balances the sweetness and enhances the overall flavor.
- 1 teaspoon cotton candy flavoring – Adds the signature nostalgic taste of carnival cotton candy.
- Gel food coloring (pink, blue, or any color of choice) – Creates the fun, pastel tones reminiscent of real cotton candy.
- 1/2 cup (65 g) powdered sugar – Used for dusting and preventing stickiness.
- 1/4 cup (30 g) cornstarch – Combined with powdered sugar to keep marshmallows from sticking together.
Instructions
1. Prepare the Pan
- Line a 9×9-inch (23×23 cm) baking pan with parchment paper.
- Lightly grease it with cooking spray or rub with a thin layer of vegetable oil to prevent sticking.
2. Bloom the Gelatin
- In the bowl of a stand mixer, combine 1/2 cup cold water with three envelopes of gelatin.
- Let it sit for 5–10 minutes to allow the gelatin to absorb the water and soften.
3. Cook the Sugar Syrup
- In a medium saucepan, combine:
- 2 cups granulated sugar
- 1/2 cup light corn syrup
- 1/4 teaspoon salt
- The remaining 1/4 cup water
- Stir over medium heat until the sugar dissolves.
- Increase the heat to medium-high and bring to a boil.
- Cook without stirring until the mixture reaches 240°F (115°C) on a candy thermometer.
4. Whip the Marshmallow Mixture
- Turn the stand mixer on low speed and carefully pour the hot sugar syrup into the bloomed gelatin.
- Gradually increase to high speed and whip for 10–12 minutes, until thick, fluffy, and slightly cooled.
- Add cotton candy flavoring and a few drops of food coloring, then mix until evenly combined.
5. Transfer to the Pan
- Pour the marshmallow mixture into the prepared pan.
- Smooth the top with a greased spatula.
- Let sit at room temperature for 6–8 hours (or overnight) to fully set.
6. Cut and Coat the Marshmallows
- In a small bowl, mix:
- 1/2 cup powdered sugar
- 1/4 cup cornstarch
- Dust a work surface with the sugar mixture.
- Turn the marshmallow slab onto the surface and peel off the parchment paper.
- Dust the top with the powdered sugar mixture.
- Use a greased knife or cookie cutters to cut into squares or fun shapes.
- Toss marshmallows in the powdered sugar mixture to prevent sticking.
7. Serve and Store
- Store marshmallows in an airtight container at room temperature for up to 1 week.
- Avoid refrigerating, as this can make them sticky.
Notes
Common Troubleshooting Tips
- Sticky Marshmallows? Toss them in more powdered sugar and cornstarch to absorb excess moisture.
- Marshmallows Not Setting? Ensure the sugar syrup reaches 240°F (115°C) before mixing with gelatin.
- Too Soft or Runny? Overmixing or humid conditions can affect texture. Reduce mixing time if necessary.
- Sugar Crystallizing? Avoid stirring once the sugar syrup starts boiling, or add a drop of lemon juice to prevent crystallization.
Helpful Kitchen Tips
- Use a Wet Knife – If marshmallows are sticking while cutting, dip your knife in warm water between cuts.
- Double the Fun with Swirls – Use two colors and swirl with a toothpick before setting for a tie-dye effect.
- Easier Cleanup – Soak your mixing bowl in warm water to dissolve sticky marshmallow residue.
- Prep Time: 20 minutes
- Cook Time: 6 hours
Making marshmallows from scratch might sound intimidating, but it’s easier than you think. This recipe is perfect for beginner cooks who want to try their hand at candy-making without needing special equipment beyond a stand mixer and a candy thermometer. Whether you’re making these marshmallows for a themed party, as a homemade gift, or just to satisfy your sweet tooth, they will impress both kids and adults alike. Plus, the best part? You can customize the colors and flavors to match any occasion!
Why This Recipe Is Perfect for Beginners
- Simple Ingredients – This recipe requires basic pantry staples like sugar, corn syrup, and gelatin. The only specialty ingredient is cotton candy flavoring, which is easily available online or in baking supply stores.
- No Baking Required – You don’t need an oven, making it an ideal treat to whip up without heating the whole kitchen.
- Customizable Colors & Flavors – You can experiment with different food colorings and flavors, making each batch unique.
- Fun & Versatile – These marshmallows can be enjoyed on their own, added to hot chocolate, used as cupcake toppings, or even turned into s’mores with a cotton candy twist.
Ingredients and Preparation
Ingredients
- 3/4 cup (180 ml) cold water, divided – Used to bloom the gelatin and create the sugar syrup.
- 3 envelopes (7 g each) unflavored gelatin – The key to giving the marshmallows their signature fluffy texture.
- 2 cups (400 g) granulated sugar – Provides the sweetness and structure for the marshmallow base.
- 1/2 cup (120 ml) light corn syrup – Helps prevent crystallization and keeps the marshmallows smooth.
- 1/4 teaspoon salt – Balances the sweetness and enhances the overall flavor.
- 1 teaspoon cotton candy flavoring – Adds the signature nostalgic taste of carnival cotton candy.
- Gel food coloring (pink, blue, or any color of choice) – Creates the fun, pastel tones reminiscent of real cotton candy.
- 1/2 cup (65 g) powdered sugar – Used for dusting and preventing stickiness.
- 1/4 cup (30 g) cornstarch – Combined with powdered sugar to keep marshmallows from sticking together.
Alternative Ingredient Suggestions
- Flavor Variations – If you can’t find cotton candy flavoring, you can use vanilla, strawberry, or even bubblegum extract.
- Natural Color Options – Instead of artificial food coloring, try beet powder for pink or spirulina for a light blue-green hue.
- Corn Syrup Substitute – If avoiding corn syrup, swap it with honey or golden syrup, though this may slightly alter the flavor and texture.
Step-by-Step Instructions
1. Prepare the Pan
- Line a 9×9-inch (23×23 cm) baking pan with parchment paper.
- Lightly grease it with cooking spray or rub with a thin layer of vegetable oil to prevent sticking.
2. Bloom the Gelatin
- In the bowl of a stand mixer, combine 1/2 cup cold water with three envelopes of gelatin.
- Let it sit for 5–10 minutes to allow the gelatin to absorb the water and soften.
3. Cook the Sugar Syrup
- In a medium saucepan, combine:
- 2 cups granulated sugar
- 1/2 cup light corn syrup
- 1/4 teaspoon salt
- The remaining 1/4 cup water
- Stir over medium heat until the sugar dissolves.
- Increase the heat to medium-high and bring to a boil.
- Cook without stirring until the mixture reaches 240°F (115°C) on a candy thermometer.
4. Whip the Marshmallow Mixture
- Turn the stand mixer on low speed and carefully pour the hot sugar syrup into the bloomed gelatin.
- Gradually increase to high speed and whip for 10–12 minutes, until thick, fluffy, and slightly cooled.
- Add cotton candy flavoring and a few drops of food coloring, then mix until evenly combined.
5. Transfer to the Pan
- Pour the marshmallow mixture into the prepared pan.
- Smooth the top with a greased spatula.
- Let sit at room temperature for 6–8 hours (or overnight) to fully set.
6. Cut and Coat the Marshmallows
- In a small bowl, mix:
- 1/2 cup powdered sugar
- 1/4 cup cornstarch
- Dust a work surface with the sugar mixture.
- Turn the marshmallow slab onto the surface and peel off the parchment paper.
- Dust the top with the powdered sugar mixture.
- Use a greased knife or cookie cutters to cut into squares or fun shapes.
- Toss marshmallows in the powdered sugar mixture to prevent sticking.
7. Serve and Store
- Store marshmallows in an airtight container at room temperature for up to 1 week.
- Avoid refrigerating, as this can make them sticky.
Beginner Tips and Notes
Common Troubleshooting Tips
- Sticky Marshmallows? Toss them in more powdered sugar and cornstarch to absorb excess moisture.
- Marshmallows Not Setting? Ensure the sugar syrup reaches 240°F (115°C) before mixing with gelatin.
- Too Soft or Runny? Overmixing or humid conditions can affect texture. Reduce mixing time if necessary.
- Sugar Crystallizing? Avoid stirring once the sugar syrup starts boiling, or add a drop of lemon juice to prevent crystallization.
Helpful Kitchen Tips
- Use a Wet Knife – If marshmallows are sticking while cutting, dip your knife in warm water between cuts.
- Double the Fun with Swirls – Use two colors and swirl with a toothpick before setting for a tie-dye effect.
- Easier Cleanup – Soak your mixing bowl in warm water to dissolve sticky marshmallow residue.
Serving Suggestions
Fun Ways to Enjoy Cotton Candy Marshmallows
- Hot Chocolate Topping – Drop a few marshmallows into hot cocoa for a melty, colorful treat.
- S’mores with a Twist – Swap regular marshmallows for cotton candy marshmallows for extra sweetness.
- Cake or Cupcake Decoration – Add them to birthday cakes or sprinkle over frosted cupcakes.
- Party Favors – Wrap them in decorative bags for giftable homemade treats.
Storage Tips
- Room Temperature – Store in an airtight container with parchment paper layers between marshmallows.
- Avoid Moisture – Keep away from humidity, as marshmallows absorb moisture and become sticky.
- Shelf Life – Best enjoyed within a week but can last up to 2 weeks if stored properly.
Conclusion
Homemade cotton candy marshmallows are a delightful and easy-to-make treat that will impress friends and family. Whether you’re making them for a party, a special gift, or just to enjoy with hot chocolate, these soft, pillowy sweets are sure to bring joy with every bite. The best part is the customization—experiment with colors, flavors, and shapes to make them uniquely yours!
Have you tried making homemade marshmallows before? What’s your favorite way to enjoy them? Share your thoughts and photos in the comments below—I’d love to see your creations! Happy cooking!