
When I first moved into my first apartment, I didn’t own a stand mixer or a rolling pin, and I barely knew the difference between baking soda and baking powder. What I did know was that the smell of cinnamon rolls baking could turn any rough day into something soft and warm. But traditional cinnamon rolls were intimidating—yeast, rising time, sticky dough. Then I discovered cinnamon roll muffins. All the cozy flavor, none of the fuss. These muffins became my go-to recipe when I wanted something indulgent yet manageable, especially when sharing with friends or prepping for a weekend breakfast.
Print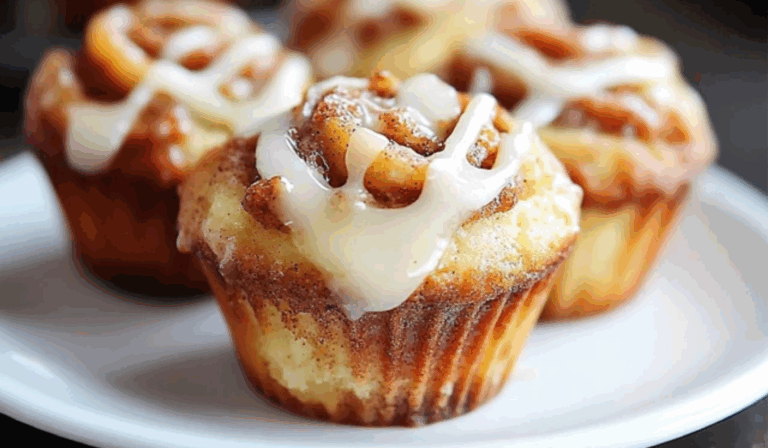
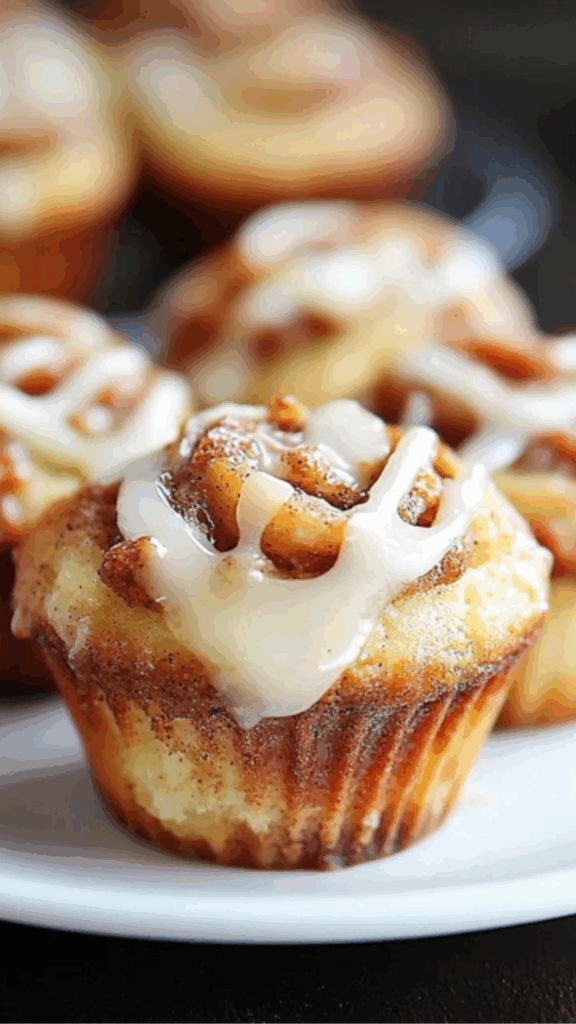
Cinnamon Roll Muffins: A Beginner’s Sweet Delight
Craving something cozy and sweet? 🍥✨ These Cinnamon Roll Muffins are pure homemade magic! Soft, fluffy, and swirled with cinnamon-sugar goodness, they’re perfect for beginner bakers ready to impress. 🧁💛 No yeast, no fuss — just simple steps and delicious results! 🍴🌟 Every bite feels like a warm hug, making them ideal for breakfast, snacks, or sweet cravings. 🎉 Bake a batch today and fill your kitchen with irresistible cinnamon bliss! 🍥🏡
- Total Time: 33 minutes
- Yield: 12 muffins 1x
Ingredients
For the Muffins:
- 2 cups all-purpose flour
- 1 tablespoon baking powder
- ½ teaspoon baking soda
- ½ teaspoon salt
- 1/3 cup granulated sugar
- 1 teaspoon ground cinnamon
- 1 cup milk (dairy or unsweetened almond/soy milk)
- 1/3 cup neutral oil (vegetable or canola)
- 1 large egg
- 1 teaspoon vanilla extract
For the Cinnamon Swirl Filling:
- ¼ cup unsalted butter, melted
- ½ cup brown sugar, packed
- 1 tablespoon ground cinnamon
- Optional: ¼ cup finely chopped cooked chicken or beef sausage for a savory twist
For the Glaze (optional):
- 1 cup powdered sugar
- 1–2 tablespoons milk
- ½ teaspoon vanilla extract
Alternative Ingredient Suggestions:
- Flour: Whole wheat flour can be used for half of the all-purpose flour for added fiber.
- Sugar: Coconut sugar can replace granulated sugar for a deeper flavor.
- Oil: Melted butter or coconut oil can be used instead of vegetable oil.
- Filling: Add chopped nuts or raisins to the cinnamon filling for texture.
- Glaze: For a dairy-free option, use plant milk.
Instructions
Step 1: Preheat and Prepare Preheat your oven to 375°F (190°C). Line a standard 12-cup muffin tin with paper liners or grease each cup lightly with oil or butter.
Step 2: Make the Muffin Batter In a large bowl, whisk together flour, baking powder, baking soda, salt, granulated sugar, and cinnamon. In a separate bowl, combine the milk, oil, egg, and vanilla extract. Mix until smooth.
Pour the wet ingredients into the dry ingredients. Stir until just combined. Do not overmix—stop as soon as you don’t see dry flour.
Step 3: Make the Filling In a small bowl, stir together the melted butter, brown sugar, and cinnamon. If using chopped cooked chicken or beef sausage, stir it in here for a sweet-savory option.
Step 4: Assemble the Muffins Spoon about one tablespoon of muffin batter into each muffin cup. Add a small dollop (about a teaspoon) of cinnamon filling. Then, cover with more muffin batter until each cup is about ¾ full. Use a toothpick or skewer to gently swirl the batter and filling together.
Step 5: Bake Place the muffin tin in the preheated oven and bake for 15 to 18 minutes, or until the tops are golden and a toothpick inserted into the center comes out clean or with just a few crumbs.
Step 6: Make the Glaze While the muffins cool slightly, prepare the glaze. In a small bowl, whisk together powdered sugar, milk, and vanilla until smooth. Adjust the consistency by adding more milk or sugar as needed.
Step 7: Finish and Cool Drizzle the glaze over warm muffins and allow them to cool for about 10 minutes before serving.
Notes
- Don’t overmix the batter. Stirring too much can make the muffins tough. Mix just until everything is incorporated.
- Use room-temperature ingredients. This helps the batter come together smoothly and evenly.
- Test for doneness properly. A toothpick inserted should come out with a few moist crumbs, not wet batter.
- No liners? You can grease the muffin tin with oil or butter if you don’t have paper liners.
- Add-ins and swaps. If you want to add raisins, chopped nuts, or bits of savory chicken sausage, mix them into the cinnamon filling for extra flavor.
What if…? Troubleshooting Common Issues
- Muffins came out dry? They were likely overbaked. Check a few minutes before the timer goes off next time.
- Muffins stuck to the pan? Make sure to grease well or use good-quality paper liners.
- Center sunk? This can happen if the batter is overmixed or the oven was opened too early. Keep the door shut until near the end of the bake.
- Prep Time: 15 minutes
- Cook Time: 18 minutes
What makes this recipe perfect for beginners is its simplicity and speed. There’s no need for yeast, rising time, or complicated shaping. The ingredients are easy to find, and the process is forgiving. Plus, the muffins are lighter than a traditional cinnamon roll, but still bursting with sweet, spiced flavor. They can be made in under an hour and are easy to customize. They’re also a great way to gain baking confidence without diving into full yeast breads or laminated doughs.
Ingredients and Preparation
This recipe yields about 12 muffins.
For the Muffins:
- 2 cups all-purpose flour
- 1 tablespoon baking powder
- ½ teaspoon baking soda
- ½ teaspoon salt
- 1/3 cup granulated sugar
- 1 teaspoon ground cinnamon
- 1 cup milk (dairy or unsweetened almond/soy milk)
- 1/3 cup neutral oil (vegetable or canola)
- 1 large egg
- 1 teaspoon vanilla extract
For the Cinnamon Swirl Filling:
- ¼ cup unsalted butter, melted
- ½ cup brown sugar, packed
- 1 tablespoon ground cinnamon
- Optional: ¼ cup finely chopped cooked chicken or beef sausage for a savory twist
For the Glaze (optional):
- 1 cup powdered sugar
- 1–2 tablespoons milk
- ½ teaspoon vanilla extract
Alternative Ingredient Suggestions:
- Flour: Whole wheat flour can be used for half of the all-purpose flour for added fiber.
- Sugar: Coconut sugar can replace granulated sugar for a deeper flavor.
- Oil: Melted butter or coconut oil can be used instead of vegetable oil.
- Filling: Add chopped nuts or raisins to the cinnamon filling for texture.
- Glaze: For a dairy-free option, use plant milk.
Step-by-Step Instructions
Step 1: Preheat and Prepare Preheat your oven to 375°F (190°C). Line a standard 12-cup muffin tin with paper liners or grease each cup lightly with oil or butter.
Step 2: Make the Muffin Batter In a large bowl, whisk together flour, baking powder, baking soda, salt, granulated sugar, and cinnamon. In a separate bowl, combine the milk, oil, egg, and vanilla extract. Mix until smooth.
Pour the wet ingredients into the dry ingredients. Stir until just combined. Do not overmix—stop as soon as you don’t see dry flour.
Step 3: Make the Filling In a small bowl, stir together the melted butter, brown sugar, and cinnamon. If using chopped cooked chicken or beef sausage, stir it in here for a sweet-savory option.
Step 4: Assemble the Muffins Spoon about one tablespoon of muffin batter into each muffin cup. Add a small dollop (about a teaspoon) of cinnamon filling. Then, cover with more muffin batter until each cup is about ¾ full. Use a toothpick or skewer to gently swirl the batter and filling together.
Step 5: Bake Place the muffin tin in the preheated oven and bake for 15 to 18 minutes, or until the tops are golden and a toothpick inserted into the center comes out clean or with just a few crumbs.
Step 6: Make the Glaze While the muffins cool slightly, prepare the glaze. In a small bowl, whisk together powdered sugar, milk, and vanilla until smooth. Adjust the consistency by adding more milk or sugar as needed.
Step 7: Finish and Cool Drizzle the glaze over warm muffins and allow them to cool for about 10 minutes before serving.
Beginner Tips and Notes
- Don’t overmix the batter. Stirring too much can make the muffins tough. Mix just until everything is incorporated.
- Use room-temperature ingredients. This helps the batter come together smoothly and evenly.
- Test for doneness properly. A toothpick inserted should come out with a few moist crumbs, not wet batter.
- No liners? You can grease the muffin tin with oil or butter if you don’t have paper liners.
- Add-ins and swaps. If you want to add raisins, chopped nuts, or bits of savory chicken sausage, mix them into the cinnamon filling for extra flavor.
What if…? Troubleshooting Common Issues
- Muffins came out dry? They were likely overbaked. Check a few minutes before the timer goes off next time.
- Muffins stuck to the pan? Make sure to grease well or use good-quality paper liners.
- Center sunk? This can happen if the batter is overmixed or the oven was opened too early. Keep the door shut until near the end of the bake.
Serving Suggestions
Cinnamon roll muffins are versatile. Here are a few ideas:
- Serve them warm with a side of scrambled eggs and fresh fruit for a balanced breakfast.
- For a brunch platter, pair with coffee or chai, roasted sweet potatoes, and simple Greek yogurt with honey.
- Add a savory protein like grilled chicken sausage or turkey slices for contrast if you’re serving them as part of a larger meal.
- Want to make it feel more indulgent? Serve with a scoop of vanilla yogurt or a drizzle of warm cream.
Storage and Leftovers
- These muffins stay fresh at room temperature in an airtight container for up to 3 days.
- For longer storage, refrigerate them and reheat briefly in the microwave before serving.
- You can freeze them for up to 2 months—wrap tightly in plastic wrap and place in a freezer bag. Thaw overnight and warm in the oven.
Engagement Features
Trying a new recipe can be intimidating, especially when baking, but cinnamon roll muffins are the perfect place to start. They come together quickly, require minimal equipment, and give maximum reward for your effort. If you’re just beginning your baking journey, this is the kind of recipe that builds your confidence. You’ll get to practice measuring, mixing, and baking all in one go, with a sweet result at the end.
Have you tried these muffins? Did you add a twist—maybe raisins, nuts, or a swirl of cocoa? I’d love to hear what you came up with. Share your version or your experience making them. Whether they turned out picture-perfect or had a few wonky edges, every bake is a win when you’re learning. Don’t hesitate to ask questions or share tips with other beginners—your insight might help someone else take the leap into baking.