
There is something undeniably satisfying about making your favorite takeout dishes at home. Chinese Lemon Chicken is one such recipe, delivering crispy, golden-brown chicken coated in a bright, tangy, and slightly sweet lemon sauce. The dish is reminiscent of what you might order at a Chinese restaurant, but when made from scratch, it is fresher, customizable, and surprisingly easy to prepare.
Print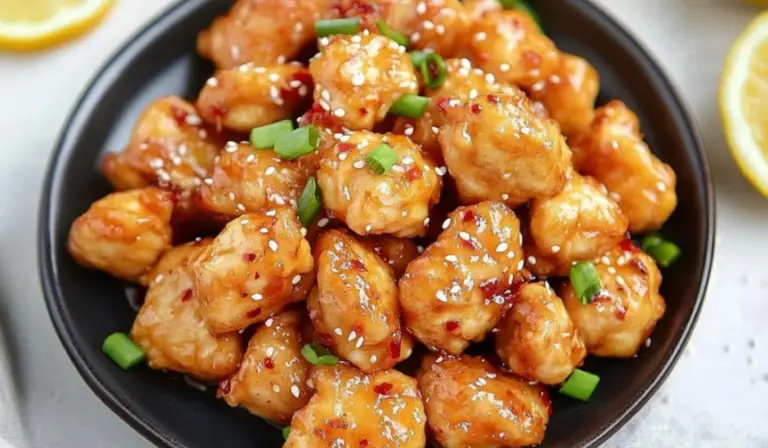
Chinese Lemon Chicken: A Beginner’s Guide to a Restaurant-Quality Dish at Home
Sweet, tangy, and perfectly crispy! 🍋🍗 This Chinese Lemon Chicken features golden, crunchy chicken coated in a bright and zesty lemon glaze. A beginner-friendly recipe that brings restaurant-quality flavors right to your kitchen—quick, easy, and absolutely delicious! ✨🥢
- Total Time: 30 minutes
- Yield: 4 servings 1x
Ingredients
For the Chicken
- 1 ½ pounds boneless, skinless chicken breasts, cut into bite-sized pieces
- 2 large eggs, lightly beaten
- ⅓ cup cornstarch
- ⅓ cup all-purpose flour
- 1 teaspoon salt
- ¼ teaspoon ground black pepper
- Oil for frying (vegetable or canola oil works well)
For the Lemon Sauce
- ¼ cup chicken stock
- ¾ cup fresh lemon juice (from about 3–4 lemons)
- 1 tablespoon lemon zest
- ¼ cup granulated sugar
- ½ teaspoon red pepper flakes (optional, for slight heat)
- 1 tablespoon cornstarch
- 2 tablespoons water
For Garnish
- Sesame seeds (optional)
- Thinly sliced green onions (optional)
Instructions
Step 1: Prepare the Chicken Coating
In a shallow dish, whisk together the eggs with a pinch of salt and black pepper. In another shallow dish, mix the flour, cornstarch, salt, and black pepper.
Take each piece of chicken and coat it in the flour mixture, ensuring it is fully covered. Dip it into the egg mixture, letting the excess drip off, and then return it to the flour mixture for a second coating. This double-coating process creates an extra-crispy texture when fried. Set the coated chicken aside on a wire rack or plate while you finish coating the rest.
Step 2: Fry the Chicken
In a deep, heavy-bottomed pot, heat about three inches of oil over medium heat until it reaches 350°F. If you do not have a thermometer, test the oil by dropping in a small piece of coated chicken—it should sizzle immediately.
Fry the chicken in small batches, adding about 7-8 pieces at a time to avoid overcrowding. Cook for about 5 minutes or until the chicken is golden brown and crispy. Use a slotted spoon to transfer the cooked pieces to a wire rack or a plate lined with paper towels to drain excess oil. Repeat until all the chicken is fried.
Step 3: Make the Lemon Sauce
While the chicken is frying, prepare the sauce. In a small saucepan over medium heat, combine the chicken stock, lemon juice, lemon zest, sugar, and red pepper flakes. Bring the mixture to a gentle simmer, stirring occasionally.
In a separate small bowl, mix the cornstarch and water to create a slurry. Slowly pour this into the simmering sauce while stirring constantly. Continue to stir until the sauce thickens to a glossy consistency, which should take about one minute. Remove from heat.
Step 4: Coat the Chicken in the Sauce
Once the sauce is ready, add the crispy chicken pieces to a large mixing bowl. Pour the warm lemon sauce over the chicken and gently toss to coat each piece evenly. If you prefer extra crispy chicken, serve the sauce on the side instead of tossing it.
Step 5: Garnish and Serve
Transfer the coated chicken to a serving plate. Sprinkle sesame seeds and thinly sliced green onions on top for added flavor and presentation. Serve immediately with steamed rice or noodles.
Notes
How to Ensure Crispy Chicken
- Make sure the oil is at the right temperature before frying. If the oil is too cool, the chicken will absorb excess oil and become soggy. If it is too hot, the outside will brown too quickly while the inside remains undercooked.
- Do not overcrowd the pot when frying. Frying too many pieces at once lowers the oil temperature, leading to less crispy chicken.
- Let the coated chicken sit for a few minutes before frying to help the coating adhere better.
How to Fix Common Mistakes
- If the chicken is browning too fast, lower the heat slightly.
- If the sauce is too thick, add a splash of chicken stock or water to thin it out.
- If the sauce is too thin, let it simmer for an extra minute or add a small amount of cornstarch slurry.
Efficient Kitchen Prep Tips
- Prep all ingredients before starting to cook to make the process smoother.
- Use a thermometer to check the oil temperature for best results.
- Clean as you go to keep your workspace organized and stress-free.
- Prep Time: 10 minutes
- Cook Time: 20 minutes
For those new to cooking, this recipe is an excellent place to start. It does not require complicated techniques or hard-to-find ingredients, and the steps are straightforward. The entire dish comes together in about 30 minutes, making it a great choice for a quick yet impressive meal. Whether you are cooking for yourself, your family, or guests, this Chinese Lemon Chicken is sure to be a hit.
Why This Recipe is Perfect for Beginners
Many beginners shy away from frying because they worry about oil temperature, coating techniques, or achieving the right crispiness. This recipe simplifies the frying process with a double-coating method that ensures a crunchy texture. Additionally, the lemon sauce is easy to make with just a few ingredients and thickens quickly, giving the dish a professional-quality finish.
Another advantage is its versatility. The chicken can be served with rice, noodles, or even a side of stir-fried vegetables, making it adaptable to different tastes and preferences. This recipe also provides alternative ingredients and tips for those who want to make small adjustments based on dietary needs or personal taste.
Ingredients and Preparation
For the Chicken
- 1 ½ pounds boneless, skinless chicken breasts, cut into bite-sized pieces
- 2 large eggs, lightly beaten
- ⅓ cup cornstarch
- ⅓ cup all-purpose flour
- 1 teaspoon salt
- ¼ teaspoon ground black pepper
- Oil for frying (vegetable or canola oil works well)
For the Lemon Sauce
- ¼ cup chicken stock
- ¾ cup fresh lemon juice (from about 3-4 lemons)
- 1 tablespoon lemon zest
- ¼ cup granulated sugar
- ½ teaspoon red pepper flakes (optional, for slight heat)
- 1 tablespoon cornstarch
- 2 tablespoons water
For Garnish
- Sesame seeds (optional)
- Thinly sliced green onions (optional)
Ingredient Substitutions and Alternatives
- If you prefer a lighter version, you can bake or air-fry the chicken instead of deep-frying.
- For a gluten-free option, substitute the all-purpose flour with rice flour or a gluten-free flour blend.
- Adjust the sugar level based on your taste. If you prefer a more tart sauce, reduce the sugar slightly.
- If fresh lemons are unavailable, bottled lemon juice can be used, but fresh juice provides the best flavor.
Step-by-Step Instructions
Step 1: Prepare the Chicken Coating
In a shallow dish, whisk together the eggs with a pinch of salt and black pepper. In another shallow dish, mix the flour, cornstarch, salt, and black pepper.
Take each piece of chicken and coat it in the flour mixture, ensuring it is fully covered. Dip it into the egg mixture, letting the excess drip off, and then return it to the flour mixture for a second coating. This double-coating process creates an extra-crispy texture when fried. Set the coated chicken aside on a wire rack or plate while you finish coating the rest.
Step 2: Fry the Chicken
In a deep, heavy-bottomed pot, heat about three inches of oil over medium heat until it reaches 350°F. If you do not have a thermometer, test the oil by dropping in a small piece of coated chicken—it should sizzle immediately.
Fry the chicken in small batches, adding about 7-8 pieces at a time to avoid overcrowding. Cook for about 5 minutes or until the chicken is golden brown and crispy. Use a slotted spoon to transfer the cooked pieces to a wire rack or a plate lined with paper towels to drain excess oil. Repeat until all the chicken is fried.
Step 3: Make the Lemon Sauce
While the chicken is frying, prepare the sauce. In a small saucepan over medium heat, combine the chicken stock, lemon juice, lemon zest, sugar, and red pepper flakes. Bring the mixture to a gentle simmer, stirring occasionally.
In a separate small bowl, mix the cornstarch and water to create a slurry. Slowly pour this into the simmering sauce while stirring constantly. Continue to stir until the sauce thickens to a glossy consistency, which should take about one minute. Remove from heat.
Step 4: Coat the Chicken in the Sauce
Once the sauce is ready, add the crispy chicken pieces to a large mixing bowl. Pour the warm lemon sauce over the chicken and gently toss to coat each piece evenly. If you prefer extra crispy chicken, serve the sauce on the side instead of tossing it.
Step 5: Garnish and Serve
Transfer the coated chicken to a serving plate. Sprinkle sesame seeds and thinly sliced green onions on top for added flavor and presentation. Serve immediately with steamed rice or noodles.
Beginner Tips and Notes
How to Ensure Crispy Chicken
- Make sure the oil is at the right temperature before frying. If the oil is too cool, the chicken will absorb excess oil and become soggy. If it is too hot, the outside will brown too quickly while the inside remains undercooked.
- Do not overcrowd the pot when frying. Frying too many pieces at once lowers the oil temperature, leading to less crispy chicken.
- Let the coated chicken sit for a few minutes before frying to help the coating adhere better.
How to Fix Common Mistakes
- If the chicken is browning too fast, lower the heat slightly.
- If the sauce is too thick, add a splash of chicken stock or water to thin it out.
- If the sauce is too thin, let it simmer for an extra minute or add a small amount of cornstarch slurry.
Efficient Kitchen Prep Tips
- Prep all ingredients before starting to cook to make the process smoother.
- Use a thermometer to check the oil temperature for best results.
- Clean as you go to keep your workspace organized and stress-free.

Serving Suggestions
Chinese Lemon Chicken pairs well with a variety of side dishes. Here are some ideas:
- Steamed Rice: A simple bowl of white or jasmine rice absorbs the flavorful sauce.
- Fried Rice: Classic egg fried rice or vegetable fried rice adds more texture and flavor.
- Stir-Fried Vegetables: A mix of bell peppers, broccoli, and snap peas complements the dish well.
- Noodles: Serve over plain or garlic noodles for a delicious alternative to rice.
Storage and Reheating Tips
If you have leftovers, store them properly to maintain their quality:
- Refrigeration: Place leftover chicken in an airtight container and store in the refrigerator for up to three days. Store the sauce separately to keep the chicken from becoming soggy.
- Reheating: To keep the chicken crispy, reheat in an oven or air fryer at 350°F for about 10 minutes. Avoid microwaving, as it can make the coating soggy.
- Freezing: The fried chicken pieces can be frozen before adding the sauce. Reheat in the oven and toss in freshly made sauce before serving.
Conclusion
Chinese Lemon Chicken is a fantastic recipe for beginner cooks looking to make a restaurant-quality meal at home. The crispy, golden chicken paired with a vibrant lemon sauce creates an irresistible balance of texture and flavor. By following the step-by-step instructions and beginner-friendly tips, anyone can master this dish with confidence.
Cooking at home allows for customization, whether adjusting the sauce’s sweetness, changing side dishes, or trying different cooking methods. Once you try this homemade version, you may find yourself skipping takeout and making it regularly.
Give this recipe a try and share your experience. Whether you follow the recipe exactly or put your own twist on it, cooking is all about learning and enjoying the process. Happy cooking!