Ingredients
1. Preparing the Crust
To begin, line a 6-count standard muffin pan with paper liners, or use a 12-count pan and line only half the cavities. This ensures your cheesecakes stay intact and easy to remove later.
- Crush the Oreos: Add the Oreos to the canister of a food processor or high-speed blender. Pulse until you’ve created a fine dust. If you don’t have a food processor, you can place the Oreos in a sealed plastic bag and crush them with a rolling pin.
- Combine with Butter: Add the melted butter to the crushed Oreos. Pulse or stir until the mixture has a wet sand consistency. The butter helps bind the crust together while adding richness.
- Form the Crust: Evenly divide the Oreo mixture among the 6 muffin cavities. Press the mixture firmly to pack it down. This creates a solid base for the cheesecake filling. Place the muffin pan in the refrigerator to chill while you prepare the cheesecake filling.
2. Preparing the Cheesecake Filling
- Preheat the Oven: Set your oven to 320°F (160°C). Lowering the temperature ensures that the cheesecakes bake slowly and evenly, preventing cracks from forming.
- Blend Ferrero Rocher Candies: Place the frozen Ferrero Rocher candies and the warmed milk into a food processor or blender. Grind the candies into a smooth paste. The candies should now be incorporated into a smooth, thick mixture that will give your cheesecake filling its signature flavor.
- Cream the Cream Cheese: In a large mixing bowl, add the softened cream cheese and sugar. Using an electric mixer, beat the mixture on high speed for about 5 minutes until it’s smooth and fluffy. Don’t forget to scrape down the sides of the bowl to ensure even mixing.
- Add Sour Cream and Cream: Add the sour cream, heavy cream, and vanilla extract to the mixture. Beat until fully incorporated, but avoid overmixing to prevent excess air from being incorporated.
- Add Ferrero Rocher Paste: Add the Ferrero Rocher mixture and cornstarch to the bowl. Beat until just incorporated, ensuring that everything is evenly combined without overworking the filling.
- Fill the Muffin Cavities: Divide the cheesecake filling evenly among the muffin cavities, smoothing the tops with a spatula. This will form the creamy, rich base of your mini cheesecakes.
3. Baking the Cheesecakes
- Prepare the Water Bath: Place the muffin pan into a larger 9×13-inch pan or roasting pan. Carefully add about 1 inch of water to the larger pan, which will create a water bath for the cheesecakes. This helps prevent cracking by ensuring even heat distribution during baking.
- Bake: Bake the cheesecakes for 40 minutes, or until the filling is mostly set. If the cheesecakes are not fully set after 40 minutes, bake them a little longer until they are firm to the touch but still slightly jiggly in the center.
- Cooling Time: Remove the baking pans from the oven. Take the muffin pan out of the water bath and allow it to cool at room temperature for 4 hours. Once cooled, place the muffin pan in the fridge for at least 4 more hours or overnight. This extended cooling time ensures that the cheesecakes set perfectly and develop their full flavor.
4. Preparing the Chocolate Whipped Cream Frosting
Once the cheesecakes are fully chilled, it’s time to prepare the chocolate whipped cream frosting:
- Whip the Cream: In a chilled bowl, add the cold whipping cream or heavy cream, sifted cocoa powder, and sifted confectioners’ sugar. Using a handheld electric mixer or a stand mixer fitted with a whisk attachment, whip the mixture until stiff peaks form. The result should be a smooth, fluffy frosting with a rich chocolate flavor.
5. Assembling the Mini Cheesecakes
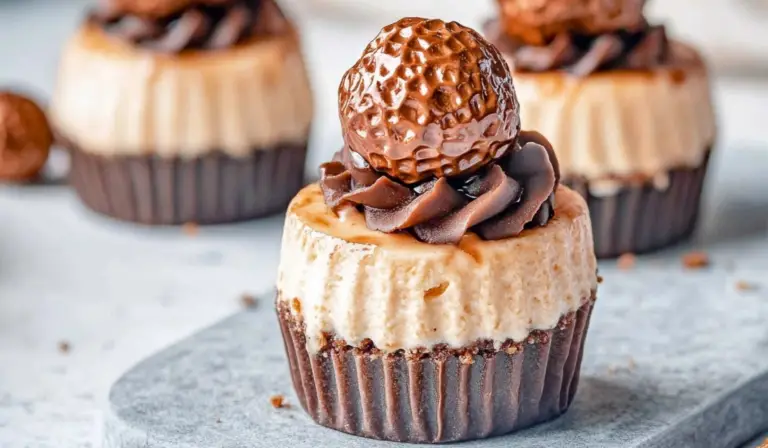
- Pipe the Frosting: Transfer the whipped chocolate cream into a pastry bag fitted with a 1M or star-shaped tip. Pipe the frosting onto each mini cheesecake, swirling it into a decorative peak. If you don’t want to bother with piping, you can simply spoon the frosting on top.
- Garnish: Top each cheesecake with a Ferrero Rocher candy, adding a final touch of elegance and crunch.
6. Serving and Storing
Serve these indulgent Mini Ferrero Rocher Cheesecakes chilled. They are perfect for special occasions, or whenever you want to enjoy a luxurious treat. You can store any leftovers in an airtight container in the refrigerator for 2-3 days. If you want to keep them longer, they can be frozen for up to 1 month. When frozen, the texture is almost like ice cream, making them an even more delightful treat!
Instructions
1. Preparing the Crust
To begin, line a 6-count standard muffin pan with paper liners, or use a 12-count pan and line only half the cavities. This ensures your cheesecakes stay intact and easy to remove later.
- Crush the Oreos: Add the Oreos to the canister of a food processor or high-speed blender. Pulse until you’ve created a fine dust. If you don’t have a food processor, you can place the Oreos in a sealed plastic bag and crush them with a rolling pin.
- Combine with Butter: Add the melted butter to the crushed Oreos. Pulse or stir until the mixture has a wet sand consistency. The butter helps bind the crust together while adding richness.
- Form the Crust: Evenly divide the Oreo mixture among the 6 muffin cavities. Press the mixture firmly to pack it down. This creates a solid base for the cheesecake filling. Place the muffin pan in the refrigerator to chill while you prepare the cheesecake filling.
2. Preparing the Cheesecake Filling
- Preheat the Oven: Set your oven to 320°F (160°C). Lowering the temperature ensures that the cheesecakes bake slowly and evenly, preventing cracks from forming.
- Blend Ferrero Rocher Candies: Place the frozen Ferrero Rocher candies and the warmed milk into a food processor or blender. Grind the candies into a smooth paste. The candies should now be incorporated into a smooth, thick mixture that will give your cheesecake filling its signature flavor.
- Cream the Cream Cheese: In a large mixing bowl, add the softened cream cheese and sugar. Using an electric mixer, beat the mixture on high speed for about 5 minutes until it’s smooth and fluffy. Don’t forget to scrape down the sides of the bowl to ensure even mixing.
- Add Sour Cream and Cream: Add the sour cream, heavy cream, and vanilla extract to the mixture. Beat until fully incorporated, but avoid overmixing to prevent excess air from being incorporated.
- Add Ferrero Rocher Paste: Add the Ferrero Rocher mixture and cornstarch to the bowl. Beat until just incorporated, ensuring that everything is evenly combined without overworking the filling.
- Fill the Muffin Cavities: Divide the cheesecake filling evenly among the muffin cavities, smoothing the tops with a spatula. This will form the creamy, rich base of your mini cheesecakes.
3. Baking the Cheesecakes
- Prepare the Water Bath: Place the muffin pan into a larger 9×13-inch pan or roasting pan. Carefully add about 1 inch of water to the larger pan, which will create a water bath for the cheesecakes. This helps prevent cracking by ensuring even heat distribution during baking.
- Bake: Bake the cheesecakes for 40 minutes, or until the filling is mostly set. If the cheesecakes are not fully set after 40 minutes, bake them a little longer until they are firm to the touch but still slightly jiggly in the center.
- Cooling Time: Remove the baking pans from the oven. Take the muffin pan out of the water bath and allow it to cool at room temperature for 4 hours. Once cooled, place the muffin pan in the fridge for at least 4 more hours or overnight. This extended cooling time ensures that the cheesecakes set perfectly and develop their full flavor.
4. Preparing the Chocolate Whipped Cream Frosting
Once the cheesecakes are fully chilled, it’s time to prepare the chocolate whipped cream frosting:
- Whip the Cream: In a chilled bowl, add the cold whipping cream or heavy cream, sifted cocoa powder, and sifted confectioners’ sugar. Using a handheld electric mixer or a stand mixer fitted with a whisk attachment, whip the mixture until stiff peaks form. The result should be a smooth, fluffy frosting with a rich chocolate flavor.
5. Assembling the Mini Cheesecakes
- Pipe the Frosting: Transfer the whipped chocolate cream into a pastry bag fitted with a 1M or star-shaped tip. Pipe the frosting onto each mini cheesecake, swirling it into a decorative peak. If you don’t want to bother with piping, you can simply spoon the frosting on top.
- Garnish: Top each cheesecake with a Ferrero Rocher candy, adding a final touch of elegance and crunch.
6. Serving and Storing
Serve these indulgent Mini Ferrero Rocher Cheesecakes chilled. They are perfect for special occasions, or whenever you want to enjoy a luxurious treat. You can store any leftovers in an airtight container in the refrigerator for 2-3 days. If you want to keep them longer, they can be frozen for up to 1 month. When frozen, the texture is almost like ice cream, making them an even more delightful treat!
Notes
- Crust Substitutions: If you don’t have Oreos, you can easily swap them out for any chocolate cookie that you prefer. Graham crackers also work well, although they will give the crust a slightly different flavor.
- Sour Cream Alternatives: If you don’t have sour cream on hand, you can substitute with Greek yogurt or crème fraîche for a slightly different flavor profile.
- Milk Options: While whole milk is preferred for its richness, you can use almond milk, oat milk, or any other milk alternative if you prefer.
- Heavy Cream Substitutes: If you’re looking for a lighter alternative to heavy cream, you can use half-and-half or a non-dairy cream such as coconut cream.
- Prep Time: 15 minutes
- Cook Time: 40 minutes